
Howdy, Stranger!
It looks like you're new here. If you want to get involved, click one of these buttons!
Categories
- 983 All Categories
- 3 Picture Posting and Resizing
- 57 New Member Introductions
- 119 Off-Topic Forum
- 4 Photography
- 2 Resources
- 17 New Product Information
- 168 The SierraWest Forum
- 10 Brett's Blog
- 119 General News & Ramblings
- 3 Re-Release Information
- 6 Q & A about SierraWest
- 9 What Would You Like to See?
- 402 Builds
- 143 HO Scale Builds
- 177 O Scale Builds
- 62 Finished SW Build Pics
- 15 Miscellaneous Builds
- 193 Techniques
- 19 Working with Wood
- 22 Painting Castings
- 5 Masonry
- 23 Scenery
- 37 Tools and Supplies
- 21 Layout Planning & Building
- 40 Miscellaneous
- 24 Prototype Information
- 22 Reference and Research
Loco and Service Shops
I am pleased to be able to share with you the “official forum build” of Sierra West Scale Models latest offering, the Loco and Service Shops, which, along with the Donkey Repair Yard, comprises the final touches on the Logging Camp diorama. I have been waiting for this ever since I won best of show in 2008 with the other two parts, Main Street and Essentials. Now I will be able to finish the dio - it has a long history of shipping, ruin, rebuild, reshipping, re-ruin, and resurrection again - now it will get the rest of its parts.
It is difficult to get into a new build right now as I am still reeling at the loss of Kevin - I know he would be urging me to “model-on, big E” - and so, with that in mind, I dedicate this build to him, to the memory of his excellent modeling work, to his cherished friendship and camaraderie and pledge to make my best effort to represent that memory with a quality build. As Brett says in his opening remarks, “Now stop fooling around and get your fingers dirty!” Pics of the contents as required:
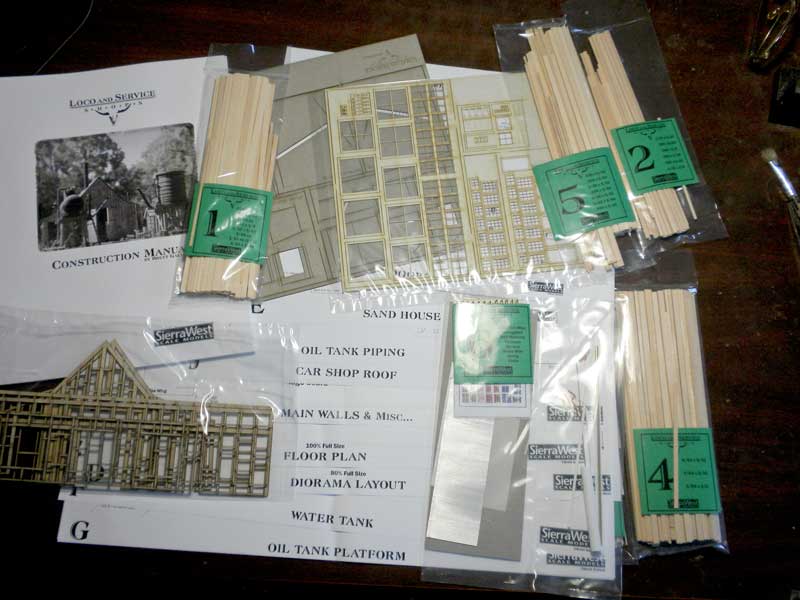
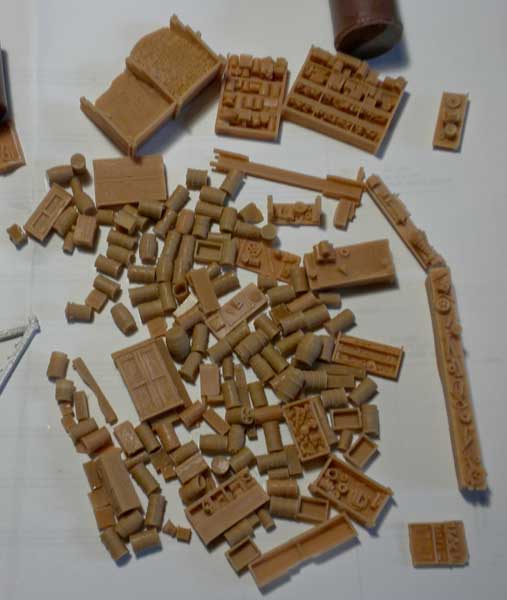
The resin casting - there are a ton of them including a nice couple of tanks
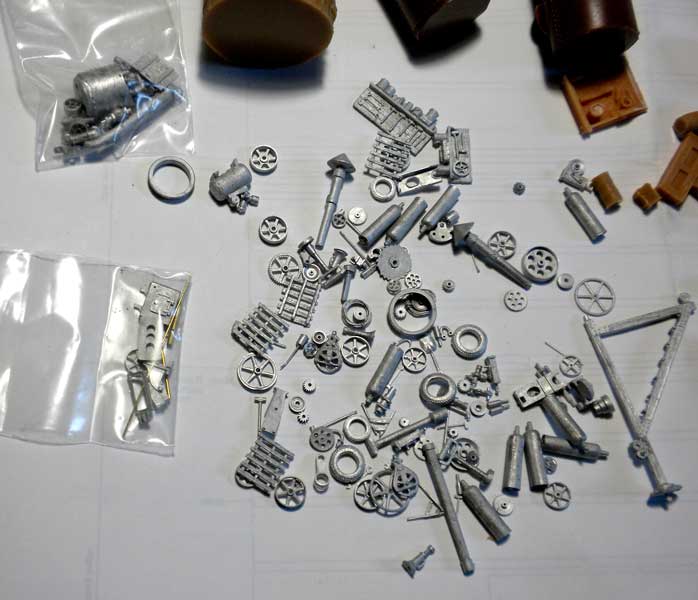
Metal casting are abundant - and varied - lots of details here - there are two baggies with other parts I did not open
yet
It is difficult to get into a new build right now as I am still reeling at the loss of Kevin - I know he would be urging me to “model-on, big E” - and so, with that in mind, I dedicate this build to him, to the memory of his excellent modeling work, to his cherished friendship and camaraderie and pledge to make my best effort to represent that memory with a quality build. As Brett says in his opening remarks, “Now stop fooling around and get your fingers dirty!” Pics of the contents as required:
The resin casting - there are a ton of them including a nice couple of tanks
Metal casting are abundant - and varied - lots of details here - there are two baggies with other parts I did not open
yet
Comments
Awesome kit, outstanding builder, I cant think of a better combination.
This is going to be a great thread !
Karl.A
Bob.
I have watched our builds from afar for several years and have your article on the Twin Mills build and wish I can get to the level of building you are at. I am really looking foward to learning alot from you during the build.
Jim
This is going to be fun. I'm sure Kevin will be peering over your shoulder as you do the castings. i know you'll do him proud Elliott.
Karl.A
Incidentally, your picture is showing up in your original post to all of us. Try logging out and logging back into your account and it should show up for you also. Thats why I deleted your second picture post..... forum glitch maybe.
This is going to be a special build and one to bookmark.
Indeed--"build on, Big E" (because Kev's got a tee time in April!)
Yep the chalk is incredibly versatile, I use it for almost everything currently, wood, details, scenery.
Karl.A
Can't wait to see more updates!
Jim
The walls inside the service shop would be dark, dingy and fairly monotone due to all the soot, grime, grease and smoke that would be flying around.
A beautiful barn but way too clean for an engine house.
Karl.A
Stevo in OZ
Karl.A
The exercise of preparing the boards for the siding has several steps - first you texture the boards - I used my Vojtech saw and scraped it across the surface - and then you apply a coat of A&I. Once that has dried you are to dust with gray chalk - I omitted this step as my coloring was just fine without it - and then smooth out the fuzzies with steel wool - I used a steel brush to do the same thing ( one has to do with one has). Now the fun starts. Peeling paint - apply a layer of mineral spirits - wait for a few minutes for it to set and paint over it with ceramcoat white - now here is where the rocket science comes in - the coating must be thick enough to pull off but you cannot overwork the paint or it starts to mix with the spirits and the effect is lost. Here are three strips - the top one was undercoated and thus no real peeling occurred - the bottom one had some peeling but the paint was overworked and thus only a little effect was achieved - and of course the middle one came out right - but I could have pulled the paint off a little sooner and got more peeling than I did - one last note, scotch tape did not work for me - but masking tape did - not the blue stuff but the manila colored roll - on to color the other 49 strips - yep I counted them.
The boards look great!
I also had some trouble in the past using scotch tape. I found that the tape's adhesion properties degraded exponentially with each use. I went though a lot of tape just to treat a marginal area. Although, lightly scoring the paint coating with a sharp blade prior applying the tape may help break-up the cohesion of the paint film [not sure if you did this or not]. Looks great though - I am excited to see this project unfold!
sfc