
Howdy, Stranger!
It looks like you're new here. If you want to get involved, click one of these buttons!
Categories
- 923 All Categories
- 3 Picture Posting and Resizing
- 54 New Member Introductions
- 111 Off-Topic Forum
- 4 Photography
- 2 Resources
- 16 New Product Information
- 166 The SierraWest Forum
- 9 Brett's Blog
- 117 General News & Ramblings
- 3 Re-Release Information
- 6 Q & A about SierraWest
- 9 What Would You Like to See?
- 362 Builds
- 131 HO Scale Builds
- 155 O Scale Builds
- 59 Finished SW Build Pics
- 12 Miscellaneous Builds
- 187 Techniques
- 19 Working with Wood
- 20 Painting Castings
- 5 Masonry
- 23 Scenery
- 36 Tools and Supplies
- 21 Layout Planning & Building
- 38 Miscellaneous
- 24 Prototype Information
- 22 Reference and Research
Bluesky Repair Shed
That's right, I've started another build. That's ok, right? If we don't build them one day our kids will just be selling the unopened kits on e-bay, dagnabit! Well, there's a reason too. I'm going to be building the tractor repair shed which is a "mini scene" as part of the whole Bluesky kit. I'm building it on a separate base, a little larger than the area allocated in the instructions, the reasons being:
1. My studio is now becoming our master bedroom due to the increasing brood swarm in our house. This means when I work on a diorama I have to slug it down two flights of stairs to the dining room. Working on smaller "palettes" makes this easier.
2. the little scene is awesome - so much is packed into it. I've always wanted to build it so here it goes (the store and barn will likely go alongside the Railroad Camp in the future to create a kind of main drag in the town- wherever and whatever that might be).
In any event, the base is a little bigger because i want the fenced-in yard to be a bit larger to fit a couple other things: another Fordson tractor (Mackenzie Iron and Steel kit I snagged on-line) and some carts/ trailers etc., maybe a Bates tractor too. Maybe that's too much.
The shed features slotted laser cut wood frames which are a god send and make the construction of what otherwise would be very fussy walls very fast:
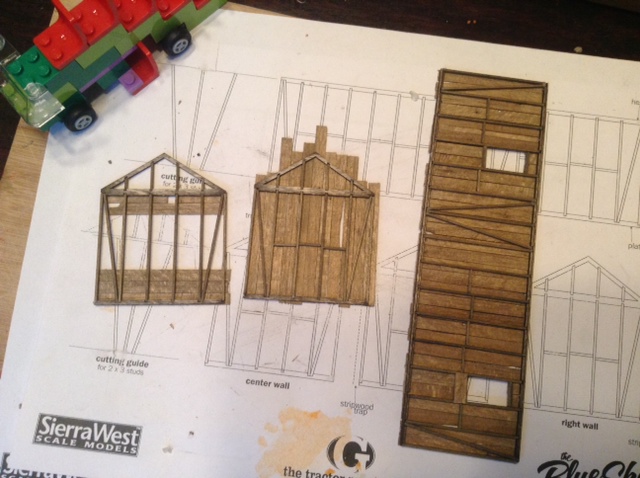
An interim shot of the wall assembly. Very easy. I remember building walls for those Campbell kits a few decades ago - you know, on wax paper with pins. The kits are grew and were ahead of their time but OMG what a chore. I think that's why I left the hobby for so long. The shed here only took an hour or two to build from opening the bag to getting most of the walls built and ready for trimming (while my daughter built monkey powered lego cars as can be seen in the shot- I'm such a good dad).
1. My studio is now becoming our master bedroom due to the increasing brood swarm in our house. This means when I work on a diorama I have to slug it down two flights of stairs to the dining room. Working on smaller "palettes" makes this easier.
2. the little scene is awesome - so much is packed into it. I've always wanted to build it so here it goes (the store and barn will likely go alongside the Railroad Camp in the future to create a kind of main drag in the town- wherever and whatever that might be).
In any event, the base is a little bigger because i want the fenced-in yard to be a bit larger to fit a couple other things: another Fordson tractor (Mackenzie Iron and Steel kit I snagged on-line) and some carts/ trailers etc., maybe a Bates tractor too. Maybe that's too much.
The shed features slotted laser cut wood frames which are a god send and make the construction of what otherwise would be very fussy walls very fast:
An interim shot of the wall assembly. Very easy. I remember building walls for those Campbell kits a few decades ago - you know, on wax paper with pins. The kits are grew and were ahead of their time but OMG what a chore. I think that's why I left the hobby for so long. The shed here only took an hour or two to build from opening the bag to getting most of the walls built and ready for trimming (while my daughter built monkey powered lego cars as can be seen in the shot- I'm such a good dad).
Comments
I look forward to following along on this one. The interior of the walls looks superb, very nice colour.
Karl.A
You know, Chuck Doan did a scene very similar to this (google "Fordson Tractor" and "Doan"), and I got kind of bummed out yesterday looking at his masterful work. But that's the wrong attitude! We should see the work of the masters as a source of inspiration, not be intimidated by them. And besides, his techniques, which he documents, and like the SW ones, are all easily mastered. Other than figure painting, there isn't anything in this hobby which is hard. It's all a matter of a little practice and having fun of course. Actually, I'm better today and raring to go - may have just been something I ate, or work, or a latent obsessive compulsive disorder flaring up.
One final question to those who have built this scene- should the drill press really be rotated 90 degrees? A minor point.. but unless there is a miter gear hidden up in the rafters, should it be facing the other way? (there's that O/C disorder again…)...
For the boat I'd have to check the manual for base coat colours and techniques, however a pale blue/white combo top coat sounds good to me, (in need of repair and a repaint).
Chuck is always inspiring, and as you say, he's happy to share how he did it.
As for the drill press it should be placed as shown in this pic...
Originally the drive belt would have been twisted 90 from the main shaft (which was very common for belt driven machinery perpendicular to the main shaft).
In the kit the machinery is no longer used and long out of service and therefore the belts are not there to show this and the machinery is in a state of disrepair.
Hope this answer helps.
Karl.A
Peeled blue over a brown base.
Karl.A
John
I look forward to this for sure. I built this kit sometime back and had a blast doing it. So much to see in that little shed, its 1 of the highlights of the kit.
Keep the pics coming.
As we all know, nail holes are a double edged sword. Too big and they look out of scale. Not do them at larger scales at least becomes unrealistic. Whatever you do, straight lines are critical too - DON'T drink and do nail holes. I've always been intrigued by images of old buildings where you see the decay/ rust from nail holes (more an issue in wetter climates) such as this snippet of a photo from a local mill:
The rust/ decay from the holes is apparent but the holes themselves are very small. So I decided to try a method posted by Chuck Doan:
1. dip your poking device in a bit of paint (I used burnt umber)
2. Make hole, erring on the side of small
3. work back and forward a bit in direction of grain if you wish
3. immediately take a que-tip or similar soaked in thinner or water (depending on your paint of course) and gently smear in the direction of the grain and mores towards the end of the board where applicable.
If some of the smears don't look right you can sand them off when dry with fine grit sandpaper. then I brushed on a wet layer of Weather-It, my old standby. I decided I wanted to darken the wall more anyhow. But the weather it, like any soak, will close up the holes a bit, making them smaller but leaving the marks (which I'm saying is good).
Here's the east (right) wall with a table held on by my fingers (If I keep fiddling with these I'm going to break something):
Here is the base with the "foundations" set down. I learned my lesson on this from Karl- see the Woodcutter thread. the walls here are just propped up. The holes are for potential wiring- If I don't use them I'll close them up. The left (west) side of the shed will have a "sub-floor" which is why there isn't "dirt" there. I'll need to smooth out the repair area before I glue down the walls, which will have another plate on the bottom to lift them off the dirt level so that boards can run past the plate.
Respectfully,
John
Here's rear wall - now I had added window openings without much forethought and the module doesn't work with any laser cut windows I have and the 2x3 walls are too thin to build them from wood so I'm going to just board them up probably. I did the same thing with the weather-it but this time I waited to see what "fell apart" and got the following:
The window opening on the left lost a board and the one on the right completely fell apart below the sill. Plus a few boards kind of lifted a bit. Cool! I can work with this! I can board them up with "newer" wood and/ or leave partially open.
I also just finished a bit more on the base but my daughter took off with my iPad so I'll have to post photo later….
John
You could board up the windows or use some corrugated or a metal sign. Any option would look cool on that wall.
Here's the base now that I got my iPad back:
the area with the bricks will have a stove (with a "fire" inside- that's the idea). The other hole will be hidden by a cabinet which will mean the drill press moves to the front. I've done a light sand on the floor boards, and then will add some more Weather- it and another light sand in the middle/ front on the floor boards.
DJ
Building a simple shed is taking me forever. It will take me decades to build the sawmill at this rate. To be fair I don;t have any time now. Literally, I glue a couple wrenches down then I get called to do some task/ chore. But it's all good. Too much free time isn't good either (that's my excuse anyway).