
Howdy, Stranger!
It looks like you're new here. If you want to get involved, click one of these buttons!
Categories
- 923 All Categories
- 3 Picture Posting and Resizing
- 54 New Member Introductions
- 111 Off-Topic Forum
- 4 Photography
- 2 Resources
- 16 New Product Information
- 166 The SierraWest Forum
- 9 Brett's Blog
- 117 General News & Ramblings
- 3 Re-Release Information
- 6 Q & A about SierraWest
- 9 What Would You Like to See?
- 362 Builds
- 131 HO Scale Builds
- 155 O Scale Builds
- 59 Finished SW Build Pics
- 12 Miscellaneous Builds
- 187 Techniques
- 19 Working with Wood
- 20 Painting Castings
- 5 Masonry
- 23 Scenery
- 36 Tools and Supplies
- 21 Layout Planning & Building
- 38 Miscellaneous
- 24 Prototype Information
- 22 Reference and Research
Twin Mills

I'm finally underway and making progress on this beauty! Construction on the mill has been well documented by Elliott, Mike, and one of the Karls (can't remember which) on RR-Line, so I'll be brief with the initial info. I'm going to experiment a little with this build--mostly construction techniques since the way the buildings are laid out fits perfectly with the area I have available on my benchwork.
The first thing was to color the stripwood (LOTS of it!). The recipe in the manual is almost identical to the recipe from the last build I did (Essentials) so I played around with some different color combinations. I used these acrylics:
1 tsp Folk Art Burnt Umber, 1 tsp Folk Art Barn Wood, 1 tsp Ceramcoat Charcoal and 1 tsp of Anita's Charcoal (it's a much lighter gray than the Ceramcoat). Also, 1 tsp of Higgins black India ink in 20 ozs of water. After 24 hours, I got a nice dusty gray-tan color:
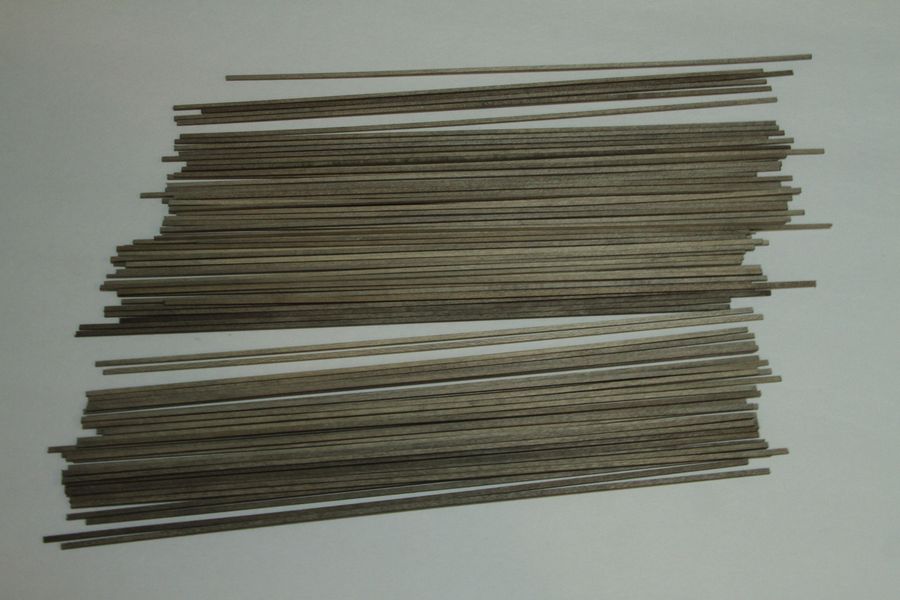
Here's the range of colors:
One thing about using the craft paint rather than Pollyscale is that they settle to the bottom a lot quicker, so the bags had to be shaken up more often.
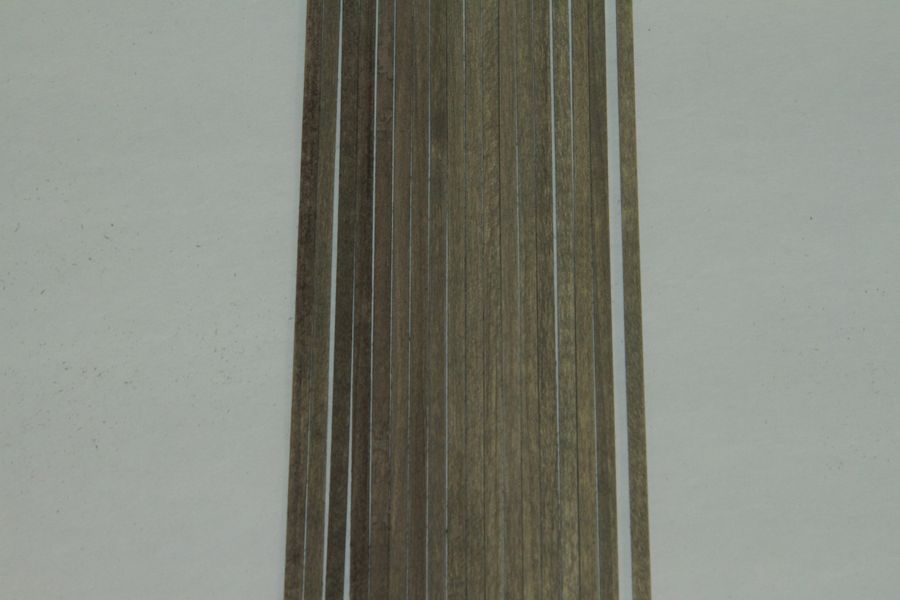
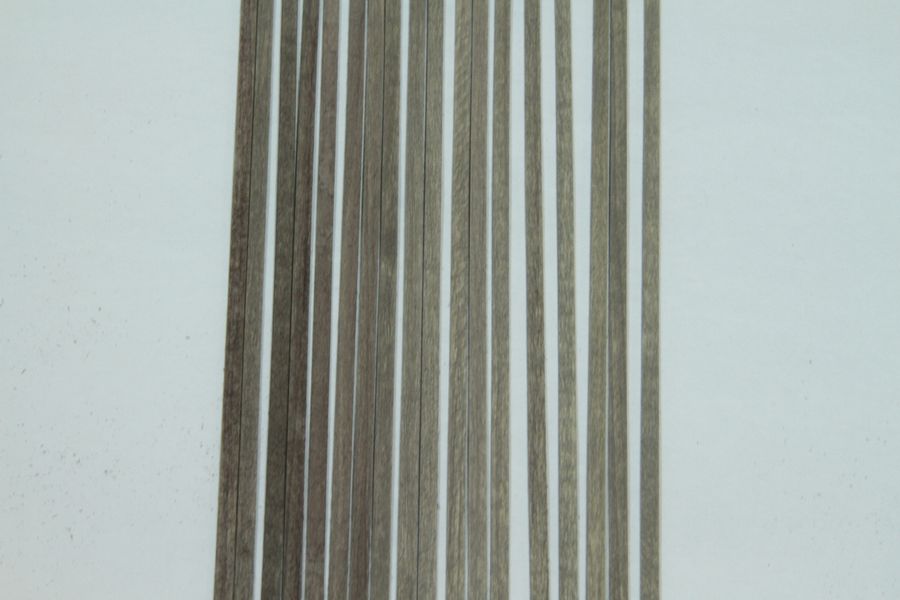
For swiping, I tried a variation of Mike Chamber's ink stains. 12 oz 91% alchol + 1 tsp of black ink plus a pre-mixed solution of 4 oz of water + 1 tsp of Bombay Van Dyke Brown + 1 tsp Bombay Sepia. Rather than "swiping" each piece of stripwood, I added the entier bag of stripwood into a pan and covered it with the ink stain. I left the wood in for a short time (maybe a couple minutes) then started pulling them out and wiping them off. By the time I got to the last pieces, they'd be darker than the ones I pulled out first. Here's a sample of the color range:
The first thing was to color the stripwood (LOTS of it!). The recipe in the manual is almost identical to the recipe from the last build I did (Essentials) so I played around with some different color combinations. I used these acrylics:
1 tsp Folk Art Burnt Umber, 1 tsp Folk Art Barn Wood, 1 tsp Ceramcoat Charcoal and 1 tsp of Anita's Charcoal (it's a much lighter gray than the Ceramcoat). Also, 1 tsp of Higgins black India ink in 20 ozs of water. After 24 hours, I got a nice dusty gray-tan color:
Here's the range of colors:
One thing about using the craft paint rather than Pollyscale is that they settle to the bottom a lot quicker, so the bags had to be shaken up more often.
For swiping, I tried a variation of Mike Chamber's ink stains. 12 oz 91% alchol + 1 tsp of black ink plus a pre-mixed solution of 4 oz of water + 1 tsp of Bombay Van Dyke Brown + 1 tsp Bombay Sepia. Rather than "swiping" each piece of stripwood, I added the entier bag of stripwood into a pan and covered it with the ink stain. I left the wood in for a short time (maybe a couple minutes) then started pulling them out and wiping them off. By the time I got to the last pieces, they'd be darker than the ones I pulled out first. Here's a sample of the color range:
Comments
And here's the completed right wall:
I'll be watching and waiting for progress with interest.
Karl.A
Here are the trusses:
And here's how I did the main floor: I'd been reading Kevin's thread on detailing castings on RR-Line and took note of the chalks he was using to help define wood parts. Using Rembrandt Burnt Sienna 411.3, Gold Ochre231.3, Raw Umber 408.7 and Burnt Umber 409.5 I was able to get a bunch of color combinations for the floorboards.
After I had them all in place, I toned the colors down and blended them together with a good rubbing with steel wool and a little A/I.
Looks good so far nice coloring. Looking for more posts from you in the future.
Jerry
Looking forward to more progress.
The sub floor is done and I gave it the same treatment as the main floor with the chalk weathering. The colors are nice, but a little too loud. Looked sort of like a gym floor. So again, they got a good brushing with steel wool and a coat of A/I, let it dry and repeat. Here's before and after pics:
Next, I added the legs to the main floor and the bracing (which I neglected to take a picture of)
Then, I built the sorting platform. Same construction technique as the main floor, but I weathered it differently. By looking at the pictures, it seems the platform is 100% exposed to the weather as opposed to the previous floor which at least had a roof over it. With that in mind...no chalk coloring; just the colors from the stain soaking, textured with a brush folowed by steel wool and ink:
For the legs on this baby (all 60 of them!), I think I came up with a clever way to install them quickly while still keeping them square. I'll put that in the next post.
But for now, I'm TWO percent of the way done!!
You're moving along swiftly.....
Karl.A
How are things going with you? Site looks good and I'm looking forward to the HO dtail parts.
Bill
You'll quickly catch up to where I'm at on the mill and pass me soon. I jump from project to project but seeing your success may bring me back around to this one!
-Jim.
I know what you mean. Posting pictures and getting shots that are reflective of the build is time consuming and can almost be a hobby within the hobby. But, the feedback I get makes it worth the extra effort. Plus, there've been plenty of people before me who went out of their way to post pictures that helped me learn, so it's kind of "returning the favor" in a small way.
Please jump in and build along with me.
Brett-
Thanks for checking in. I'm working on the walls with the peeling paint and I'm not totally happy with 'em, but I made better progress tonight and I'll get pics up in the next few days. On another note, the instructions and plans are straight forward and easy to follow...just what I expected from YOU!
To keep the legs square while glueing, I used a piece of 1/4" guide and added double stick tape to one side. Using a square, I lined up the guide with the joists and stuck it in place.
You can tell that I didn't use a guide on the first 2 rows:
I positioned the legs against the guide and steadied it with my index finger and angled tweezers:
See how I'm pinching the tweezers to square up the leg with the joist below?
I was using canopy glue and found that after placing 2 rows of legs, the glue had set enough to where I could remove the first guide and reposition it for the next row of legs.
I sort of pushed down and "rolled" the guide back like this:
Yep, the middle leg in that second row stuck to the guide and got out of square, but a quick nudge and eyeball adjustment and I had it back in line. It's not 100% foolproof, but it was a big time saver for me. I glued 60 legs in an hour (including taking the pictures)...so actual work time was closer to 30 minutes.
Jerry
But the front wall wasn't looking "correct"
With some help from KP and Karl (you can see the thread in the "Working With Wood" category under "Techniques"), I went back and reworked several of the boards and got it a little better. Or at least a little more consistant with the other walls:
More tomorrow...
As far as the coke sign, do you think it's the color or the stark, commercial nature of it that makes it jump out? My thinking was they tried to board up 2 broken panes with whatever material was handy.
As for the coke sign, I like the idea, the only thing I would do is weather it up a bit as If whatever was hanging around was used, chances are it would have been in a scrap pile and/or outside for awhile.
More progress...
Here's the Boiler House
and the drying shed
And a few shots of the structures all together:
Then, it's just a matter of sliding the 2 guide pieces to the next lines, lay down some drops of glue and tuck the 4x8 against the butt end of the guides:
This worked pretty good...better than trying to "eyeball" it with the lines below. To lay the decking, I used popsicle sticks to elevate the guides a little. That made them just tall enough so that the decking could butt right up to them:
And here's the finished shed floor:
Then it was on to the Old Mill Dock and the Flat Car table. Not difficult to build...just more to it than meets the eye. I tried to make the wood look sun-bleached and fairly beat up. The manual even makes reference to a "run away log" taking out one of the timbers on the side of the flat car table.
Here's the view from the back looking out of the mill:
...and in position on the pond:
Time for a break!!!
Congratulations on your excellent modeling.
Alan--thanks for the kind words. The windows are dull coated on both sides and on some I gave them a dusting of brown chalk (usually on the lower levels where it seemed like there was more dust flying around. Some of the darker panels are pieces of rusted corrugated aluminum. (a little hard to tell from this picture):
Next up was the Dry Rollway. The huge logs would get dumped off the flat car and onto this structure. Obviously, it would take a lot of abuse. To model that, I heavily grained/distressed the 16x16 timbers and rather than just round off the corners, I beat 'em good! I tried to crush them in a way that would compact the grain of the timbers--much like it would look if a huge tree fell on it. I banged up the corners with the edge of a hammer and polished up the wood with steel wool. In some spots, I gouged the timbers with the handle of an exacto knife. This left a good sized dent and a cool looking black scuff mark (not sure if it's from the steel wool particles getting rubbed by the aluminum knife handle, or what).
For the legs, I wanted to simulate the water-logged look you sometimes see on boat piers. After giving them a deep scribing with an awl and attaching them to bottom, I flipped the whole thing over and dripped A/I onto the bottoms of the legs. Then dabbed on a paste of black chalk and alcohol:
Once again I dripped on more A/I so that the black chalk would "wick" up the legs. I learned that you don't want the let chalk and alcohol paste dry at all or it leaves a straight line (in the time it took to take the picture above, enough alcohol evaporated leaving an unnatural black line). Fortunately, it'll be hidden by the pond water. Anyway, here's what it looks like all together:
The dock for the log pond came next:
And here's how all this "stuff" looks on the dio:
And that's a wrap! What am I up to...8%? 10%? There's only about 80 more pages!!
Keep sweating the 'unseen' things, thats what makes the difference between a 'good' model and a 'great' one.
You may think that it will end up unseen.... but, someone, some where will get that camera angle that shows it...... and even if they dont, sometimes the supposedly unseen is what adds that little bit extra depth to a model, even in the subconcious.
On a project such as this, cutting a few corners to save a little time is not worth it due to the detrimental effect on the whole.
You're really making rapid and impressive progress on this kit, kinda inspirtional to follow along with.
Karl.A
(When I grow up I wanna build a sawmill)