
Howdy, Stranger!
It looks like you're new here. If you want to get involved, click one of these buttons!
Categories
- 923 All Categories
- 3 Picture Posting and Resizing
- 54 New Member Introductions
- 111 Off-Topic Forum
- 4 Photography
- 2 Resources
- 16 New Product Information
- 166 The SierraWest Forum
- 9 Brett's Blog
- 117 General News & Ramblings
- 3 Re-Release Information
- 6 Q & A about SierraWest
- 9 What Would You Like to See?
- 362 Builds
- 131 HO Scale Builds
- 155 O Scale Builds
- 59 Finished SW Build Pics
- 12 Miscellaneous Builds
- 187 Techniques
- 19 Working with Wood
- 20 Painting Castings
- 5 Masonry
- 23 Scenery
- 36 Tools and Supplies
- 21 Layout Planning & Building
- 38 Miscellaneous
- 24 Prototype Information
- 22 Reference and Research
Railroad Camp - Stump Creek Lumber RR Office

I realize this has been done here before but I thought I would post my build as it will have a few twists from the standard "as built" kit. The Mack AC build was put on hold these past few months because of a heavy regimen of business travel but I will also be updating that build as well. I'm taking a week of vacation and hope to be contributing on a regular basis. On to the Railroad Camp build.
I started with weathering the office using the standard tools as shown. In this scale, I really like using the fine tooth razor saw. With the correct pressure it doesn't leave as much of the fuzz that I've found with some of the other types. I use just the file card on some boards and the wire brush on others and some combination of all to add variety to the texture.

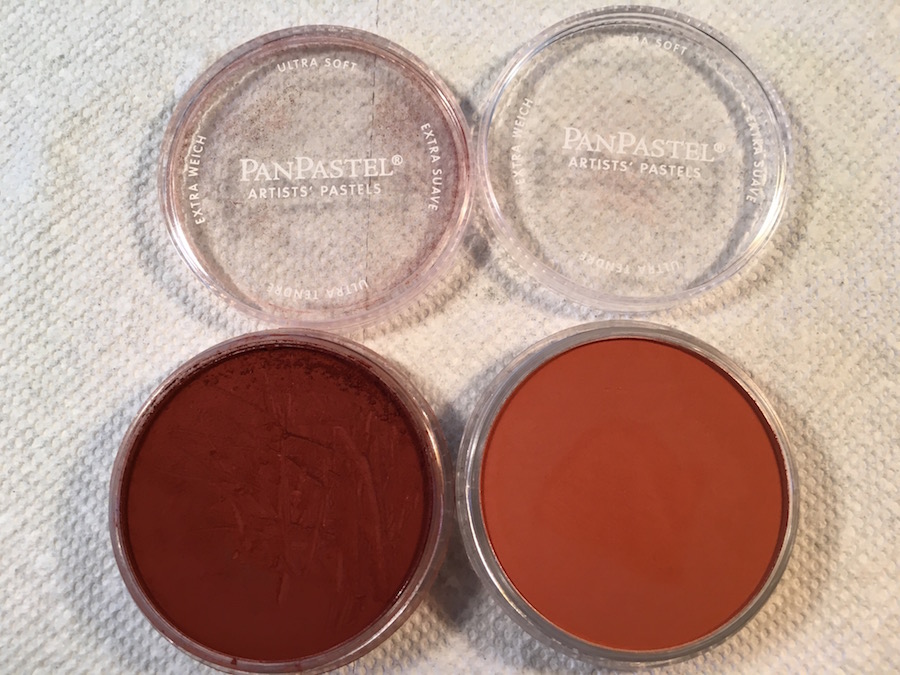
I used the alcohol and pastel powder method but substituted PanPastels for the coloring.
This is the wood after weathering and staining.

I started with the back wall of the office but haven't yet added the nail holes. I'm also thinking of adding a light wash of a black stain to bring out the wood grain and details.
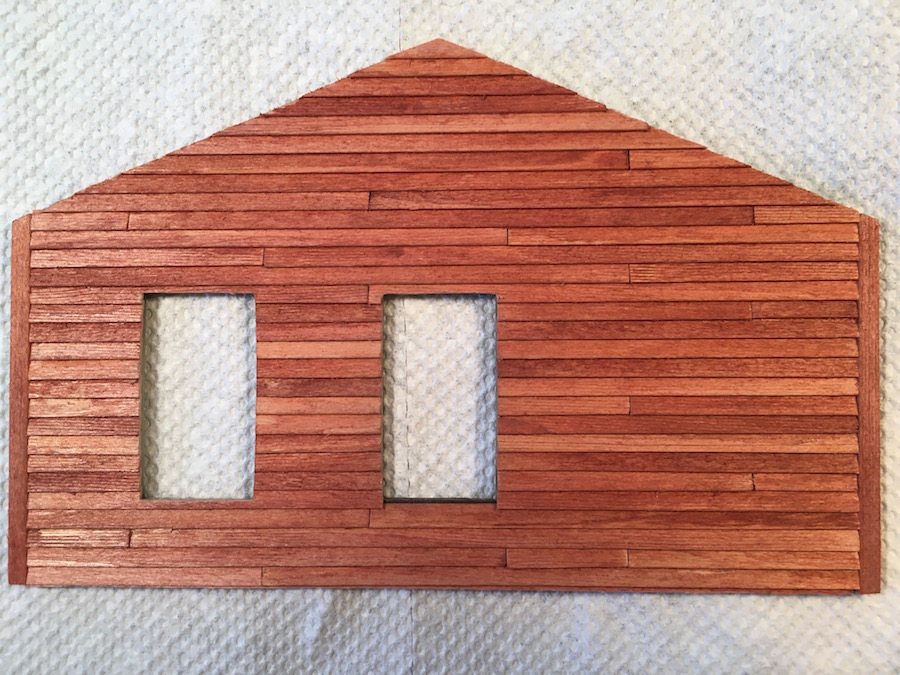
I started with weathering the office using the standard tools as shown. In this scale, I really like using the fine tooth razor saw. With the correct pressure it doesn't leave as much of the fuzz that I've found with some of the other types. I use just the file card on some boards and the wire brush on others and some combination of all to add variety to the texture.
I used the alcohol and pastel powder method but substituted PanPastels for the coloring.
This is the wood after weathering and staining.
I started with the back wall of the office but haven't yet added the nail holes. I'm also thinking of adding a light wash of a black stain to bring out the wood grain and details.
Comments
I've got some 0000 steel wool now to clean up the fuzzier and I want to fix the gap in the window frame miters. Not to mention needing to clean up some of the weathering and add some wall details. Wow looking at these pictures on a large screen is certainly eye opening. Lots more work here!
I also modified the plain wall to add a door for the aforementioned outside staircase I'll be adding.
Will you be adding interior lighting? If so, you will want "room blocks" to divide the upstairs into sections. This is easily done with some black construction paper.
This is a good time to think about window coverings also. Do you want blinds/curtains of some type? If so, do it now before the roof goes on.
I like having stories with my structures. My thought on the colors was that this was a new second story office addition after the company had enjoyed a successful first two years of logging. Therefore, the office would have a fresh coat of paint in the company's new colors. It was to be a contrast to the more weathered warehouse and shed. In looking at the pictures though the contrast seems a bit too stark. I need to clean up the fuzzies on the trim. This will give me the chance to tone down that light grey with some darker chalks.
I love to have lighting in structures. I just finished a shed with a detailed interior and open doors that I lit with surface mount LED's in lamp shades. I really liked the effect. For the second story office, I wanted to put a desk and figure behind the open front window with lighting. View blocks are a good idea as I see the second story comprised of three offices and a small storage area. I think the view blocks will have to form a flat interior ceiling as well as a wall because of the peaked roof. Unless you see it differently.
For the Windows, I have some B.I.S. Venetian blinds that I was planning on using along with some tissue paper curtains on some of the back windows and maybe some pull down shades. I've always wanted to add a cord with a pull ring hanging from the bottom of a shade. We'll see. I need to find a small enough ring to make it work.
I took a diversion today and started on the tar paper shed. I'll post some pictures in the morning.
Thanks again
Steve
I epoxied the four stone walls together that will comprise the original office structure. I reinforced the corners with 1/4" square stock which were also epoxied in place. I painted the inside a flat black and painted the outside with an inexpensive grey primer. A lighter grey or even a white might have been a better choice. I then painted most of the individual stones with acrylic paint from Michael's. I used the following colors diluted similar to the method used by Karl in his earlier build on the forum. I realize there is not much new here, just sharing my progress.
This gave me the following results.
My second step is to tone everything down with a blend of brown and black leather dyes diluted in 99% alcohol. While I'm applying the alcohol, I scrub fairly aggressively on any of the stones that appear to be too bright. I do this one wall at a time utilizing a hair dryer to move the process along.
While the alcohol stain blends everything together, it tends to leave the walls a little too muddy for my taste and the raw sienna is still too bright in a few places. What has worked for me on a previous stone structure is to use Pan Pastels after the acrylics to bring the walls back to life. That will be the next step.
Part way through the build tonight, I thought it might be even more interesting if I moved the storage shed to the back of the stone building. This would allow me to build an open frame work shed to the right of the office building.
I found this fabric textured paper in my supplies and used it to cover the walls. I'm not sure where I got it. I hope the texture with the chalk weathering will show the storage shed along with the stone building as the oldest structures in the group.
That's all for tonight.
SteveF
I also needed to build and weather the warehouse and side doors. I Finished the side door tonight adding hinges and and door handle that goes through both sides of the door. I haven't got the warehouse doors installed yet but have included a picture. They need more weathering, hinges and door pulls.
I've included one last picture to illustrate the view to the interior with the door open. You can also see the vent I included next to the window. I made this with individual boards and painted it this evening with my new SWSM paint set which just arrived today. Thank you Brett!
I continue to be in awe of the quality of modeling shown on this forum. The latest discussion builds of O'Neil's and the Loco and Service shops are clinics on to themselves. I can only hope to get to that level of modeling some day. Thanks Brett for including me in this incredible group of modelers.
SteveF
I also decided that the large hinges used on the warehouse doors were oversized for the side door and I decided it would also be more practical for that door to open in not out. So I removed the hinges and remounted the door to the other side of the door frame. I cut small pieces of .025" wire to represent the pivots on the door hinge. Again, there is more cleanup to do on the boards and the tarpaper. I may replace the sign as well because it looks a bit too weathered.
Next, I'm going to paint and detail the castings for inside the shed so I can get the lighting and the roof in place. I'm also thinking of mounting the shed on a board walk that extends past the side door and wraps around in front of the warehouse doors that would then step up to the front loading dock tying everything together.
The warehouse will contain all of the supplies for the lumber company so I may use this shed as a storage location for oil, lubes and paint but I'm not sure. I need to decide the purpose of the building so I can paint and add the castings that fit the location.
SteveF
The door latches and hinges are some superb modeling, and definitely inspiring to replicate.
The boarded interior, the door hardware, the louvred window, just great all around.
Karl.A
Very innovative work executed flawlessly! Little details like this I think are what draws a viewer in for a closer look.
Jerry
I started by weathering the boards as described by Brett in his instructions and the excellent videos in the Craftsman University. This is the first time I've ever done applied knot holes and was amazed at how much detail they added.
I then decided to try the technique in Brett's latest video, "wet brushing". I still need to work on the technique and could probably use a better brush but here are the results.
It's great to be back and thanks to everyone posting here especially the O'Neil's discussions. This is truly a great place to learn and a great escape from the rigors of everyday life.
Steve F
Those are some wonderful results. The knot holes are perfect and the tonal variation in the paint is pretty spot on.
Well, the business travels continue and I didn't get as much accomplished as I had hoped but I wanted to get something posted to keep the momentum going. I'm really looking forward to the long weekend next week. I've got the siding on the walls and will get them trimmed next. I've also primed all of the castings including the doors. So, I hope to have a completed warehouse next weekend. It looks a little darker in the photographs than it actually is especially the dock side wall and the knotholes.
SteveF
I'm really happy to hear your suggestion about "dirtying up" the siding. I was debating whether the white needed a little more aging. I like the idea of using some pastel rubbed on with my finger. I'm going to try that as well this weekend. I'll post the pictures this weekend and look forward to everyone's comments.
SteveF