
Howdy, Stranger!
It looks like you're new here. If you want to get involved, click one of these buttons!
Categories
- 923 All Categories
- 3 Picture Posting and Resizing
- 54 New Member Introductions
- 111 Off-Topic Forum
- 4 Photography
- 2 Resources
- 16 New Product Information
- 166 The SierraWest Forum
- 9 Brett's Blog
- 117 General News & Ramblings
- 3 Re-Release Information
- 6 Q & A about SierraWest
- 9 What Would You Like to See?
- 362 Builds
- 131 HO Scale Builds
- 155 O Scale Builds
- 59 Finished SW Build Pics
- 12 Miscellaneous Builds
- 187 Techniques
- 19 Working with Wood
- 20 Painting Castings
- 5 Masonry
- 23 Scenery
- 36 Tools and Supplies
- 21 Layout Planning & Building
- 38 Miscellaneous
- 24 Prototype Information
- 22 Reference and Research
More Machine Shop Builds
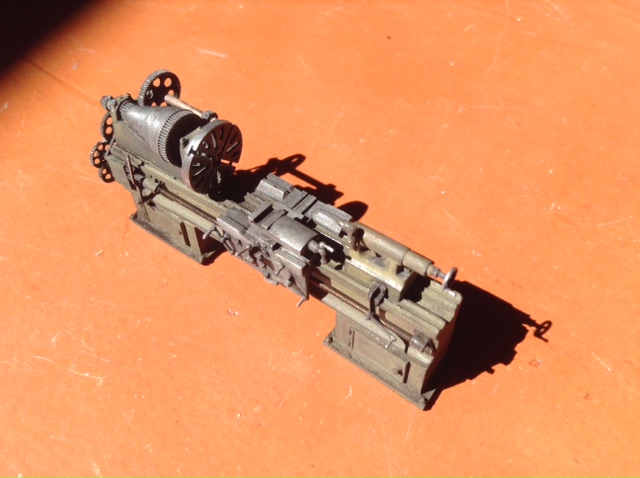
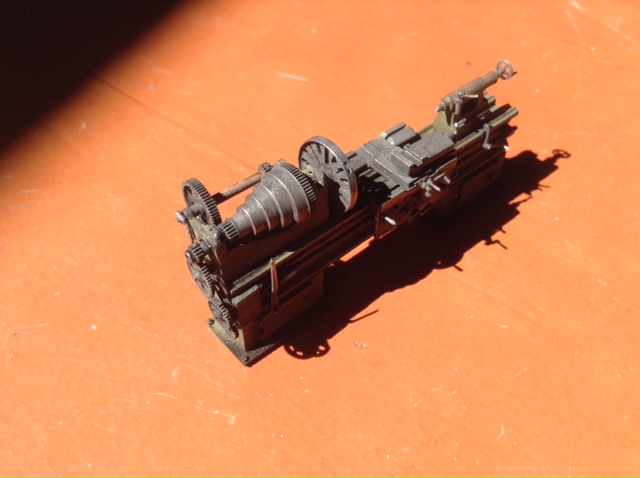
here is my first build out of the O SCALE Machine Shop package- the 24" Lathe. This was a fast build helped by the unsurpassed quality of SW castings (I realize now the shadow contrast in these shots is a bit high).
Here are two more shots of the 24" Lathe with an F Scale 28" Lathe as part of a separate project. I post these re: a couple comments:
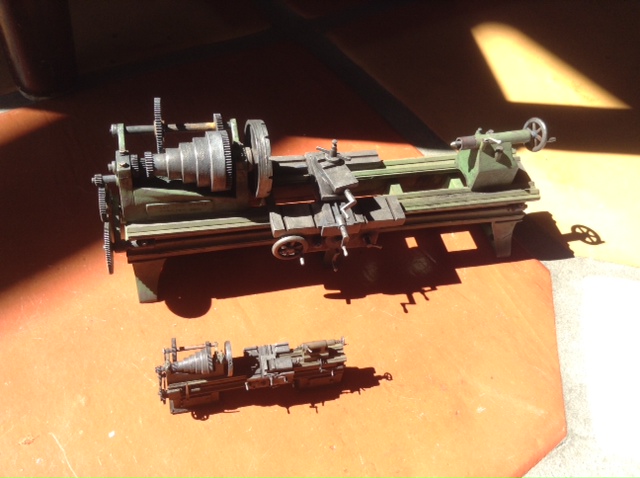
For anyone who thinks O scale is "big"- check out what it takes to move up a scale! (to be fair, a 28" Lathe is a bigger animal than a 24" lathe of course). But I'd be hard pressed to tell the difference in scale if not placed beside each other, as the SW castings are so precise- but there are many tiny handles and levers so make sure you are confident about where they go before gluing (I glued one in the wrong spot just before leaving on a trip- when I got back, I realized the error- luckily I had had a Sailor Jerry's or two when I glued them and I had mixed the epoxy badly so it had never set)!. I kind of buggered up the tailstock level- I've done that on every single machine shop build I've done to date (four)- I don't know what it is about those levers- they are really fussy. I may redo them on both these lathes but not really noticeable once the dust settles. I'll leave any minor repairs / weathering when they get installed.
The other thing is I broke the lead screw casting on the 24" lathe (resin castings can be brittle!) so I replaced the casting with a 1mm threaded rod. On the F Scale lathe, the screw casting was kinked so I replaced it with a 2mm threaded rod.
NB: yes the tool column is missing on the 24" lathe - it's "in the shop" (i.e. on the floor somewhere). And yes, the big back gear on the 28" lathe is in the wrong spot- my five year old daughter was fiddling with it- but it's loose and can be slid back.
Here are two more shots of the 24" Lathe with an F Scale 28" Lathe as part of a separate project. I post these re: a couple comments:
For anyone who thinks O scale is "big"- check out what it takes to move up a scale! (to be fair, a 28" Lathe is a bigger animal than a 24" lathe of course). But I'd be hard pressed to tell the difference in scale if not placed beside each other, as the SW castings are so precise- but there are many tiny handles and levers so make sure you are confident about where they go before gluing (I glued one in the wrong spot just before leaving on a trip- when I got back, I realized the error- luckily I had had a Sailor Jerry's or two when I glued them and I had mixed the epoxy badly so it had never set)!. I kind of buggered up the tailstock level- I've done that on every single machine shop build I've done to date (four)- I don't know what it is about those levers- they are really fussy. I may redo them on both these lathes but not really noticeable once the dust settles. I'll leave any minor repairs / weathering when they get installed.
The other thing is I broke the lead screw casting on the 24" lathe (resin castings can be brittle!) so I replaced the casting with a 1mm threaded rod. On the F Scale lathe, the screw casting was kinked so I replaced it with a 2mm threaded rod.
NB: yes the tool column is missing on the 24" lathe - it's "in the shop" (i.e. on the floor somewhere). And yes, the big back gear on the 28" lathe is in the wrong spot- my five year old daughter was fiddling with it- but it's loose and can be slid back.
Comments
That F scale version is beautiful too.
Respectfully,
John
Here is the SW O scale one with my parallel F scale bashed one…
You amaze me with the subtle colouring and age metal look.
That chipped yellow paint on the base is amazing.
I blew through allot of 0.15 wire for the cooling lines (I see Chuck Doan left the pump off his build!) - I've got to get me some proper wire bending tools.
Jerry
Respectfully,
John
I sailed through the assembly, feeling pretty cocky, then came to rig the belt on the one drill. OMG. I made every mistake in the book, including breaking off the cone pulley as I tightened up the last wrap of the belt. Ack! I was going to squish that little drill but counted to ten and rallied and salvaged it. Lesson learned with belts. Go slow, let everything set and dry at each step. Don't over tighten.
Here are the two drills with my F scaled bashed (un-rigged!) version:
I've concluded a couple things on using chalk for dust/ grime: (1) the "umbers" are best (raws to burnts); (2) when in doubt, go with the darker colour. This is, I believe, also an old modeller's rule of thumb for paint colour too. Just as shiny/ bright doesn't look as good at scale, darker colours usually look better too- it's probably just how our minds interpret things at smaller scales. But only use black for very sooty surfaces. Light greys and tans are harder to control but add depth/ variation as highlights, or for splashed or caked on mud. Just my thoughts but all consistent with the SW instructions I believe.
Here it is with an F a scale Vertical engine for comparison. Also not finished.
for the drive wheels/ pulleys on the 812 kit I left it blackened and buffed. For the F scale one I took some 2500 grit and sanded it down to make it bright. I think either is correct depending on how much the pulley is being used and under what conditions and how old it is I presume. I still need to rig the governor belts on both too.
Beautiful work and excellent comments. Thank you. What you are considering errors are indiscernible.
John
There are 13 machines in total not counting the electric motor in the prototype - with the SW kits I have them all now. The #812 engine will power the line from outside the shop instead. Plus I need to add the universal miller somewhere (because it's cool) and probably the 36" drill too. The lathes may be turned 180 degrees from the prototypes to allow for greater divisibility of detail (as placed here) but who knows in the end. I plan to "open up" the sides of the shop (barn doors etc.) to allow for interior viewing of course, something the prototype doesn't feature- always an issue. The building is big - over 40 x 60 feet. I'll try and compress it as much as I can.
I tried a formula for highlighting which I got from a fantasy gaming figure painting site: 3 or 4 parts water to one part acrylic floor wax and a bit of acrylic paint. It's supposed to "suck down" into the details, but didn't work- there was still too much surface tension. So I went to the old fall back of dropping drops of rubbing alcohol onto the acrylic paint and let the alcohol work its magic. Once the alcohol has pooled in natural lows, you can float in a bit more black acrylic from a brush to add more stains or highlights.
I wanted there to be oil stains like Chuck Doan did on his version- leaking from the case or thrown from the crank…. I also took a bit of chalk off the base to contrast it a bit more as concrete.
Respectfully,
John
The oil stains as you said are subtle, but visible and the placement looks right on.
Karl.A
I'm leaving this one well enough alone for the time being. There's always a danger of going too far...