
Howdy, Stranger!
It looks like you're new here. If you want to get involved, click one of these buttons!
Categories
- 985 All Categories
- 3 Picture Posting and Resizing
- 57 New Member Introductions
- 119 Off-Topic Forum
- 4 Photography
- 2 Resources
- 17 New Product Information
- 168 The SierraWest Forum
- 10 Brett's Blog
- 119 General News & Ramblings
- 3 Re-Release Information
- 6 Q & A about SierraWest
- 9 What Would You Like to See?
- 403 Builds
- 144 HO Scale Builds
- 177 O Scale Builds
- 62 Finished SW Build Pics
- 15 Miscellaneous Builds
- 194 Techniques
- 19 Working with Wood
- 23 Painting Castings
- 5 Masonry
- 23 Scenery
- 37 Tools and Supplies
- 21 Layout Planning & Building
- 40 Miscellaneous
- 24 Prototype Information
- 22 Reference and Research
#308 SierraWest O scale Sawmill Project ..... Karl.A

With the imminent release of the O Scale Sawmill I figured now would be a good time to do some of the ground work in preparation for it's arrival.
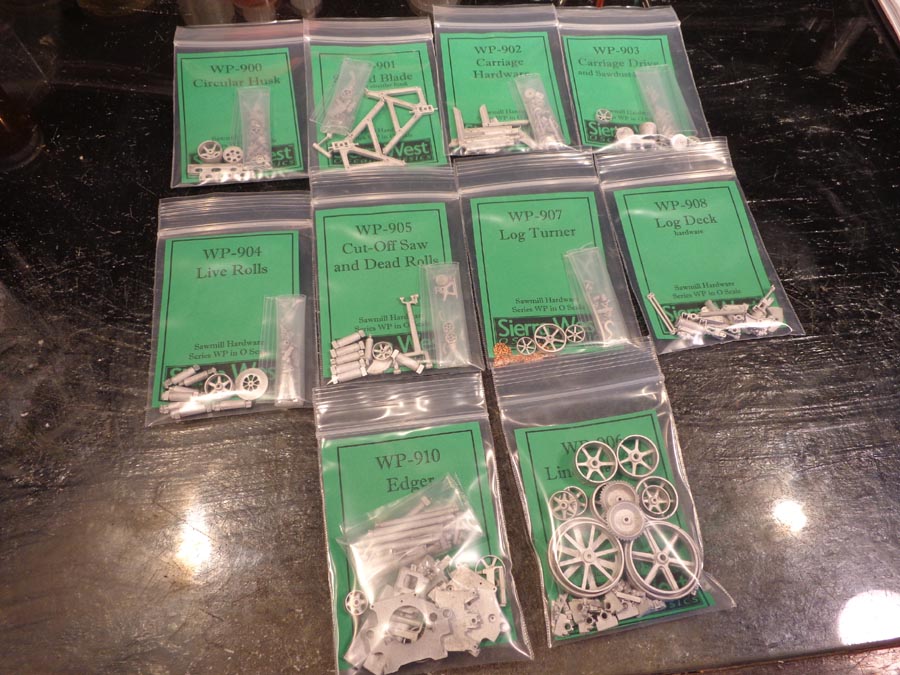
So, here's the machinery I will be building to install into the mill when the time arrives.
Starting with an overall shot of most of the packages that the machinery arrives in.
As with all of Brett's castings the parts are incredibly clean and crisp. The intricacy and accuracy of these components is just unbelievable with a level of detail in even the tiniest pieces that blows me away every time I see them.
I haven't really done anything like this before so it should be a really fun learning experience for me.......
Onward...
Feel free to join in if you have a set waiting to be built.
Karl.A
Comments
Hell I might even join you!!!!
Jerry
I opened a few of the packages and spent some time blackening the pieces.
This was followed by dips into two containers of water with toothbrush scrubs after each.
The next step is to start polishing some of the pieces to show wear and activity.
As you can see, lots and lots of pieces as I'm sure Joe Morgan can attest to after his recent completion of these machines, in darned fine style I might add.
Karl.A
Karl.A
What color stain did you use?
On the above glad your at the helm of the ship!!!!! I'll remember to check before moving on.
Jerry
Colour is Rembrandt 408.3 washed in with alcohol then lightly wiped off while wet with a clean cloth. This makes the grain pop a little more.
Karl.A
Great start buddy. Love the wood colouring.
Seeing the little dogs for the log carriage is giving me a flashback. Even in O-scale they're still pretty tiny!
Looking good, Karl. Are you loving it?
I spent a few days away working on 'other' projects but got back to the machinery this evening.
Not much left to do but a few details, the second belt and the blades. Touch up and weathering of course.
Karl.A
Now to decide which one of these great pieces to build next.....
Karl.A
Jerry
How is the sawmill coming along? Is there alot of CHB details that Brett has stored away to produce yet?
Jim Richards
What's the belt material made of? Nice job keeping the slack out of them.
And what is this piece?
Jim, what is even more amazing about the castings is that that is the way they came out of the packet from Brett, no clean up required whatsoever, perfect quality.
The Sawmill is really coming along well, lots of great progress has been made. I'll leave it up to Brett to post specifics when the time is right.
Bill, I can never remember the name of the stuff, I'll look it up and let you know tomorrow.
The circled piece is called the 'slitter'. It is a small disk mounted on the end of a short shaft. The disk (should be) lined up perfectly with the blade. Mine needs to be dulled down somewhat, too shiney.
From what I can understand, as the log travels through the saw (from left to right) the slitter goes between the log and the plank being cut. This will keep the cut open as the log continues to travel and be cut, thus preventing the blade getting 'sandwiched' tight and binding up.
Hopefully that made sense, I can post a better pic if you want one..
Karl.A
A great little kit and a lot of fun. Still a few more pieces to add when I attach a log, and the weathering of course.
Karl.A
Karl.A
Jerry
Live and dead rolls pretty much done, I need to add the friction drive wheel to the live rolls but that can wait until I install it into the mill floor to ensure it all lines up correctly.
Aside from that all that remains is weathering, I will do this for all machines at the same time prior to installation.
Karl.A
Another beautiful update. I cant wait to see all the kits together in the final sawmill diorama.
Jim
Karl.A
Next I decided to build the "log Carriage Drive". This is basically a winch system that drives the log carriage via a cable attached underneath.
The drive is powered by a shaft that exits beneath the main saw.
Karl.A
Jerry
Now the edger next I think.
Karl.A
Blackened and buffed.
Karl.A
Karl.A
Nice start on that edger Karl.
Jerry