
Howdy, Stranger!
It looks like you're new here. If you want to get involved, click one of these buttons!
Categories
- 923 All Categories
- 3 Picture Posting and Resizing
- 54 New Member Introductions
- 111 Off-Topic Forum
- 4 Photography
- 2 Resources
- 16 New Product Information
- 166 The SierraWest Forum
- 9 Brett's Blog
- 117 General News & Ramblings
- 3 Re-Release Information
- 6 Q & A about SierraWest
- 9 What Would You Like to See?
- 362 Builds
- 131 HO Scale Builds
- 155 O Scale Builds
- 59 Finished SW Build Pics
- 12 Miscellaneous Builds
- 187 Techniques
- 19 Working with Wood
- 20 Painting Castings
- 5 Masonry
- 23 Scenery
- 36 Tools and Supplies
- 21 Layout Planning & Building
- 38 Miscellaneous
- 24 Prototype Information
- 22 Reference and Research
The Donkey Repair Yard

I'm just finishing up my seventh Sierra West Scale Models diorama, the Loco Shop and Fuel Servicing Facility, and I'm now beginning my eighth, the Donkey Repair Yard. It is a companion kit to the Loco Shop, but when I finish combining all these diorama kits into a backwoods logging railroad it will not be adjacent to the Loco Shop.
I'm starting this build-thread but probably will configure it in a slightly different manner than the pilot model. I'll build the several elements and we will see where it leads. I do have sort of a plan, but it will depend on how they all fit.
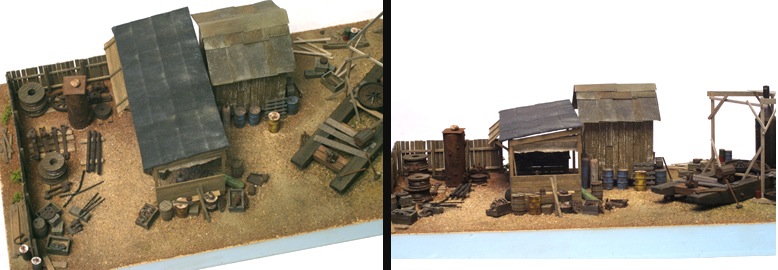
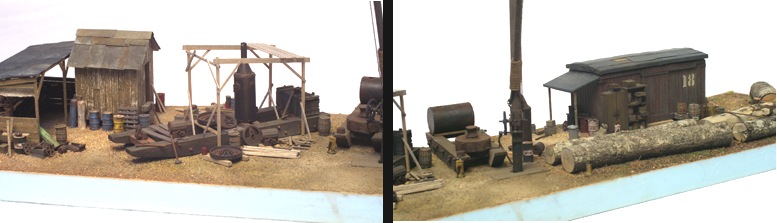
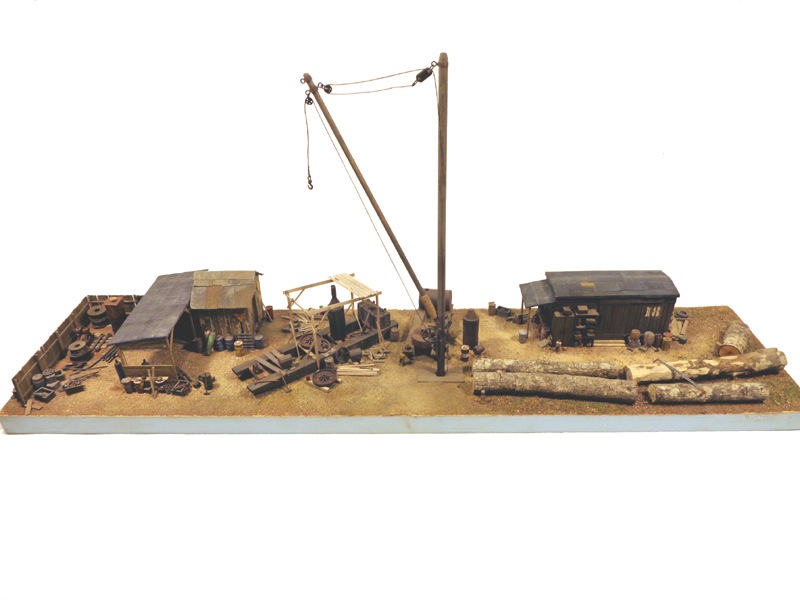
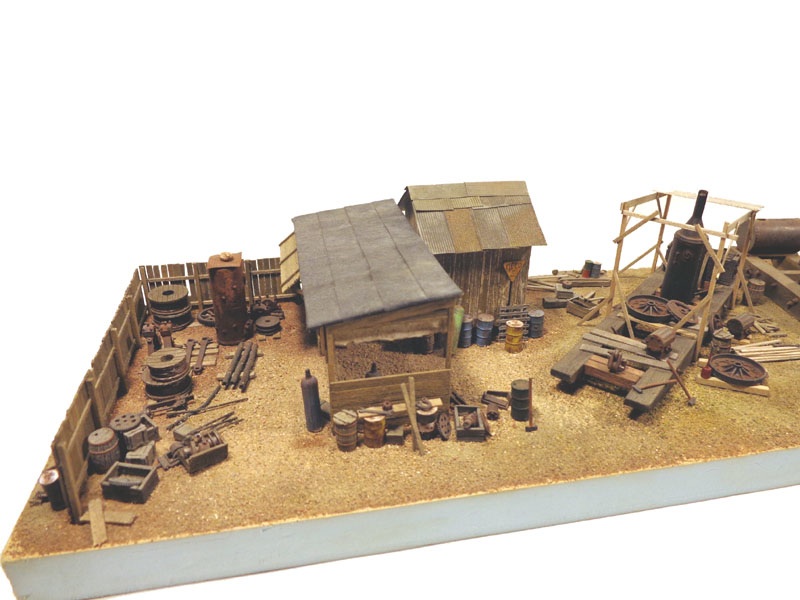
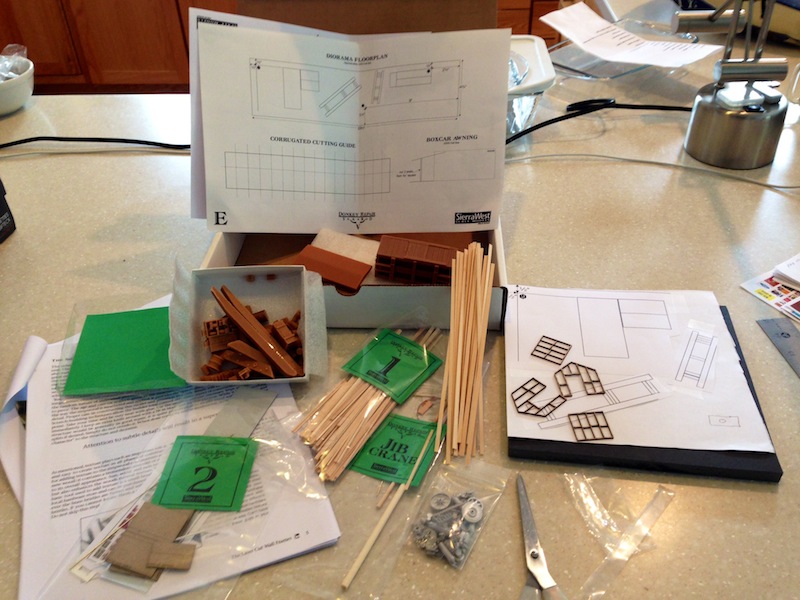
The first pics (from the SWSM site) show where we are headed, and the last shows the kit contents. Next post I'll show what I've done so far- the Storage Shed. Elliott is also doing this as part of his big Logging Camp diorama, but anyone who has this and wants to join in, the waters fine.
I'm starting this build-thread but probably will configure it in a slightly different manner than the pilot model. I'll build the several elements and we will see where it leads. I do have sort of a plan, but it will depend on how they all fit.
The first pics (from the SWSM site) show where we are headed, and the last shows the kit contents. Next post I'll show what I've done so far- the Storage Shed. Elliott is also doing this as part of his big Logging Camp diorama, but anyone who has this and wants to join in, the waters fine.
Comments
Karl.A
Jerry
Congratulations on the award at the Narrow Gauge Convention! Great accomplishment. Can't wait to see this come together. Are you going to put this along side the Loco and Service Shop Diorama?
Jim Richards
Jerry
I've accumulated some logging research over the last few years and one great piece is a book by Merv Johnson, "In Search of Steam Donkeys" that includes great photos, diagrams, and at least ten plans of donkey engines.
I used to visit Mendocino County a lot when I lived in the East Bay, and there is a display in Willits, CA of a spool donkey that worked the Mendocino Coast in the earlier part of the 20th century. A photo from the web is below. The Skunk RR is nearby. I'm sure there are quite a few other similar displays in other logging areas.
Now to the build. I set up a temporary work area on my desk while the gang was here. I want to mention my second favorite tool (after my CHOPPER ll), a 12x15 inch piece of plate glass that is a half-inch thick with rounded edges. I got it for a couple of bucks at a garage sale. Perfectly flat for assembling walls, great for mixing acrylics, pastel chalks and alcohol, and a great cutting surface even though the blades get duller a little faster. Incredibly easy to clean. Try one.
The key is to get the initial staining of the boards dark enough so you will get enough contrast with the peeling white paint. This effect is pretty tough to pull off with any color except white if you are working in HO scale.
After the laser-cut wall frame was attached to the wall template with double-sided tape, and a couple of framing guides (1/4" sq.) were attached the same way, start gluing the wall boards from both sides. Rough-up the board ends on the bottom before you glue them. The tops will be cut off at the roof line after the wall is done.
Here are a few pics so that you get the idea.
Next will be a floor, some doors, and a roof for this little guy.
Great picture too !!
Karl.A
Another bout with the evil etchant. First the corrugated aluminum was cut into appropriate sizes using a cutting guide and my handy Philatelist tool, a miniature paper cutter I got really cheap at a stamp store. Incredibly sharp, clean cuts, better than a brand new #11 blade or scissors.
The "evil etchant", ferric chloride or PCB Etchant Solution as sold by Radio Shack was used to weather the roof panels, and although not something I'd like to do every day, it's the best thing around to get the right effect. I've used it enough times to have an efficient system. You can get some neat effects if you over-cook them a little- see the panels on the far left.
The last pic shows the Supply Shed pretty much finished- it still needs some handles for the sliding doors, some pastel chalk touch-up on the roof, and some toning down of the signs. A lot of modeling goes into this little critter, but I love it!
Ken
The wood was stained with the pastel powder (408.5) and alcohol. Lots of boards to distress and rough up the ends. A rolled-up canvas tarp (paper stained with brown/tan chalks. A slightly slick tissue paper. Next I'll build a fence.
Bill, the tutorial is in the instruction manual. I'll be taking copious notes when Brett and Karl A. are giving clinics. The hard part of the peeling paint is being able to pull it off consistently. See you next month, and don't forget the Shay!
Karl.A
Beautiful build.The peeling paint is amazing on the first building and I really like the rolled tarp on the next building you did. Karl really sums it up. I wanted to let you know how much I have admired your work too. I keep looking at Camp Chambers you built several years ago as well as the loco shop build you just did. I really like the placement of the kits you did on Camp Chambers and am really looking foward to seeing what you do with the current project. Keep up the fantastic work!
Jim Richards
Jerry
There are two fence sections on this diorama, and the building is very straight forward because of the templates and cutting guides provided. The one task that is difficult is trying to rough up the ends of the fence boards since they are less than an inch long. I used scratch brushes but also wound up using my Xacto quite a bit.
I attached a couple of signs, but I doubt if there were many advertising posters on fences in the backwoods. I'm done doing HO nail holes, having finally decided if I can see them they are oversize. Also, I for sure can't model a nail head in this scale.
I propped the two fence sections up on my "layout" to take some pics for color check. Again the shadow lightener program makes the board ends look like they need to be touched up. I can't resist making the boards different lengths- I should just crank them out all the same length with the Chopper. But it is a bit of a caricature, after all, so they are OK.
Sorry about the out-of-focus shots, but in the interest of keeping this moving along, I won't retake them. Two problems- cheap camera and operator error.
I really like the fence. The various board heights add alot of dimension and character to your build. I really like the color, very nicely faded with variations from board to board. I have alot of trouble with nail holes and ended up buying a monster nailer from monster model works. The nail holes are very tiny and seem to be more to scale. I dont know if you have seen one or tried one (my quess is that you have) but if not, you may want to check it out. Keep up the fantastic work! This is very enjoyable to see come together.
By the way I am curious if you would recommend waiting to start a diorama until all the buildings are complete. Here is my dilema. I almost have the castings and buildings from essentials done but want to incorporate main street as you and Elliot had done plus a few other kits( probably Bretts water tank and his woodcutters shack). My concern is spacing of the buildings as I am unclear of the individual building sizes. I am just itching to try out some scenery work.
Jim Richards
As for your diorama, I would want a plan before I started. But if you have several elements done, and you have decided on what else you are going to use, we can tell you the dimensions of any of the structures you mentioned so you can mock them up, or at least their footprints. That way you can decide the base size and start some scenery. The buildings will look better if they are "planted" in your first scenery layer or ground cover while it is still wet, rather than have them look like they are sitting on top of it if you wait till it dries.
More advice. Why not do one of the kits you have and complete it as a diorama, and then incorporate it into a larger one later as you build the others? The kits you mention together would require more than a 2' x 4' area, a little big for a diorama, especially if you are going to take it anywhere. I know this! Putting them all together makes it difficult to maintain a "focus area" as a diorama, although they make a great module or display, or a great start toward a logging layout.
Post pics of whatever you do. I probably exceeded by bandwidth limit for the decade.
.
By the way that picture of the fence with the background of Camp Chambers is really something I am aspiring to do!
Thanks again!
Jim Richards