
Howdy, Stranger!
It looks like you're new here. If you want to get involved, click one of these buttons!
Categories
- 924 All Categories
- 3 Picture Posting and Resizing
- 54 New Member Introductions
- 112 Off-Topic Forum
- 4 Photography
- 2 Resources
- 16 New Product Information
- 166 The SierraWest Forum
- 9 Brett's Blog
- 117 General News & Ramblings
- 3 Re-Release Information
- 6 Q & A about SierraWest
- 9 What Would You Like to See?
- 362 Builds
- 131 HO Scale Builds
- 155 O Scale Builds
- 59 Finished SW Build Pics
- 12 Miscellaneous Builds
- 187 Techniques
- 19 Working with Wood
- 20 Painting Castings
- 5 Masonry
- 23 Scenery
- 36 Tools and Supplies
- 21 Layout Planning & Building
- 38 Miscellaneous
- 24 Prototype Information
- 22 Reference and Research
Return to HO

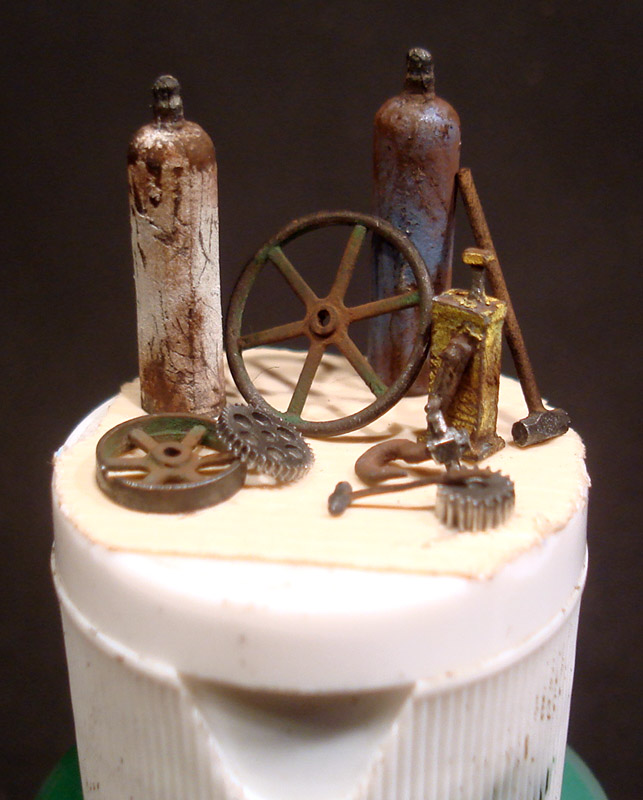
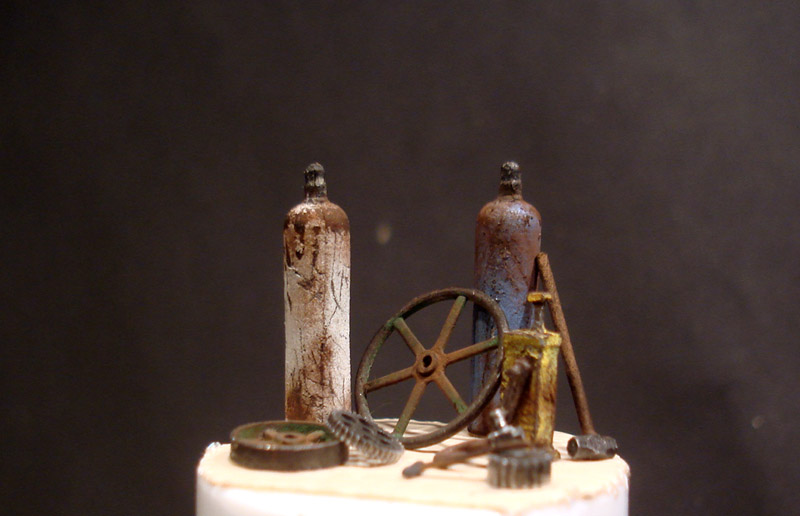
Returning to HO for the next couple of projects will take some 'adjustment' and refocussing.
However I'm real happy with these results so far, it will prove to be an interesting couple of months at the workbench indeed.
Karl.A
However I'm real happy with these results so far, it will prove to be an interesting couple of months at the workbench indeed.
Karl.A
Comments
Well I wish you would have stayed with the O-Scale. I'll still follow you through with this project.
So far excellent!!!!
Jerry
Personally, I'll be sticking with the O scale, you can expect to see alot more of that scale from me in the future.
I'll be carrying on progress with my own O scale builds in my spare time while I'm fortunate enough to help out a little on these HO projects .
Karl.A
Thanks for the great compliment Kaz.
I'll certainly put an explanation together for you both, however it will probably be after I return from the Expo, not much spare time over the next few days.
Karl.A
I've been away from the hobby for much of the past year but managed to get down to the Peabody show this past weekend. I wasn't going to buy anything but Brett managed to sell me BlueSky in O-Scale (and I have a couple more kits coming from him next month for my collection). Hoping for a long winter so I can actually start building something. I also need to finish track-laying on my Dad's On30 layout.
- JT
Karl A. that is some beautiful work on those castings.
Build Thread: http://www.railroad-line.com/forum/topic.asp?TOPIC_ID=22208
Also, thanks to google, I found the original web page on Brett's site for the HO BlueSky Co.: http://www.sierrawestscalemodels.com/ckits/101/101.htm
For resin...
Spray the part with flat black rattle can for the base.
Paint the top colours you choose with acrylic craft paint.
Use a wire brush to chip and remove the top coat where required.
Dust the chipped areas with rust coloured chalk on a small detail brush.
For metal...
Blacken the part using something like A-West 'Blacken-it'.
Paint the top colours you choose with acrylic craft paint.
Use a wire brush to chip and remove the top coat where required and reblacken to remove any shiney spots
Dust the chipped areas with rust coloured chalk on a small detail brush.
Karl.A
Personally it is hard to believe these are HO castings, both resin and metal. It is just amazing what both you and Brett are capable of doing with such small items. The details are just stunning. Of course I will give your techniques a try. By now I have some of Brett castings to work with.
Great stuff, thanks for sharing.
Size really is relative, it's all in the techniques, follow the instructions, get comfortable, relax and most of all have fun.
Karl.A
Dave
DJ
Take a casting with you so that you can try the solution on it and ensure it works for what you are needing. The reaction should be pretty instantaneous.
Karl.A
DJ