Howdy, Stranger!
It looks like you're new here. If you want to get involved, click one of these buttons!
Categories
- 985 All Categories
- 3 Picture Posting and Resizing
- 57 New Member Introductions
- 119 Off-Topic Forum
- 4 Photography
- 2 Resources
- 17 New Product Information
- 168 The SierraWest Forum
- 10 Brett's Blog
- 119 General News & Ramblings
- 3 Re-Release Information
- 6 Q & A about SierraWest
- 9 What Would You Like to See?
- 403 Builds
- 144 HO Scale Builds
- 177 O Scale Builds
- 62 Finished SW Build Pics
- 15 Miscellaneous Builds
- 194 Techniques
- 19 Working with Wood
- 23 Painting Castings
- 5 Masonry
- 23 Scenery
- 37 Tools and Supplies
- 21 Layout Planning & Building
- 40 Miscellaneous
- 24 Prototype Information
- 22 Reference and Research
Planning Ahead - Power Distribution
Hi All.
A few years ago I had started a DCC layout. Life happened along the way and I had to dismantle the layout and power system for it. Although I had well intended plans, I found that I had used the same wire color for a number of functions, had inadvertently reversed some wires, and flat out forgot what I had originally intended in a couple of cases. This was largely due to adding on over a period of time. As I am planning my new layout, and where my SWSM kits will be located, it seemed to make sense to establish a system up front, so as I built SWSM buildings, I could wire them in such a way that they would be readily able to be tied in to the overall system.
I decided to build a central power distribution center that I could relocate as the layout increased in size. In talking with Brett, he said there were probably folks who might have an interest in this electron thing. So it is humbly that I offer what I've done as ideas and maybe someone might find it of use.
This is the power center from the front view.

As you can see, the AC to DC transformer is on the left, and next is the DCC control unit. The faceplate has a voltmeter, ammeter, and DCC radio unit. The switch between the two meters is to allow them to be switched into the circuit for diagnostics, and then switched out of the circuit for normal operations.
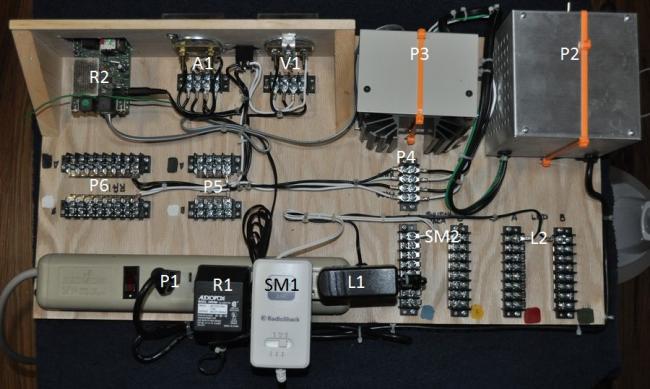
This next picture shows the overview of the wiring.

The power center is a piece of 3/4" plywood with a 1/4" thick faceplate mounted along one edge. The transformer and DCC control unit are held in place with tie-wrap and double-stick mounting tape. The AC power distribution strip is a simple switched power strip that affords some overload protection. I've numbered the components by circuit to help identify what is going on:
P1 - 120 VAC power cord for DCC transformer (P2)
P2 - AC/DC Transformer for DCC Control Unit (P3)
P3 - DCC Control Unit
P4 - Landing Terminal for DCC Track Power and Programming Signal
P5 - Programming Terminals(7 available pair), Black(+) White(-)
P6 - DCC Track Power Terminals(15 available pair), Black(+) White(-)
A1 - Ammeter
V1 - Voltmeter
R1 - Power Supply for DCC Radio
R2 - DCC Radio
SM1 - 9 VDC Switch Machine Power Supply
SM2 - Switch Machine Terminals(15 available pair), Blue(+) Yellow(-)
L1 - 12 VDC Regulated Power Supply for LED lighting
L2 - LED Lighting Terminals(15 available pair), Red(+) Green(-) [same colors of magnet wires used in LED circuits]
I painted a small square of color to match the wire color next to each of the terminal strips.
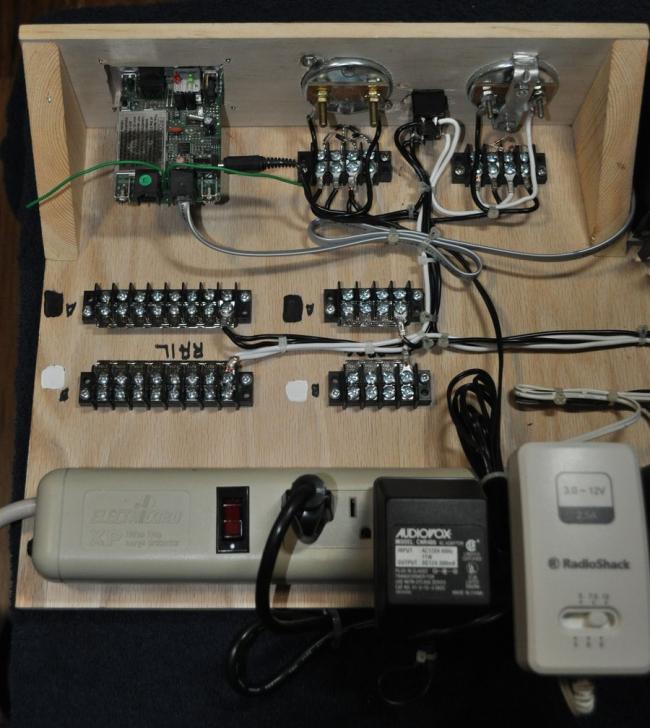
The circuits for the ammeter (A1) and voltmeter(V1) require special wiring to be able to correctly read the square wave DCC signal. This special wiring gives indicative readings but affect the voltage level on the output to the track. For this reason, these meters are switched out of the circuit so they do not affect general operation. The photo below shows a closer view of the circuits.

As I have looked at building the SWSM modules for my layout, it struck me that mounting terminals underneath the module with wire colors consistent with the layout, will make it easier to integrate the modules into the layout without mistakes.
I'll be happy to share any further information, but will stop now in case any one is dosing off.
Mark (AKA the nail hole guy, thanks to Ed.)
A few years ago I had started a DCC layout. Life happened along the way and I had to dismantle the layout and power system for it. Although I had well intended plans, I found that I had used the same wire color for a number of functions, had inadvertently reversed some wires, and flat out forgot what I had originally intended in a couple of cases. This was largely due to adding on over a period of time. As I am planning my new layout, and where my SWSM kits will be located, it seemed to make sense to establish a system up front, so as I built SWSM buildings, I could wire them in such a way that they would be readily able to be tied in to the overall system.
I decided to build a central power distribution center that I could relocate as the layout increased in size. In talking with Brett, he said there were probably folks who might have an interest in this electron thing. So it is humbly that I offer what I've done as ideas and maybe someone might find it of use.
This is the power center from the front view.

As you can see, the AC to DC transformer is on the left, and next is the DCC control unit. The faceplate has a voltmeter, ammeter, and DCC radio unit. The switch between the two meters is to allow them to be switched into the circuit for diagnostics, and then switched out of the circuit for normal operations.
This next picture shows the overview of the wiring.

The power center is a piece of 3/4" plywood with a 1/4" thick faceplate mounted along one edge. The transformer and DCC control unit are held in place with tie-wrap and double-stick mounting tape. The AC power distribution strip is a simple switched power strip that affords some overload protection. I've numbered the components by circuit to help identify what is going on:
P1 - 120 VAC power cord for DCC transformer (P2)
P2 - AC/DC Transformer for DCC Control Unit (P3)
P3 - DCC Control Unit
P4 - Landing Terminal for DCC Track Power and Programming Signal
P5 - Programming Terminals(7 available pair), Black(+) White(-)
P6 - DCC Track Power Terminals(15 available pair), Black(+) White(-)
A1 - Ammeter
V1 - Voltmeter
R1 - Power Supply for DCC Radio
R2 - DCC Radio
SM1 - 9 VDC Switch Machine Power Supply
SM2 - Switch Machine Terminals(15 available pair), Blue(+) Yellow(-)
L1 - 12 VDC Regulated Power Supply for LED lighting
L2 - LED Lighting Terminals(15 available pair), Red(+) Green(-) [same colors of magnet wires used in LED circuits]
I painted a small square of color to match the wire color next to each of the terminal strips.
The circuits for the ammeter (A1) and voltmeter(V1) require special wiring to be able to correctly read the square wave DCC signal. This special wiring gives indicative readings but affect the voltage level on the output to the track. For this reason, these meters are switched out of the circuit so they do not affect general operation. The photo below shows a closer view of the circuits.

As I have looked at building the SWSM modules for my layout, it struck me that mounting terminals underneath the module with wire colors consistent with the layout, will make it easier to integrate the modules into the layout without mistakes.
I'll be happy to share any further information, but will stop now in case any one is dosing off.
Mark (AKA the nail hole guy, thanks to Ed.)


Comments
Personally, I find wiring and electrical work my least favorite aspect of the hobby. It just ain't fun! However, following your example, many stresses and concerns can be eliminated.
Up front planning is key.
The volt meter and ammeter are not a necessity. As I am anticipating having four different operating areas on the layout I felt it would be handy to have them wired in for diagnostics in case I had power issues. Since I'm putting together the building blocks, it seemed easier to add them in now, rather than wish I had them later.
Having said that, I fully subscribe to the KISS principle. And being an engineer, I readily acknowledge I have the ability to make things more complicated than necessary.
Feel free to ask any questions you might have.
Simplifying things in the beginning that could become complicated and problematic in the future is a great advice.
So many projects get sidelined by so many of us due to initial steps that need to be redone.
Very well planned, even down to future trouble shooting options, that's great forethought, not needed now but... one day, and its already in place.
Well thought out, well planned, (for now and future), professionally executed and really nice tidy work, great job.
'anal' is ensuring all the screw heads are all exactly lined up the same way and twisted to the same degree.
Clean, organised, tidy work such as this is professionalism, care, and attention to detail, big difference.
Karl, that element of forethought shows through the composition and execution of the details of your modelling. You've set a lofty yet hopefully attainable goal to reach.
I mused over Ed's comment and was reminded of pessimists being referred to as realists. I push back a bit at the term 'anal' but It seemed that as Ed may have been pointing a finger at me, he was knowingly pointing three back in reference to himself, so I considered it pretty high praise.
I found this picture of a kit I put together a little over a year ago. Now that I've seen the better way of finishing models, I see the big shortfalls, but I thought I'd offer this as a baseline to compare my progress in the future.
Thank you Ken, Brett, Bill, Mike, Ed and Karl. For being recognized as 'the best', you've made me feel amazingly welcome. I look forward to getting to know you each better as our journeys continue.
Mark
You are totally cool in my book. Absolutely no offense taken. As a matter of fact, I appreciate honesty and candor. If I ever have an issue I'll address it off-line with you.
I'm from the school that if someone ribs you, it shows they care enough to bother.
I have appreciated your comments in the forum and look forward to getting to know you.
Mark
To this end, I've constructed a 8' x 9" module that holds three HO tracks and one HOn3 track. I want to be able to provide straight DC power (typical DC power pack), and DCC (both power and programming). I thought it might be of interest to see how I solved the construction of the power distribution within this module.
This photo shows the switches on the control panel of the module. I have made this removable so that I can rewire or maintain the witches without upending the module.
The function of the switches from left to right are:
DCC function select (Program - UP, Power -Down)
Switches 2-5, track power function (DC - Up, DCC - Down)
I wanted the switches to operate so that simply switching them all down would give me straight DCC power and control. The up position would be the exception. This is all a matter of personal preference. What I've shown is simply the way I chose to solve the problem.
This photo shows the back of the control panel. Please note that since this is the back, the top wires, are at the bottom when mounted on the module.
The first switch selects between DCC power and DCC programming. This selection applies to all the tracks. To disable the tracks that I do not wish to be programmed, I flip the switches up.
The other infeed wires are for DC wiring. For those who don't know, this is the typical power from a power pack that is used to control non-DCC locomotives. I think I inadvertently smoked a motor in a brass engine by accidentally having it parked on a DCC powered track, so I want to avoid that. Did you know that all electricity is conducted through smoke. When you let the smoke out, things stop working.
I used a couple of different sizes of wire. For those who don't know, the wire size affects how much power the wire will carry before it turns into a heat source. I use 16 AWG wire for all my power circuits as that is ample to carry 10 Amps of power. The wires shown for the track wiring are actually 18 AWG but are solid so are much smaller. The advantage of this is that it will carry up to 7 Amps which is a lot for HO scale, but with a small groove in the tie, underneath the rail, you can totally conceal the wire under the rail thereby avoiding trying to hide the solder typically added to the outside of your rails.
I know this is not directly related to Brett's kits, but I hope someone may find something useful in this. If anyone has questions about the circuits or why i did something, feel free to ask me here or offline.
Again thanks for the warm welcome. BTW Ed, I think fastidious may be a better word to describe us than other four-letter words but will leave that for others to decide.
Mark
This photo shows the track module from the rear bottom to show the termination on the rear, as well as how I wired in the control panel.
The first thing I did after mounting the control panel was to wire the incoming wiring to the terminal strip on the left. Next I wired track wires to the terminal strip on the left. If you have a multimeter, now is a great time to check the wiring from the incoming terminals, through the switches, to the output terminals to the tracks. I found that one of the switches needed to be exercised until it worked. If something needs to be replaced, now is the time to find it.
Next I mounted a terminal strip on the rear side of the track module. I connected the wires to the terminal strip and determined the approximate diameter of the bundle. I then drilled a hole through the back panel through which to route the wires. I try to keep it simple, and simply used fencing staples and wire-ties to hold the wiring as it is routed to the terminal block.
After that I added wires for each of the tracks, shown on the right. This will make is much easier to have everything done to minimize the work that will have to be done under the module later.
If you plan on adding lighting, or track power to your SWSM structure or diorama, planning ahead for the connections can save frustrations and extra work.
Mark