
Howdy, Stranger!
It looks like you're new here. If you want to get involved, click one of these buttons!
Categories
- 920 All Categories
- 3 Picture Posting and Resizing
- 53 New Member Introductions
- 111 Off-Topic Forum
- 4 Photography
- 2 Resources
- 16 New Product Information
- 165 The SierraWest Forum
- 9 Brett's Blog
- 117 General News & Ramblings
- 3 Re-Release Information
- 6 Q & A about SierraWest
- 9 What Would You Like to See?
- 361 Builds
- 131 HO Scale Builds
- 154 O Scale Builds
- 59 Finished SW Build Pics
- 12 Miscellaneous Builds
- 187 Techniques
- 19 Working with Wood
- 20 Painting Castings
- 5 Masonry
- 23 Scenery
- 36 Tools and Supplies
- 21 Layout Planning & Building
- 38 Miscellaneous
- 24 Prototype Information
- 22 Reference and Research
"Foss' Shipyard" scratch build in O scale.

This is Richards build moved from a previous thread.
Karl.A
rtbaron June 16
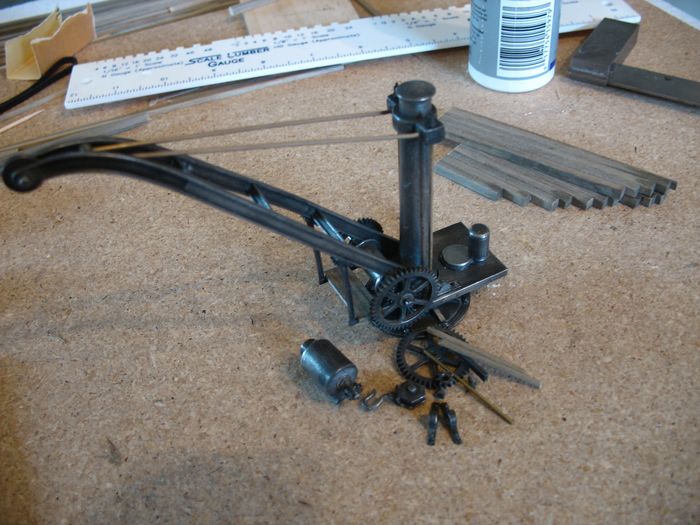
Posts: 9 Latest pictures of my O scale build...The Shipyard..
The crane will be under repair on the dock....
Karl.A
rtbaron June 16
Posts: 9 Latest pictures of my O scale build...The Shipyard..
The crane will be under repair on the dock....
Comments
Posts: 11
Richard
Thanks for the update. It's looking fine.
Jerry
------------------------------------------------------------
toddmc09 June 16
Posts: 11
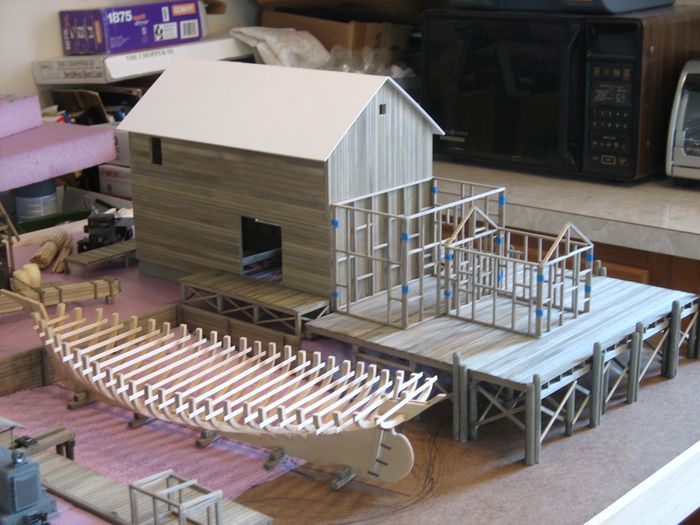
The ship under construction is a masterpiece all by itself, that really is a fantastic kit and great lesson in shipbuilding to boot. The shipyard structures look fantastic as well. If somebody does not win first prize or best of show somewhere this year with this kit I would really be surprised.
------------------------------------------------------------
admin June 16
Posts: 59
Rich - you know I'm loving watching this build. Thanks for sharing it with us here.
Brett
972-618-5563
sierrawestscalemodels.com
-------------------------------------------------------------
Wes June 17
Posts: 13
Nice work Rich. That is going to be a monster when its finished.
------------------------------------------------------------
Posted By :- rtbaron June 18
Posts: 9
Dormers....used wood angle for the corners.
---------------------------------------
Posted by :- rtbaron June 20
Posts: 9
Peliminary roof test.....also used the wood angle pieces for the trim around
the freight doors....
---------------------------------------------------
admin June 20
Posts: 59
looking awesome... man that sucker must be huge!
Brett
972-618-5563
sierrawestscalemodels.com
----------------------------------------------------
rtbaron June 20
Posts: 9
Brett,
My base is 31" x 35". Not too bad considering all the activity going on.
This is probably my limit in a diorama like this. I'm saving a base for the
sawmill which is 24" x 48".
-----------------------------------------------------
-------------------------------------------------------
Karl.A June 20
Posts: 60
Very impressive work Richard, keep the updates coming!
Karl.A
hoN3_rr June 20
Posts: 27
Love the rubber band 'chains' holding the wood on the flats.
I too have to say "WOW" .... this is something!
-------------------------------------------------------
rtbaron June 22
Posts: 9
almost time for the ground work....
---------------------------------------------------------
rtbaron 10:10AM
Posts: 9
Pitch and tar tank. Used disks cut using hole saw on a dirll press.
Covered with 2x6 and used a copper band.
----------------------------------------------------
Karl.A
horizontal bracing 4x6.
keel and supports so the ship can be easily taken off and not damaged. Will put
back in place when ready for scaffolding.
building details unitl I await for the remaining equipment orders.
It's coming together beautifully!!
I hope your order comes in soon so that we can see more.
Karl.A
Getting close to water are we??
Jerry
On top put 1x6 boards and glued into position.
The sign is too big to go on the main building where the lettering
is on the HO kit.
Karl.A
Brett.....
Karl.A
Stairways and porch bring that whole area together perfectly....
Karl.A