
Howdy, Stranger!
It looks like you're new here. If you want to get involved, click one of these buttons!
Categories
- 920 All Categories
- 3 Picture Posting and Resizing
- 53 New Member Introductions
- 111 Off-Topic Forum
- 4 Photography
- 2 Resources
- 16 New Product Information
- 165 The SierraWest Forum
- 9 Brett's Blog
- 117 General News & Ramblings
- 3 Re-Release Information
- 6 Q & A about SierraWest
- 9 What Would You Like to See?
- 361 Builds
- 131 HO Scale Builds
- 154 O Scale Builds
- 59 Finished SW Build Pics
- 12 Miscellaneous Builds
- 187 Techniques
- 19 Working with Wood
- 20 Painting Castings
- 5 Masonry
- 23 Scenery
- 36 Tools and Supplies
- 21 Layout Planning & Building
- 38 Miscellaneous
- 24 Prototype Information
- 22 Reference and Research
Help with New Layout

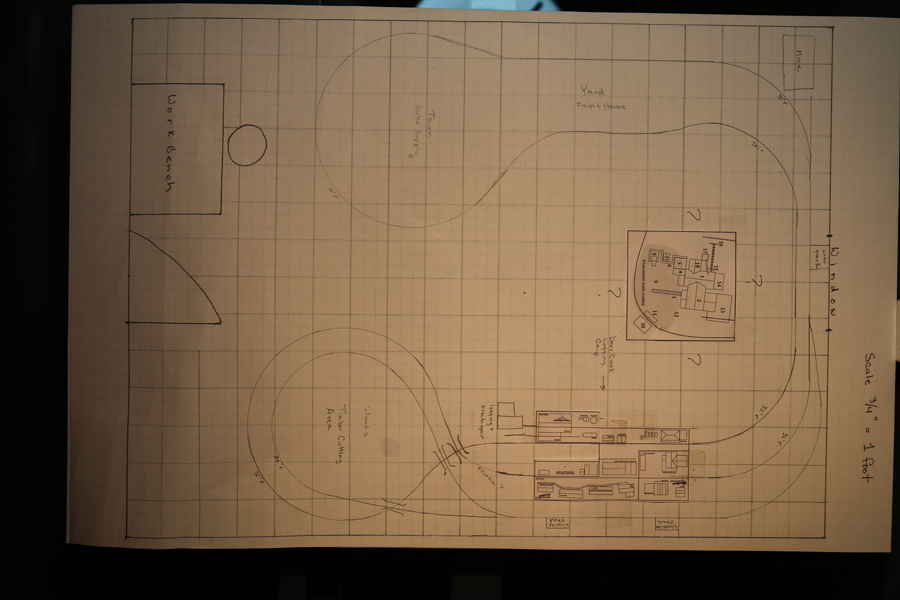
Hey Guys. As you know, I moved and am planning a new layout which will feature many of the S.W. models. My goal is to have a main line that loops and has curves that will accommodate a passenger train. That's why you will see 32" r curves. I'm stumped. I don't know where to put the saw mill. I would like to put it where you see it on the layout, but I'm having difficulties getting the tracks to join up with Brett's suggestions. It may be that I have to rearrange the layout of the saw mill, but I would rather not. Please review the plan below and give me your suggestion. Each square is one foot. The room is 14 x 19. It's hard to get a great picture. Let me know if you need a better one.
Thanks. Phil
Thanks. Phil
Comments
I would suggest putting the sawmill inside one of the loops and make the proposed sawmill area the wood cutting area. The mill in that location would make it easier to put straight tracks into it and the curve for log unloading. The wood cutting area would only need one or two tracks and could employ much sharper curves with a geared engine. If you have not built the other Deer Creek buildings yet make them without mounting them until you are ready to locate them. That will give you much more freedom when placing them in the layout. I am curious what other modelers will have for suggestions.
Best regards,
Mitch
I think Mitch is heading in a similar direction as I was... Maybe place a third loop around the mill creating a backwards "E" - preserving your existing track plan and allowing you to build the new loop to size around the mill. Add a couple spur tracks as necessary for the sorting and burn areas and you are good to go.
I am in the same position as you are and I have been planning my new layout that I plan to start this Fall. The size of mine is about the same as yours 17' x 12-14.5'. I wanted to also run mainline trains and by the use of some hidden tracks for the mainline and a variation in elevations on both the mainline and logging rr was able to come up with a track plan that I liked.
My track plan is basically a dog bone like yours but later added a middle section to form an E like you mentioned above. The saw mill, scratch built, Brett's Locomotive Service Facilities and Main Street, and storage tracks are above the mainline on the upper end of the bone. The other end, lower end, of the bone is a helix with a small town in the middle of it. I was able to fit in a nice switching yard near the town and some mainline industries that will provide manufacturers that will use lumber from the mill. I have a water front area near and below the town for Brett's Shelby Marine Service. In the "E" section I am using this area for the actual logging operation and separate tracks leading to the sawmill. Opposite the logging area I plan on putting Brett's mine tipple kit.
By having different elevations on the layout, having the sawmill area above the mainline you do not need to have parallel tracks in the circle Also with both a mainline operation and a logging operation will make a very interesting layout.
I tried to upload the track plan, but it wouldn't work.
Steve
Email me the plan Steve and I'll upload it for you.
Love seeing these layouts based around Bretts kits come to life.
Karl.A
Also, good news. My workshop, which is separate from the layout room, is almost finished. This will allow me to do the major construction and cutting outside the house. As for my layout room, we are replacing the carpet with a floating floor before I start construction. I will be back to building Brett's kits very soon. My next build will be Main Street. Also, Karl and Brett, would it be ok if I post progress in my train room?
Phil
I second Mitch's comment about not mounting the structures on a diorama until you know how they will fit on your layout. On my Main Street diorama which was built before I had any ideas of a layout, I have it mounted on a 1/2" piece of plywood and I am going to have to do the scary thing and cut it down the street and the rails on my table saw.
I don't know where Karl is, but he must be out back on his patio sipping a beer.
Steve
well, OK, I am, you know me too well.
Get a fine toothed plywood blade for the table saw and don't even break a sweat about it.
Before we went to the last show we cut up Bretts original pilot full diorama of main street, essentials, loco, etc. Brett was nervous as all hell before I started, but after the first cut he was like, "yeah, cut that bit off too, and that bit, and down the street there.
The diorama didn't vibrate at all and the cuts were like going through butter, nothing was damaged and nothing moved, not even barrels or scenery next to the cut. I know its tough to do, but it will be OK.
Definitely have someone there to help you support and guide it, use a new blade and only have the blade high enough to make the cut. But apart from that, once you get started it is easy/safe enough to do.
Guess I better go check my e:mail now.
Karl.A
and Phil yes it would be great to follow your layout (room) progress and construction here in the layout section of the forum. Especially with all the SWSM kits due to be on it.
Karl.A
I don't have an email address for you, or you would have it in a heartbeat.
Steve
Ok, so it begins!!! Here is the layout room with all the boxes and miscellaneous stuff removed. First step is to replace the carpet with a floating floor. I can't have a glue down floor because of the OSB below the carpet. I chose a rough plank design.
Phil
What will be the height of the layout, and will the sloping walls effect placing structures near the back of the layout?
Karl.A
I was also able to obtain a couple of clearance cabinets and started unloading boxes. I'm just about ready to start the layout as well as starting my next SW kit.
I will start a new thread for my next build, but will use this thread to show you the progress of my layout. I will be using an L-girder design and the layout will highlight a majority of the SW kits. There will be a few interloper kits also. My next step will be getting an electrician so I can install my track lighting.
Phil
Karl.A
So why the stripe? First, the bench work will be below the bottom blue. I want the benchwork to be higher so folks can really see these fine kits. Second, I really didn't want to paint the ceiling, so I ended the sky at the track lighting. Later I will add clouds as I add structures and the scenery.
Also, I have finalized my layout. See below.
It may be hard to see, but will feature the Twin Mill Sawmill in the middle, the Deer Creek Timber buildings, the Water Tank, the Mine, the Freight House, Scotia Supply.
Phil
Only one suggestion, If it were my room I would paint everything above the 'sky', blue line in flat black. this will just make it disappear completely. I undertand that you don't want to paint the ceiling, but if everythin up there is black all the focus will be on your excellent models and there will be nothing to draw the eye upwards.
Karl.A
I would vote for continuing the blue paint over the ceiling to give a feeling of space. Having the angled ceilings would pull this off nicely I bet.
Are you going to leave the window as-is or block it with some scenery? I had a similar window and decided to cover it above the layout and it is open below it to let in some light.
I'm big on continuous loops so I can put a train on the track and watch go around the layout. However, there will be a lot of opportunity for a real timber operation.
I'm still thinking about the ceiling. You guys make a good point, but it will be a pain to paint. As for the window, I'll have to wait and see how the scenery fits around it. The plan calls for some fields around that location.
Phil