
Howdy, Stranger!
It looks like you're new here. If you want to get involved, click one of these buttons!
Categories
- 923 All Categories
- 3 Picture Posting and Resizing
- 54 New Member Introductions
- 111 Off-Topic Forum
- 4 Photography
- 2 Resources
- 16 New Product Information
- 166 The SierraWest Forum
- 9 Brett's Blog
- 117 General News & Ramblings
- 3 Re-Release Information
- 6 Q & A about SierraWest
- 9 What Would You Like to See?
- 362 Builds
- 131 HO Scale Builds
- 155 O Scale Builds
- 59 Finished SW Build Pics
- 12 Miscellaneous Builds
- 187 Techniques
- 19 Working with Wood
- 20 Painting Castings
- 5 Masonry
- 23 Scenery
- 36 Tools and Supplies
- 21 Layout Planning & Building
- 38 Miscellaneous
- 24 Prototype Information
- 22 Reference and Research
St Mary Lumber Co
I'll start with a track plan and add on later. This is the current configuration of my layout as an around the wall point to point. It mostly is a main camp on the left with a sub camp and logging operation in the center and a big open space on the right waiting on a sawmill.
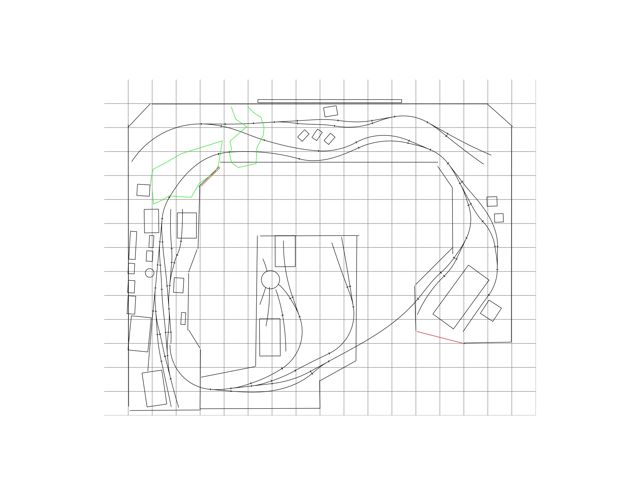
The 2nd pic is a proposed addition to have the option of a continuous run with a lift out, a loco service facility as an extension of the main camp and a 2nd logging area. Though once this addition is added the first logging area may turn into a small mine.
The layout is on30 and is on a 12" grid.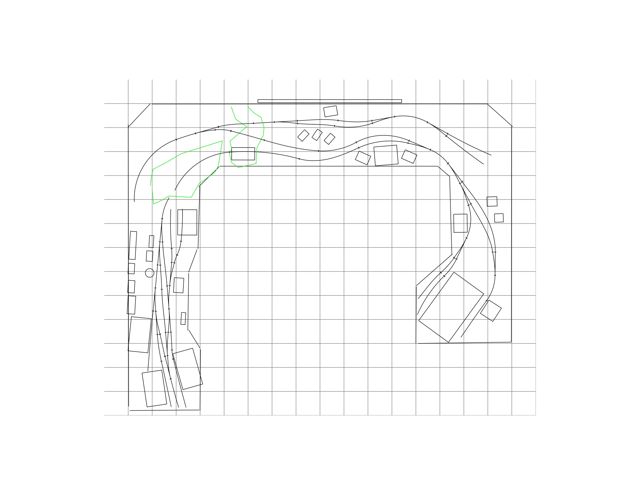
The 2nd pic is a proposed addition to have the option of a continuous run with a lift out, a loco service facility as an extension of the main camp and a 2nd logging area. Though once this addition is added the first logging area may turn into a small mine.
The layout is on30 and is on a 12" grid.
Comments
You've already made a fantastic start on the left side and I am certainly looking forward to watching you progress around the room/layout.
Karl.A
Jerry
The first pic here is an older one where I was using the structures to mark out where sidings should go while laying track. Notice the conduit on the wall. This was leftover from my previous layout. I had installed a backdrop on hardboard on that layout so this was hidden. Experience says that removing this will take a chunk out of the wall that will need to be patched. I chose to paint it as part of the backdrop to see if I could hide it. It still looked bad so I came up with a plan B which was to hollow out a big tree. A tree this size sticks out so I needed a small clump of trees to blend it in...so on with the plan for connect the dots.
Next was to install lights into the existing structures. Much easier to do when building them by the way. Then the first layer of dirt was applied. Once this base was dried I started adding layers of ground covering. Weeds, vines, junk, deadfall, and pine needles. I'm thinking that an end of rail stop of some type and a pile of ties should finish it up.
I've been working on blending in 3 of the 4 SW dios that I have built. The 4th, the Woodcutter Shack is going over near the sawmill since that boiler will need a constant supply of wood and water.
The first photo shows the placement of each dio followed by further close ups. I wanted to look to be cluttered and used but overgrown by weeds. I started by putting in grass then adding junk, weeds, etc. Paths worn in the grass suggest movement between buildings. The tree trunks suggest that this area was logged over years ago and a meadow has creeped in.
I'm still working on adding weeds to the tracks and will probably have some more junk laying around. I'm trying to balance not enough vs too much. Once I'm satisfied with the look and the function of the track I will ballast the turnouts and secure everything with one last dose of matte medium.
If I ever get to do my expansion, the rigging and tool shed will need to move a bit since this is where the expansion will take off from. Not a problem though. The only thing holding these dios in place if the dirt and matte medium. I only need to find the edge if the dio and cut around it and lift it out.
The paths look very natural. Keep posting some more pics.
Thanks Brett. The boiler is from the tractor repair shed. I think it looks at home here.
Thanks for the tip.
The yarder sled started as a dowel I got at Lowes. I believe about 1 1/8". I used a dremel to put some taper in it then attached it to some 1x2 scraps to secure it while I carved out the notches using a #11 blade...well a bunch of them.
The long shot shows the area being worked on. It's about 10ft, and the loader is not in it's final position. I'll get around to a cover for it soon. I used a smaller diameter tree and logging blocks in the distance. It's nice having these excellent castings available to make the scene look right.
John
I did paint the backdrop myself. I found lots of resources online. I particularly liked this tutorial:
The key is painting from back to front. Using subtle colors. And painting a haze on each layer as you move forward. I just used a white wash so the sky got several coats, the back mountains 1 less, the next set of ridges 1 less etc.
Here are a few progress photos. I tried to keep the foreground trees the same size, shape and colors as the model trees.
I used thick acrylics and applied the paint thick for texture.
Karl.A
John
This set of pics shows some of the sizes of trunks I used. This grouping will be extended to fill in the spaces so almost this entire corner will be wooded. Getting in closer you get a feel for the trunk sizes, and getting in much closer you see what gives the grouping a forest feel...the forest floor. (it also hides my lack of root structure).
I've also used trees for camoflauge. The big trunk on the last pic hides a wire conduit going up the wall. The back of the trunk is flat against the wall with a channel carved in it. The big tree stumps in the foreground make this big tree seem right at home.
Carl
Yes Steve, the gnome is fishing. I'd hate to see what he catches. I put some goldfish in that body of water along with railroad ties, tires, rusted barrels, etc.
Geezerbill