
Howdy, Stranger!
It looks like you're new here. If you want to get involved, click one of these buttons!
Categories
- 920 All Categories
- 3 Picture Posting and Resizing
- 53 New Member Introductions
- 111 Off-Topic Forum
- 4 Photography
- 2 Resources
- 16 New Product Information
- 165 The SierraWest Forum
- 9 Brett's Blog
- 117 General News & Ramblings
- 3 Re-Release Information
- 6 Q & A about SierraWest
- 9 What Would You Like to See?
- 361 Builds
- 131 HO Scale Builds
- 154 O Scale Builds
- 59 Finished SW Build Pics
- 12 Miscellaneous Builds
- 187 Techniques
- 19 Working with Wood
- 20 Painting Castings
- 5 Masonry
- 23 Scenery
- 36 Tools and Supplies
- 21 Layout Planning & Building
- 38 Miscellaneous
- 24 Prototype Information
- 22 Reference and Research
Painting those Details. The Basics. (Karl. A)

Brett's kits are famous throughout the hobby for having the highest quality detail parts available in the market and there are more packed in the box than can be found anywhere else.
The details are beautifully and cleanly cast, with continually new and original details being mastered for each new kit release.
As with every stage of building a SierraWest kit the process of working with the many detail castings is explained thoroughly in the manual. Follow and master those instructions and you will be very happy with the results.
In this thread I am going to go over the basics of painting the castings with the simple methods that yield excellent results. Once these basics are mastered they can be used as a base for more involved techniques or developing your own methods.
Mastering the basics will give a good understanding of how things interact.
I never said that I was the tidiest person, but this shows the workspace....
everything pretty close to hand, a selection of the most used paints, brushes, foam bases for holding the castings, an old rag to dry them on, dish of water to clean brushes ( It is easy to knock over a cup of dirty, paint coloured water, thereby ruining a perfectly finished structure wall that you had carefully put to one side while painting details. It is much harder to knock over a dish. Trust me, I know !). And other various modeling 'stuff' .
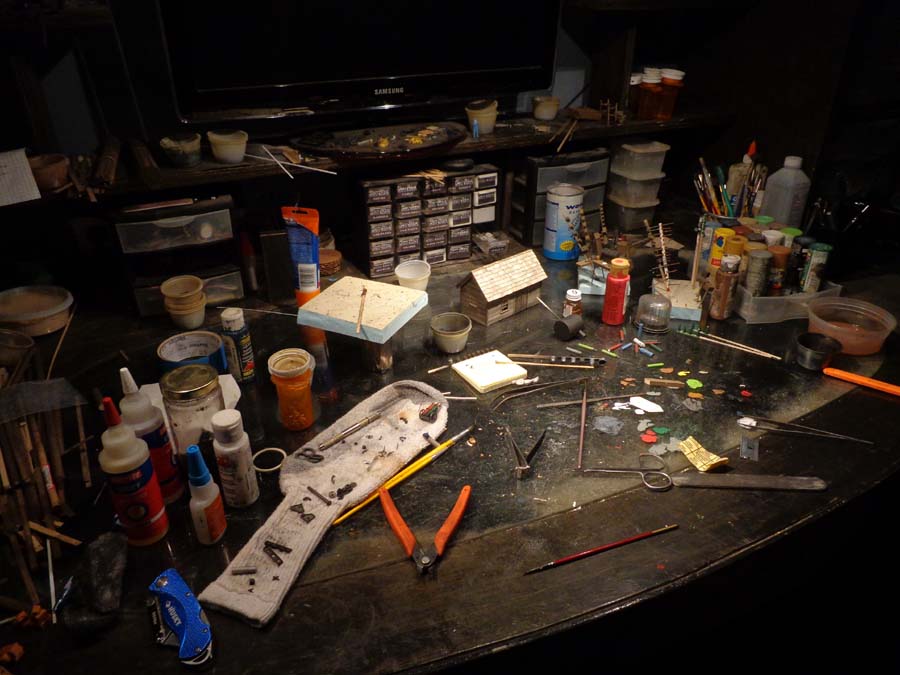
The benefit of working on glass is that you can mix the paints and chalks right where you are working, going in and out of each as you need them. It's also really quick to clean up after a session with a single edge blade. Glass is also perfectly flat and can aid in ensuring something is level, tanks/barrels standing up straight etc... If not a full glass table top then a piece of glass on the bench is most beneficial, you wont go back.
A small selection of HO castings to work on, I tried to get a good representative variety.
One of the most important things for me is to be able to hold the part I am working on securely and steadily.
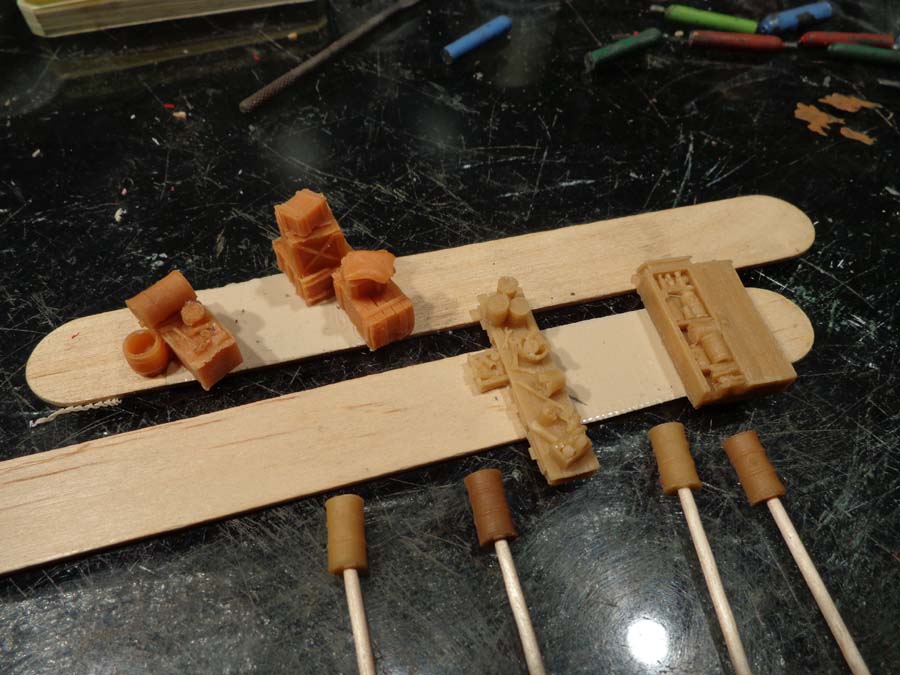
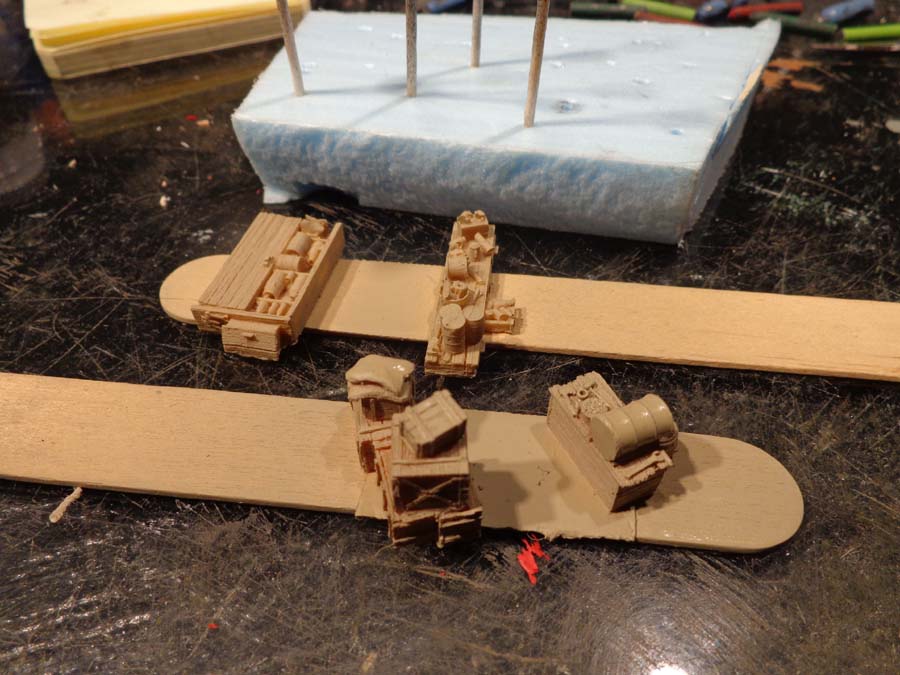
To this end I like to use double sided tape and either popsicle sticks or coffee sticks to hold the details as I work on them. Easy to work around all sides of the casting and no fingerprints in the finish.
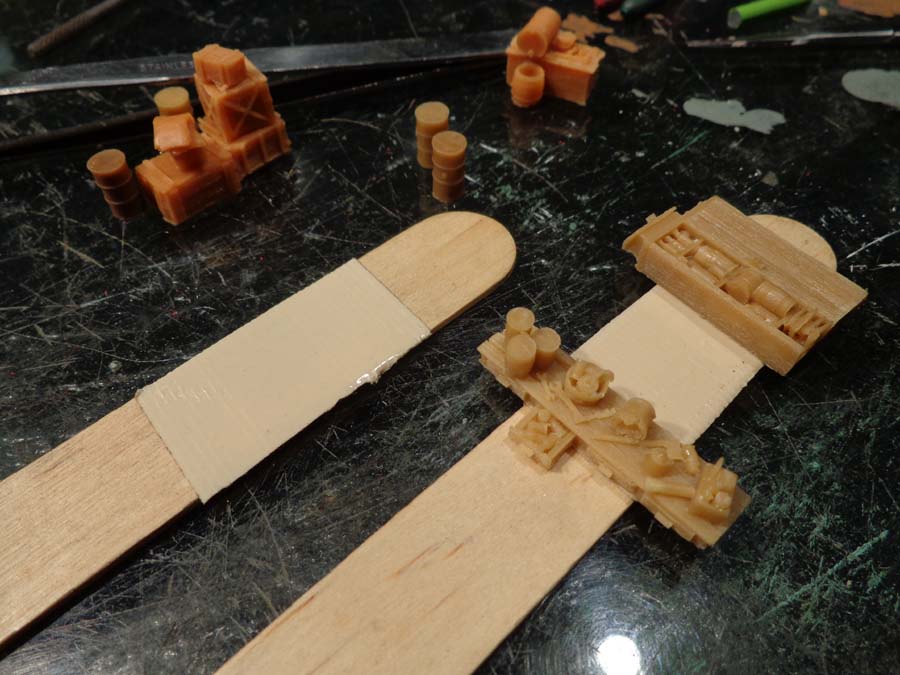
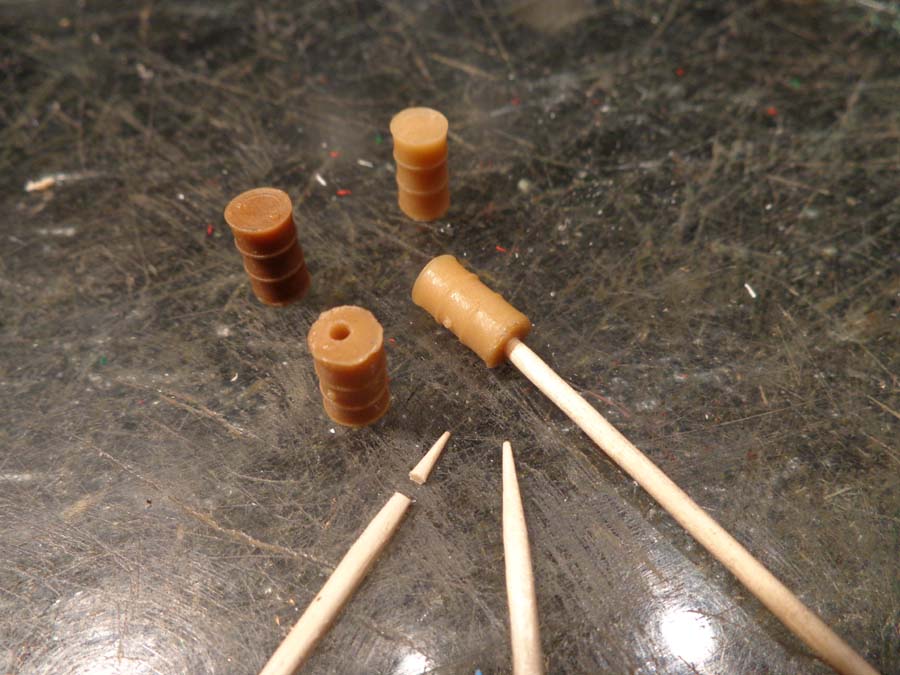
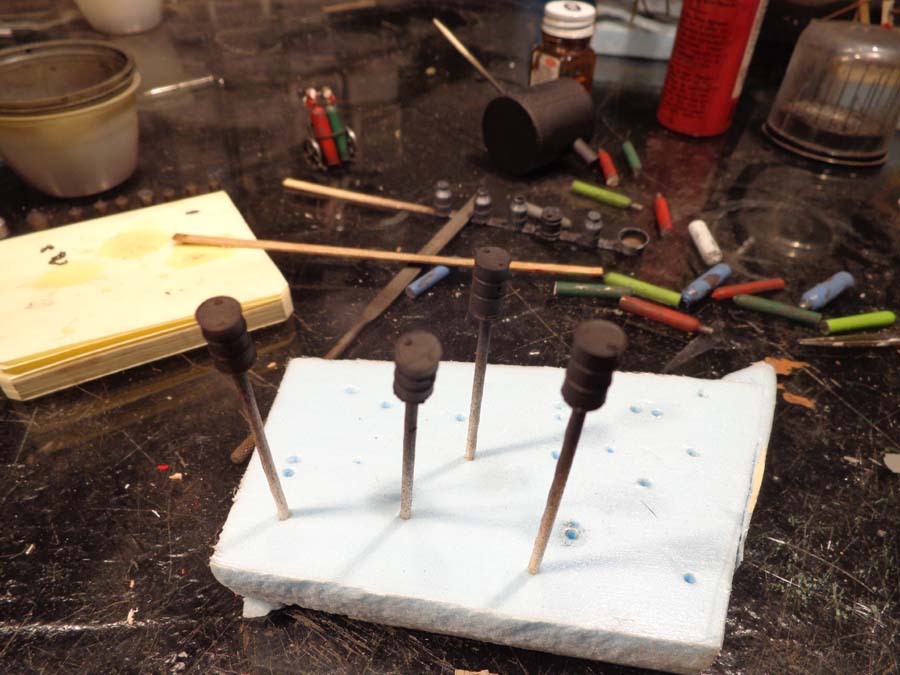
For barrels and drums I like to be able to twist them as I work on them so a hole is drilled in the bottom and a toothpick inserted. Certainly not a new idea and not mine, but, it does work great.
Snip off the point of the tooth pick before inserting it in the casting, this way you wont need to drill so deep which is critical on some items. You want a nice tight fit, the pick will 'squeek' as it grips the casting when you push it in.
Ready for paint....
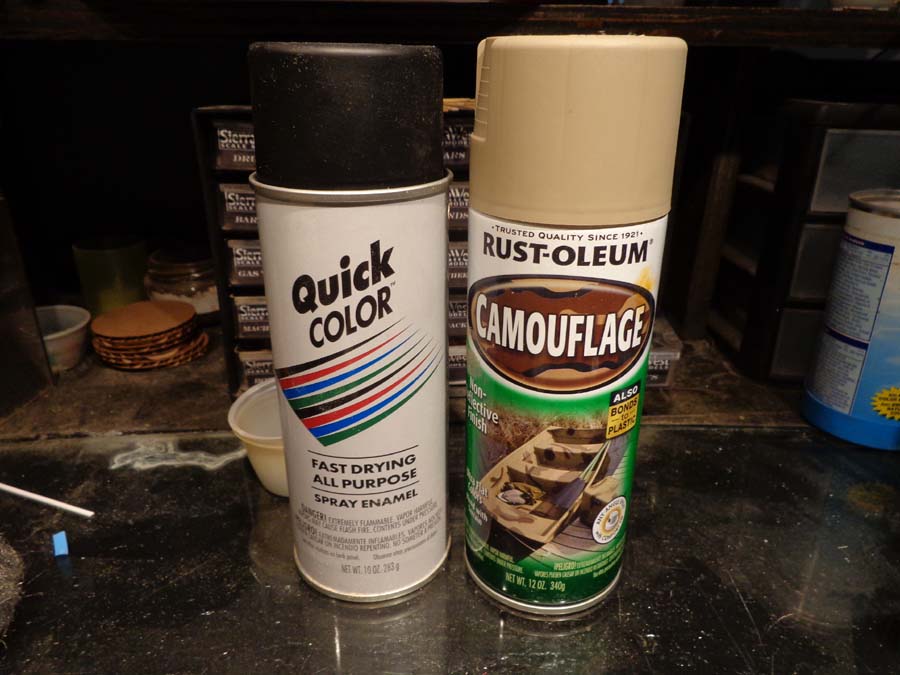
For base coats I prime with rattle can paint. Anything that represents wood I spray with Rustoleum Camoflage "Khaki" a light tan colour almost identical to floquil earth (except in price).
Anything that represents metal gets sprayed flat black, I use either the Wal-Mart or Home Depot in store 99c cans, they contain a fine pigment that will not obliterate the fine details.
When spraying move the can side to side across the casting, about 6-8 inches from the casting, turn the casting after each pass, you want even, light coverage.
Let these dry well and then it's time for the fun stuff......
Karl.A
The details are beautifully and cleanly cast, with continually new and original details being mastered for each new kit release.
As with every stage of building a SierraWest kit the process of working with the many detail castings is explained thoroughly in the manual. Follow and master those instructions and you will be very happy with the results.
In this thread I am going to go over the basics of painting the castings with the simple methods that yield excellent results. Once these basics are mastered they can be used as a base for more involved techniques or developing your own methods.
Mastering the basics will give a good understanding of how things interact.
I never said that I was the tidiest person, but this shows the workspace....
everything pretty close to hand, a selection of the most used paints, brushes, foam bases for holding the castings, an old rag to dry them on, dish of water to clean brushes ( It is easy to knock over a cup of dirty, paint coloured water, thereby ruining a perfectly finished structure wall that you had carefully put to one side while painting details. It is much harder to knock over a dish. Trust me, I know !). And other various modeling 'stuff' .
The benefit of working on glass is that you can mix the paints and chalks right where you are working, going in and out of each as you need them. It's also really quick to clean up after a session with a single edge blade. Glass is also perfectly flat and can aid in ensuring something is level, tanks/barrels standing up straight etc... If not a full glass table top then a piece of glass on the bench is most beneficial, you wont go back.
A small selection of HO castings to work on, I tried to get a good representative variety.
One of the most important things for me is to be able to hold the part I am working on securely and steadily.
To this end I like to use double sided tape and either popsicle sticks or coffee sticks to hold the details as I work on them. Easy to work around all sides of the casting and no fingerprints in the finish.
For barrels and drums I like to be able to twist them as I work on them so a hole is drilled in the bottom and a toothpick inserted. Certainly not a new idea and not mine, but, it does work great.
Snip off the point of the tooth pick before inserting it in the casting, this way you wont need to drill so deep which is critical on some items. You want a nice tight fit, the pick will 'squeek' as it grips the casting when you push it in.
Ready for paint....
For base coats I prime with rattle can paint. Anything that represents wood I spray with Rustoleum Camoflage "Khaki" a light tan colour almost identical to floquil earth (except in price).
Anything that represents metal gets sprayed flat black, I use either the Wal-Mart or Home Depot in store 99c cans, they contain a fine pigment that will not obliterate the fine details.
When spraying move the can side to side across the casting, about 6-8 inches from the casting, turn the casting after each pass, you want even, light coverage.
Let these dry well and then it's time for the fun stuff......
Karl.A
This discussion has been closed.
Comments
Usually I would be doing this 30mins after spraying, there is no need to wait for two days, but, I'm working on other stuff too.
We will start with the wooden portions of the castings. Generally when working on a kit I will pull all of the castings with 'wood' on them together to make things easier.
Using a single edge blade I will scrape several shades of chalk into a fine powder. The shades I selected are similar but different enough to provide variety.
Here is the desk ready to start with the basic supplies.
Castings....
Three shades of chalk.
Single edge blade.
Clean alcohol
Small round brush
I work light shade to dark, because, the darker shades will cover the light if needed.
Dip the brush into the alcohol and swirl it next to the light chalk. Move into the edge of the chalk and drag some chalk into the alcohol mixing it into a paint. Add more alcohol or drag more chalk as needed.
Use this to 'paint' one of the crates. Work through your castings painting various items with this shade.
Once a random selection are coloured move onto the next shade and repeat the process 'painting' adjacent items with a different shade.
If you are doing this for the first time you will see that it doesn't look like the chalk is covering the casting very well. Especially with lighter colours. Do not be tempted to pile on the chalk or make a thicker mix to get better coverage. As the wet looking casting dries it will leave the dissolved chalk behind and the colour will show through.
For the first timers try a medium shade first on a casting, paint some chalk on so that you get a wet streaky look, a cabinet door or side is good for this. As the alcohol evaporates the coverage will show through and you will see that there is a lot more colour on there than you had thought. The alcohol will evaporate off in about 20-30 seconds so it is a very quick to see process. You should get a feel for this relatively quickly.
The beauty of this experimental stage is that it is very easy to wash the chalk back off and practice as often as you need with no ill effects.
Continue working through the castings until all the wooded portions are coloured. If necessary you can go back over areas to 'fill in' colour where needed.
As you can see from the following pics there is no need to be careful of other details that are cast in and will be painted later. All we are doing at this stage is getting our base colour down, quick and simple.
Note:
As you are painting your castings with the C&A ( chalk & alcohol ) your puddle
will rapidly dry out.
Simply dip your brush into the alcohol and add it to the puddle, consistently
mixing as you work adding chalk or alcohol as needed, very quick, very simple.
A quick swirl in the alcohol of the brush is all that is needed when changing
shades, which I usually only do when going from dark to light.
So, now all your castings have their base wood colour in various shades, we can move on to the next step.
Allow the C&A puddles to dry and turn back to chalk, using a SEB scrape the chalk back into their respective piles.
Tip:
Personally I have several old pill bottles with alcohol in them for the most used shades of chalk that I use. They have the tops that can be inverted. I will scoop up the excess chalk and store it in the cap.
No, I'm really not that tight fisted to save a little chalk, They make it really easy to do touch ups throughout the builds. Cut board ends etc. Just grab the right pill bottle, take off the cap, dip in the alcohol, dip in the chalk, do the touch up. No need to clear a space, scrape some chalk make a puddle when you are in the middle of something else.
Karl.A
Time to get some colour on these castings so here is my most used paint selection for general casting painting.
Christmas Green
Midnight Blue
Pinwheel Blue
Lipstick Red
Raw Sienna
Burnt Umber
Pewter Grey
Bright Yellow
Black
White
I generally just paint these straight without thinning, most have a good consistency. The only one I add water to is the red as it is too thick.
I like to start off with all the parts of the casting that represent metal. For these I paint around 75% black.
The brush here is a fine detail brush, not super expensive, mid-range, about $4 I think, it is 10/0.
I like to paint out of the cap, I shake the bottle well take the cap off and use that as my 'resevoir'.
I dip the brush into the paint and then onto my glass surface, I'll work the paint into the bristles about half way up with a few swirls and then wipe off the excess. Rolling the brush in the edge of the paint will give it a nice fine point. Be carefull not to have too much paint on the brush, things will get real messy real quick.
Work around the castings painting anything that is obviously metal with the black.
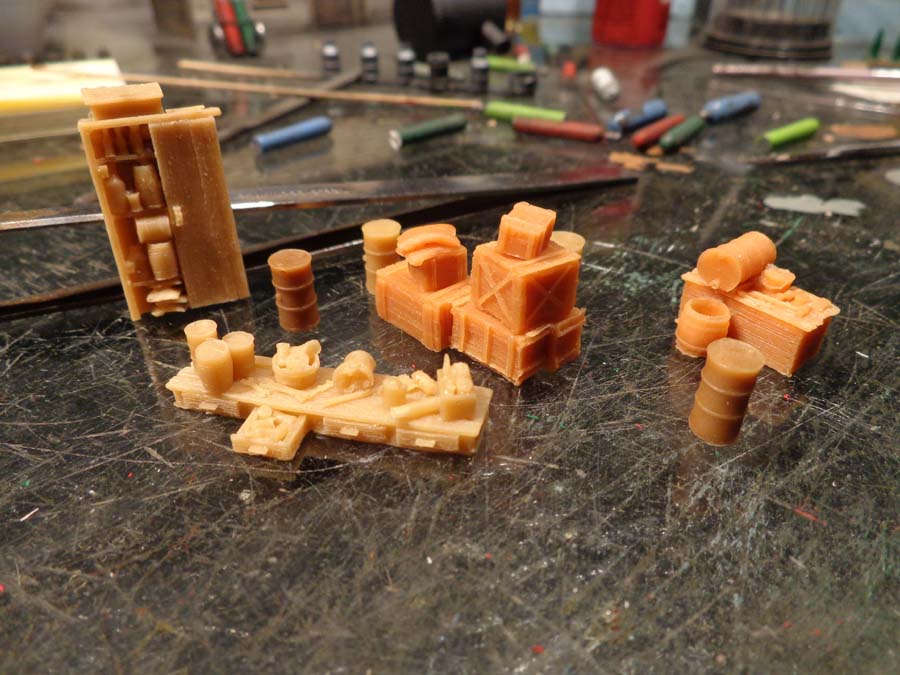
Brett's castings are loaded with details, even the details have details. The buckets, crates and drawers are generally filled with items, ( I think he does this just to show off his skills ! ).
With the black I will paint some of the larger items in these "parts containers" such as cogs or pipes and will also paint down into the recesses with the black.
Back to the bigger items.
Once I think I have painted almost all of the items that are metal I will switch colours. This time around I switched to green. I like the Christmas green for glass bottles. I go around the castings and paint all the bottles, I usually try to leave one or two and do them brown or white for a variation.
Now that my bottles are done it's into the blue for a couple of items. Don't worry too much about what some of the generic items are at this stage. A canister, jar, storage container can easily be many colours (pink is not recommended).
On the bench casting shown below with the large black oil drum you can see I painted a small round 'thing' blue. Now, this may really be a piece of machinery, it may be a section of pipe, or, something else.
I decided it can be an old coffee cup, without a handle and I'll stick a pencil or two in it later.
If you're not sure what something is don't sweat it, either leave it for later and it may become apparent, or, paint it a nondescript colour , a little dry brushing and some chalk and it will look great.
Next up is red, red is a very strong bold colour so I use it very sparingly. A small spot of red can easily overpower a casting. Look at the picture below, at first glance your eye is instantly drawn to the red, even though there is only a tiny amount of red on the castings. Keep this in mind as you are painting. Red may be your favourite colour, but use it sparingly.
Another colour I like to use for metal parts is Burnt Umber. I will go back around the castings and paint the items I purposefully left earlier. Also as I have been painting the other items and other colours I will have discovered a bunch of other metal parts that I missed the first time around. It doesn't mater how hard I scrutinize the castings I always miss a ton of detail.
I also go back to the full parts buckets/drawers/crates and paint about half the items in them randomly with the burnt umber.
Raw sienna as well as burnt umber is a good 'rust' base colour. I finish off the misc. draws and such with the raw sienna and a touch of grey. At this point I also noticed the coffee pot sitting on the bench, I swear it wasn't there earlier!!
So I painted this grey also, in the hopes of achieving a galvanized metal look later on.
Well, that's pretty much all the colourful stuff finished, time to go back to the wood base clours and complete the wooden crates and kegs that appear on the shelves and benches, but that will be next time.
Karl.A
Almost time to start working on that "subtlety" I'm always going on about, but for now the bright colours can stay for a little longer.
Here are three more of my standard colours.
Sandstone
Nutmeg Brown
Blackened Steel
The sandstone is a nice, lineny, off white, light tan colour that I like to use for sacks. It's also good for dry brushing as it is not a harsh white and great made into a wash for stonewalls. Here I have used it for the sacks.
The nutmeg brown is a colour I like to use for handles on tools primarily. It is a nice 'woody' colour to me and dirties up nicely with a little chalk.
I sure did get messy painting those handles....
Tip.
If I get some colour in the wrong place and paint on the detail next to the one I am actually supposed to be painting I leave it for a minute to dry. I keep a sharpened tooth pick on the bench when painting castings. Once dry any stray paint can be quite easily scraped away with the point of the pick leaving you with a nice tidy paint job again.
Once all the tool handles were painted the only things left were the small crates and kegs on the shelves and benches.
These were 'painted' with C&A using my small brush. I used the darkest of my three shades to give them some contrast with the other wooden portions.
Another place I often use the nutmeg brown is for the bands on the barrels. I also keep the toothpick handy when doing this task.
Well that just about finishes up all the base colours on everything, now its time to use a few basic techniques to finish things off.
Starting with the "blackened steel", I put a tiny amount of paint on the end of the brush and then wipe most of it off on the back of my hand. There is more paint left than if I was dry brushing but I want the black to show through. I very lightly run the brush over the details where I want a metal look over the black base.
You can see in this super close up how the black is still visible and how much depth that gives to the metal areas. There is much more paint than dry brushing, however the parts are not painted. I call it "damp brushing", kinda in the middle. I really like how these came out, and super easy.
I also added some areas where the red paint had worn off the handles, dull that down later.
The hammer was done in the same way as the wrenches. For the axe heads I placed the damp brush at the cutting edge and lightly dragged it back towards the handle. Most of the paint was left at the cutting edge and very little made it all the way back. I think this gives the impression of a sharp used blade which is polished at the business end from use and still has that metal look but slightly oxidized at the back.
You will notice in the next pic that I have significantly dulled down the raw sienna that was in the three spare parts containers. It was just way to yellow/orange and bright, and also there was too much of it. I damp brushed some burnt umber over the raw sienna to mute it down.
Once this was dry I then stayed in my blackened steel and I dry brushed the various metal parts in the containers. This dry brushing will peek through the final chalk layer at the end.
More tomorrow...
Karl.A
I'm going to split this down into two or three posts, there is quite a few pictures to include and I get bored easily so I can take a quick break at various stages....
A little enhancement is required for the three barrels featured on the castings, now sure, they're painted, nice and neat and a lot of times they would be left as is. However with next to no effort or time they can be elevated to the next level and really look good.
I will start by painting the tops white to give them some interest ( "holy cow, bright white?The guy talks about subtlety and things just keep getting brighter...." ).
The easiest way I find to do this with a nice clean sharp edge it as follows. Load a small brush up with the paint and starting in the middle of the top of the drum lightly draw it out and off the edge. Use as little pressure as possible so that the bristles don't bend and come down the side to spoil the finish.
A few quick, light strokes from different angles is usually all it takes, depending on you base colour contrast you may need two light coats. Also remember that the top will be weathered and chalked so it really doesn't need to be a perfect solid finish, too thick paint will spoil the finish.
When I had finished painting the barrels I wipped all the paint from the brush and dry brushed again the misc. clutter drawer and bucket for some extra highlights.
Once the white was dry I grabbed a jewelers screwdriver that was close by and added some relatively small scratches to the top of the drums.
I also added a few chips to the sides of the drums.
Time for some A&I...
I poured some A&I into a small container to work from (don't ask me the ratio as I have no idea, the main jar has had ink or alcohol added to it as needed over the past 6 years. I guess it's a medium strength in the scope of things..
I dip the small detail brush into the A&I checking that it is loaded but not dripping, then lightly touch an area of the casting where two items meet and I want to add a shadow or definition.
I worked all around the bench casting twice and a little extra here and there. Then moved on to the cabinet.
I'm just going to do the outside of this one to highlight the boards. I want to use a very small amount of A&I and have it run down the board joints.
Again having a wet brush (but not dripping) I hold the casting vertical and lightly touch the top of the joint. Thus allowing a small amount of A&I to run down the join but not so much that it runs down the face of the casting, quick and simple when you get the hang of it. If you do get too much A&I on the face and feel like it is too heavily done simply let it dry, re-evaluate the look and if necessary brush on some of the chalk (dry) that you used to colour the casting originally, this will mute or even obliterate the A&I.
Once pretty well dried I inverted the cabinet and repeated the process from the top edge running down.
Time for a quick break while that dries.....
Well, actually it dried about an hour and a half ago, but, I'm taking 5 anyway.
Karl.A
Side note...
In the last picture of this post you can really see the difference between the white on the oil drums and the "sandstone" used to colour the sacks.
Subtlety is one of the most important techniques (in my opinion) for creating realism in our models.
Whether the models are for the layout, the contest room, sharing with fellow modellers here on the forum or just personal enjoyment. Subtlety is a key ingredient.
I'm going to achieve this through the use of chalks, starting with the misc. junk drawer and bucket. Chalk colour is 411.3 and I'm using a small brush again.
Load the brush up with some of the dry chalk and dab it onto the areas for a rust finsh, I worked it down into the crevises.
A couple of light blows to remove all that excess chalk and the effect is really quite pleasing. Also notice how that subtle dry brushing is peeking through the rust.... nice.
Next I finished up the oil drums.
Again I picked up some dry chalk with the brush and dabbed it where I wanted it. Concentrating primarily on the scratches, which is why the need for the small brush.
Again a light blow to remove the excess chalk.
As well as removing the excess chalk the blowing action in this case will give you a nice diffused rust effect, moving out from the scratches where the chalk was concentrated.
At that stage the white still looked too bright for me, so, I repeated the process once more to dull down the brightness.
I repeated the "dab and blow" process for the scratches/chips on the sides of the barrels.
Dab.
Blow.
The last thing to do was to dull down the other colours, the red, green etc and to dirty up those handles. For this I used my darkest wood shade, the 408.3. Using the small brush I specifically lightly dabbed this on the remaining items, and blew it off.
Moving onto the cabinet I stayed with the 408.3 as my dulling agent but stepped up to a slightly bigger brush as I'm not being too specific with this casting and just doing a general 'dull down' of the items on the shelves. Again using the dab and blow technique. Lightly dab the chalk onto the area to dull down, work it into the crevises, and blow it off.
Top shelf done.
Full interior done, I also used a little rust colour on the sideways black drum in the middle.
The final step was a quick dab and blow of rust colour on the door handle and hinges.
These two are ready for a diorama.....
Break time, again....
Karl.A
The front face of the drum was painted white as before and then some chalk was scraped.
Black chalk, a force not to be taken lightly. This stuff is extremely strong in pigment and only needs to be used in very small amounts to get the desired effects. Too much and you could find yourself back tracking quicker than a Ferrari in reverse. But hey, now that I have put your mind at rest lets move on.
Instead of using the A&I for the shadows and definition this time I'm using the black chalk. Using the smallest brush I dip in the chalk (dry) and line the edge under the lip.
The excess is blown off. I repeated this under the lip on the sides also.
Next I moved onto the bench top itself. Again dipping into the dry chalk, shaking off any excess and then carefully adding the chalk along the edges of the cast in details. Very little chalk is needed and a fine pointed brush.
Any loose chalk was again blown off leaving a shadow effect around the items.
Hapy with the bench top I moved my attention down to the bottom of the casting where it would sit on the floor. I lined the perimeter where it would contact the ground and blew off the excess. Maybe simulating damp, or just grime or... whatever.
Whatever I was simulating it ended up a little too heavy a finish.
Using a clean brush I went to my 408.3 wood colour and blended it over the black, this toned down the effect nicely and I could move on.
Using a larger brush I used the dry 411.3 and dusted the oil drum main body lightly.
The tub of parts on the bench next to the oil drum and the scratched white face of the drum was given the "dab and blow" treatment on the scratches as before, and then a light dusting on the drum to tone it all down.
Finally using the small brush some black chalk was used around the spout to show a dusty, oily, messy finish.
I think that's it for today.
Karl.A
Despite there being quite a lot of text and pictures on the previous two pages it is good to remind ourselves that we really haven't done that much work to get these results.
Essentially we have completed only three basic processes on these castings.
1) The primed castings were coloured with a C&A wash.
2) The smaller cast in details were painted (some then chipped)
3) The finished castings were weathered and dulled with dry chalks
Karl.A
Sure, we can all slap some red or blue paint on an oil drum, glue it down and call it done. However with a little basic work we can improve their look.
The castings were prepared as described earlier in the thread.
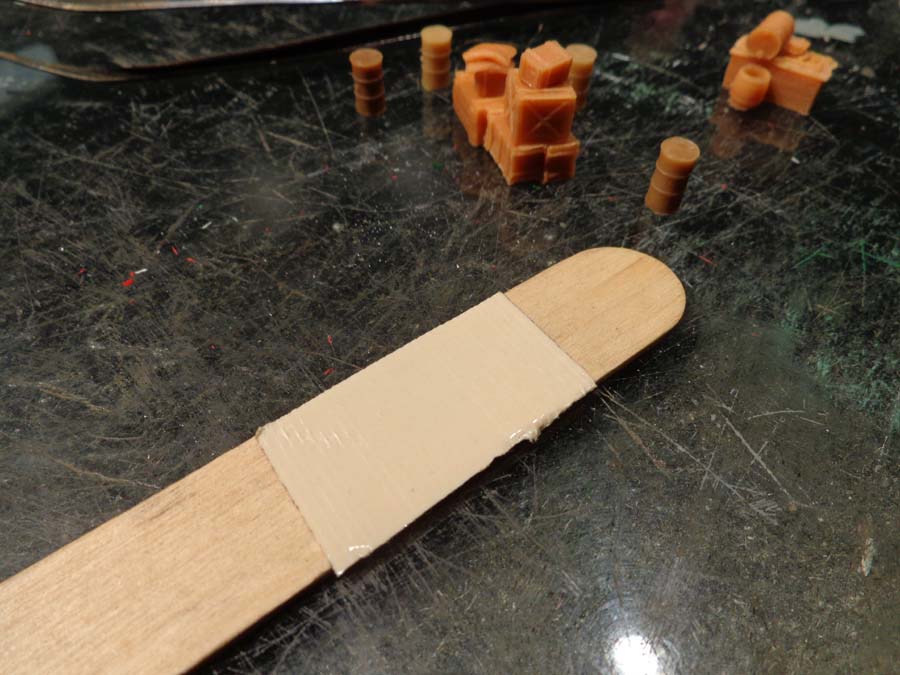
The small crates are attached to coffee stir sticks using carpet tape.
I place the crates on the tape at 45 degree angle. This allows me to paint all four sides and the top easily with no obstructions. I also use this method when doing benches, cabinets, shelves, etc.
The castings were spray primed as before, Khaki for the wood and black for the metal.
The base colours were then applied as described earlier.
Painting the bands on a drum is a relatively simple process utilizing the toothpick handle.
Carefully paint between the ridges while rotating the toothpick between your finger and thumb.
After the paint has dried, which may take two light coats for the white, you can clean up any overpainting with either a thumbnail or a toothpick by running it around the outside of the ridge. You should now have a relatively straight line of difference.
The top of the drum is painted as described earlier in the thread to get a nice clean edge.
I will generally work through all of the castings bringing them to the same point in the process.
Chips and scratches can now be added to these details to give them more interest and realism. I try to keep the scratches and chips small on items that are supposed to be in use.
As with many of the great techniques we learn from Brett's incredible manuals overdoing the effect can sometimes spoil it and become a negative. Subtlety !
Scratches can be made with either a thumb nail, or maybe a toothpick...
Even a jewelers screwdriver or dull exacto blade. When using something sharp like this remember to use very little pressure, you only want to take off the coloured paint not the black base.
Again I will work through my selection of castings at one time. I find it easier to do the one process throughout while I have the tools in my hand, also repetition is good practice.
Now it is time to work on the wooden barrels with some chalk. This is now my preferred method for painting the bands on barrels. I gives a nice rust colour with a dusty dry rust textured look very easily.
We are using the 411.3 rust colour mixed with alcohol. This time we need to be a little more careful of our consistency, too much alcohol and the colour will flow too easily from the bands, which we obviously don't want. A little practice is all it takes.
Also if a little of the chalk gets on the barrel it looks like the rust is leaching into the wood and not like a sloppy paint job.
If you wander too far off the band it can be removed with a tooth pick or covered back over with the original barrel colour.
As with the oil drum the toothpick handle makes a simple job of rotating the barrel while carefully painting the bands with the C&A. I complete one band all around before moving to the next.
The finished item.
We will stay with the 411.3 rust colour for the effects on the oil drums and tanks.
This time however we will be using the chalks dry.
We will once again be using the "dab & blow" method from earlier.
Dip a small dry detail brush into the dry chalk and lightly dab it onto the casting, do this specifically over chips and scratches.
Lightly blow the excess chalk from the casting. Where the chips and scratches are the black base will show darker through the remaining chalk, thereby looking like old exposed rusted metal. The diffused chalk left on the paint will look more like surface rust and rust coming out through the paint.
That's my theory anyway and I'm sticking to it.
Repeat the process on the other items you have ready and waiting.
Sometimes all you need to do with an oil drum is prime it flat black and using a slightly bigger soft brush dust on some chalk. One or two of these abandoned out of the way on a dio also look great.
Wooden crates in the next post.
Karl.A
The wooden crates were primed as shown earlier with the Khaki colour and then coloured randomly with the three shades of chalk.
To enhance them a little I give them a light dry brushing with the 'sandstone' and then a dip in the A&I.
In my own personal modeling I really do very little dry brushing unless it is for a specific reason or item. Some like to dry brush everything. It's a personal taste thing I guess. For me there is a time and a place.
Regardless of that here is how I do it....
I'll dip the end of the brush into the paint picking up just a little.
I will then rub as much of this off as I can into an old rag, generally in a circular motion. This will do two things, it will remove the paint from the outside of the bristles, it will also work the paint up between the bristles into the center of the brush, kind of like a reservoir.
Once I think I have removed enough paint I will run the brush over the back of my hand to test. Usually there is more paint than I thought and I remove some more and test again.
Once happy with the amount of paint being released I lightly brush the casting at 45 degrees to the grain or ridge that I want to highlight. Lightly brushing will build up the highlight. The beauty of the chalk base is that if you add a little too much paint a quick rub with a fingertip will blend it into the chalk base.
When happy with the dry brushing I will give the castings a quick dip in A&I. I don't do this for all of them just a random selection.
My A&I is in a pickle jar, it's great for staining 8" lengths of O scale stripwood quickly, the jar is about half full. I'll just add alcohol or ink as needed based on the results or level in the jar.
Shake up the jar to get an even mix, then I quite simply grab a stick of castings, dip them in the jar and swirl them around, shake off the excess A&I and put the stick on a rag to dry. The castings in the white circle were not submerged, for a slight contrast in finish.
After about 10 minutes the castings were dry and ready for placement in the scene.
I'll post a group shot tomorrow of the details we have worked on and finished throughout the thread.
I hope this thread has been beneficial to some of you out there following along and I look forward to seeing some of your results.
Karl.A
Job Done.
Karl.A