
Howdy, Stranger!
It looks like you're new here. If you want to get involved, click one of these buttons!
Categories
- 920 All Categories
- 3 Picture Posting and Resizing
- 53 New Member Introductions
- 111 Off-Topic Forum
- 4 Photography
- 2 Resources
- 16 New Product Information
- 165 The SierraWest Forum
- 9 Brett's Blog
- 117 General News & Ramblings
- 3 Re-Release Information
- 6 Q & A about SierraWest
- 9 What Would You Like to See?
- 361 Builds
- 131 HO Scale Builds
- 154 O Scale Builds
- 59 Finished SW Build Pics
- 12 Miscellaneous Builds
- 187 Techniques
- 19 Working with Wood
- 20 Painting Castings
- 5 Masonry
- 23 Scenery
- 36 Tools and Supplies
- 21 Layout Planning & Building
- 38 Miscellaneous
- 24 Prototype Information
- 22 Reference and Research
Woodcutter - O Scale - removable roof
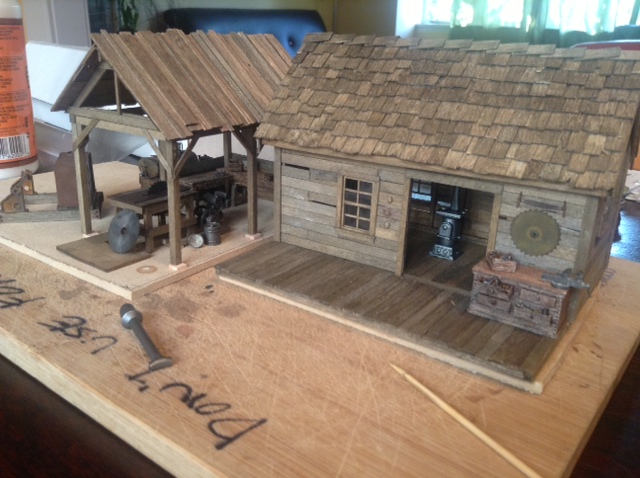
Woodcutter Shack with removable roof (that's why there is a facia board as opposed to exposed rafter tails). Plan is to detail interior and light it with an LED. I'm building the scenes on separate palettes - makes work easier plus I haven't designed the base yet. They will all be blended in at the end. This is pretty much the first thing I have ever built - at least in 35 years or so. I'm stoked how easy these techniques are. For any newbies- dive in! You'll figure it out.
BTW - the saw blade leaning against the table saw is a real blade for a mini tool! I ordered the blade from Walthers (80 teeth I think). Blackened real nice and is the right thickness. Will probably add a bolt ring. Nothing in the photo is glues down yet of course.
Comments
I love the roof of the open shed. Id like to see some close up pics of the shed. Did you scratch the table saw?
Jerry
Here is some bits. To answer Ken's question, most of the rusting was done as per the manuals with chalk. I did some with "Sophisticated Finishes" rusting solutions/ paint. I bought some on a whim, not thinking I'd use it as on some blogs it's poo poo'd. But I've come around to the stuff- if used sparingly! It's not a substitute for chalking. But it does add variety. In the photo, the tank and the pipe by the saw blade were done with this stuff, as was some of the metal bits on the sled. Pros: it's real rust! Cons: it's real rust- meaning it will continue to rust over time unless sealed (which I've done). The rust also darkens over time (which is what rust does).
That cabinet with the single door is a neat piece.
Jim
May take a few hours or days before the rust forms- one can also brush on more solution to increase effect. Will continue to rust for weeks or even months.
Karl.A
Also some fantastic work on the details, benches look superb, hard to see the drums and tank but from this view they look a bit plain. Maybe some streaks in the tank and some chips on the drums, of course this may already be done or planned.
Karl.A
But I did have a problem with the big tank. I did a couple over sprays of gun metal and rust and let this set for months. But when I came to chalk with the pra the paint started to be stripped off. Which hasn't happened before with a SW casting - maybe I got some film on it or something. Luckily I've learned a thing or two and started at the bottom. So I switched to a dry finger rub method which actually yielded a nice, smoothly rusted tank which I'll fix with a fixative. But yes some dust streaks and spills are in order in the end...
Your work looks really nice! I especially like those castings I see on the first page. Any way you could post more pictures? You can never post too many and it will give all of us a better view and in turn give you better feedback. I know it takes extra time and effort (I'm guilty of it myself lately!) but I think you'll find it to be a worthwhile investment.
About the paint stripping off, I've had the same issue with some resin castings and I wonder if this is also a problem for more of us. The concrete walls in my Quincy thread peeled right down to the resin exposing stark orange and brown "scars" on the wall. The paint was fully cured (at least a week) but I've had it happen with others that had dried close to a month--like yours. After curing, Floquil paint is supposed to resist its own thinner.
My only thought is that the formula for the paint or thinner has changed. In my case, I don't have Dio-sol since it isn't available. The Testor's enamel thinner that I used is supposed to the equivalent of Dio-sol but it may be completely different. Possibly stronger--to the point of stripping the paint. Karl is a professional painter and hopefully will see this and weigh in with advice or a solution.
What did you use?
I'll post some better pictures after next round of efforts.
You detail work has great depth and tones (pink bricks not included).
Everything is looking really good. I'm still not digging the tablesaw though, it looks a bit clunky/crude compared to everything else surrounding it, also it looks out of scale.... comparing the blade with the double open doors the blade looks to be at least 36" probably closer to 48" diameter.
The colours and texture on the shingle roof are superb, nice job!
Karl.A
I also added a weather head/ junction box and wire brackets on the side of the shed. I guess I've crossed the rubicon and will have to figure out how to get "power" to the shed...
I look forward to more.