
Howdy, Stranger!
It looks like you're new here. If you want to get involved, click one of these buttons!
Categories
- 922 All Categories
- 3 Picture Posting and Resizing
- 53 New Member Introductions
- 111 Off-Topic Forum
- 4 Photography
- 2 Resources
- 16 New Product Information
- 166 The SierraWest Forum
- 9 Brett's Blog
- 117 General News & Ramblings
- 3 Re-Release Information
- 6 Q & A about SierraWest
- 9 What Would You Like to See?
- 362 Builds
- 131 HO Scale Builds
- 155 O Scale Builds
- 59 Finished SW Build Pics
- 12 Miscellaneous Builds
- 187 Techniques
- 19 Working with Wood
- 20 Painting Castings
- 5 Masonry
- 23 Scenery
- 36 Tools and Supplies
- 21 Layout Planning & Building
- 38 Miscellaneous
- 24 Prototype Information
- 22 Reference and Research
Jumping in with both feet
Greetings, First modeling post for me. I was a little intimidated at first by all the fine work I have seen, but, since I have been building models since 1960, I probably have learned a thing or two.
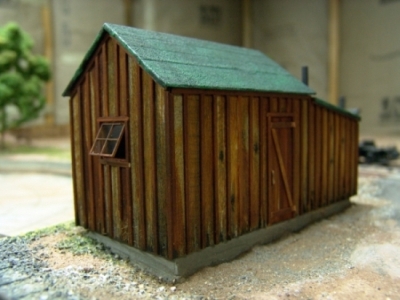
I posted a link to my railroad layout in that part of the forum, and will put here a couple of images of what I started with, the Lineside shack. This is first of the 0 scale buildings that Brett offers. I have bought them all to give me "something to do".
I have taken a little departure from what I see most of you are doing. I am not building individual dioramas, but building the kits on site. Integrating them into the "real world" of my layout.
These first pictures are just that. The building is just setting there with no other items worked on yet. I have built the concrete pad for it. The basic structure is done, Inside detailing is next. The roof is removable with rafters inside for viewing what I hope will be a small shed in which I would want to work out of.
The roof is rolled roofing. The paper is painted green and very fine sand is sprinkled on to simulate the rolled roofing. It is my railroads operational building code color and material.
I use real concrete for the foundations. It is anchor bolt setting cement which has very fine materials and dries the correct, (real) color. I pour it in forms on the layout and it settles level, as in the real world.
Work on the castings is starting this week.
Comments
I look forward to seeing you move forward with details and such.
Karl.A
.
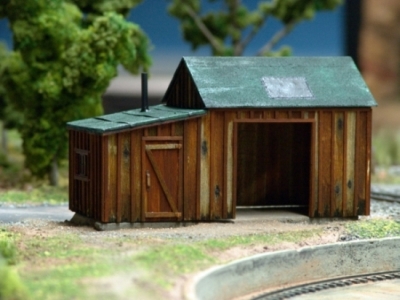
This is the place it lives on the layout. It has become the repair shed for the turntable.
Overhead view of the lot.
A closer view of the building. I have added more to the inside and dirt collected. Not the neatest employees. Maybe that is why they are stuck here.
I love the pallet jig from another kit and am going to use it alot on my railroad. Getting the hang of using the chalk for weathering and rust.
Overall this kit, since it is the first of many, is teaching me new techniques, thanks Brett. It's fun to work with.
To see more of these and close ups, use this link to the page on my layout web site.
http://minietonrailroad.org/html/line_shed.html
Thanks.
.
The colours in the pictures seem a little harsh, not sure if this is the photo's or the actual colours. Some muting of the colouration would certainly enhance the pictures of the model. Most specifically the red tones on the shed walls and the stark contrasts between the fence boards.
A light dusting of grey chalk on the fence would blend and harmonise it giving it a more natural look I think.
The pallet jig is indeed awesome, there is no comparable way to make such realistic pallets that I have come up with...... I really need to just sit out on the deck and use it more often while I am 'relaxin'. Then I'd have them when I needed them.
Good work and looking forward to many more updates from you as you progress..
Karl.A
Learning to use the chalks and my own alcohol stains is a learning experience to get the right balance. The next kit, out of 9 left to go, will be even more of a learning one.
More pictures of this build here with new details added.
http://minietonrailroad.org/html/line_shed.html
( I need to review the upload picture tutorial again, I seem to be having some real problems getting things working correctly)
Thanks, Wayne
After this great build I'm certainly looking forward to following and participating in your next nine SW builds here on the forum, and as you say every SW kit has something new to learn and is a new experience. Brett certainly keeps things fresh.
Karl.A
On to the next one.