
Howdy, Stranger!
It looks like you're new here. If you want to get involved, click one of these buttons!
Categories
- 922 All Categories
- 3 Picture Posting and Resizing
- 53 New Member Introductions
- 111 Off-Topic Forum
- 4 Photography
- 2 Resources
- 16 New Product Information
- 166 The SierraWest Forum
- 9 Brett's Blog
- 117 General News & Ramblings
- 3 Re-Release Information
- 6 Q & A about SierraWest
- 9 What Would You Like to See?
- 362 Builds
- 131 HO Scale Builds
- 155 O Scale Builds
- 59 Finished SW Build Pics
- 12 Miscellaneous Builds
- 187 Techniques
- 19 Working with Wood
- 20 Painting Castings
- 5 Masonry
- 23 Scenery
- 36 Tools and Supplies
- 21 Layout Planning & Building
- 38 Miscellaneous
- 24 Prototype Information
- 22 Reference and Research
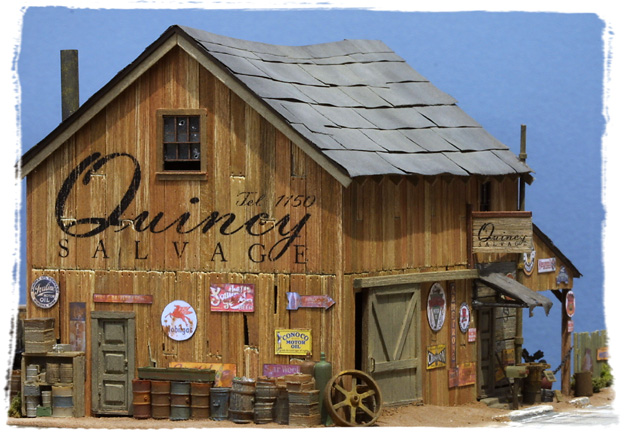
Quincy Salvage

Hi everybody...I'm back again for another Sierra West build. This time I'm taking a crack at Quincy Salvage. I bought this kit a couple years ago mostly because of the main barn. It has two qualities that kept grabbing my attention: the look/color of the wood siding and the beautiful sagging roof. As you'll see, both effects are achieved with amazingly simple methods (a trademark of Sierra West kits!).
When I start a project, I like to have two sets of goals in mind: one for the model and another for modeling skills. I'm stating them here as a reminder for myself but it may be helpful for others, too. For the model, I'm hoping to end up with a scene of a thriving auto salvage yard that's about to fall on hard times. The owner probably was a good mechanic but a real pain in the a%$ to deal with. He knows cars and scrapin' but he's a bad businessman who doesn't take care of his employees or his property. The structures are starting to reflect his "if you don't like it, go some place else" attitude. Keeping that little image in mind can help solve modeling challenges: his tools and parts would be kept in neat order, but the roof? Bahhhh...slap some tar paper on the leak and call it done!
Now for my modeling skills. As in the past, I'm hoping to try some new techniques and different materials. I'll be trying some stuff with the roof(s), working on my dry brushing, and experimenting with some scenery ideas. I'm not quite ready to alter the shape of the structures in a kit but I'm going to incorporate a new/different structure somewhere on the dio while maintaining the balance of the scene. The other challenge will be the vehicles. I'm going to need LOTS of them in various stages of disintegration. I've never built a single Jordan so why not dive in and build a dozen or two!!
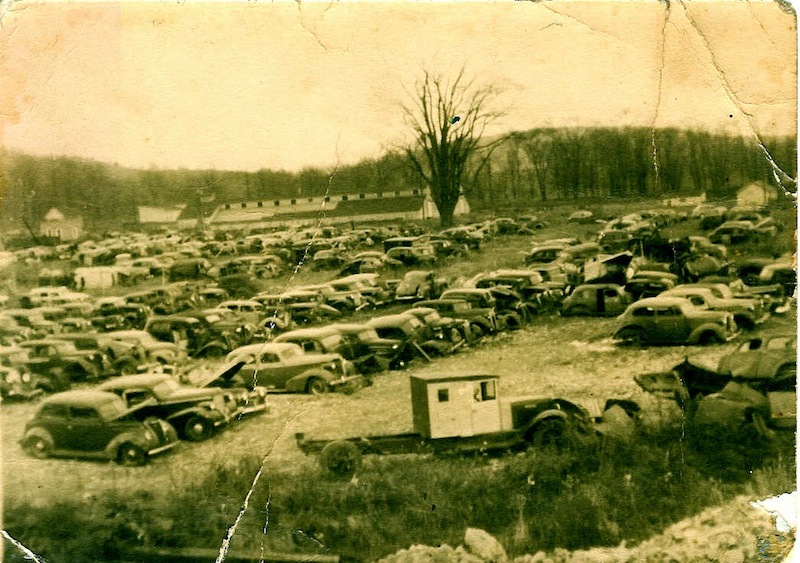
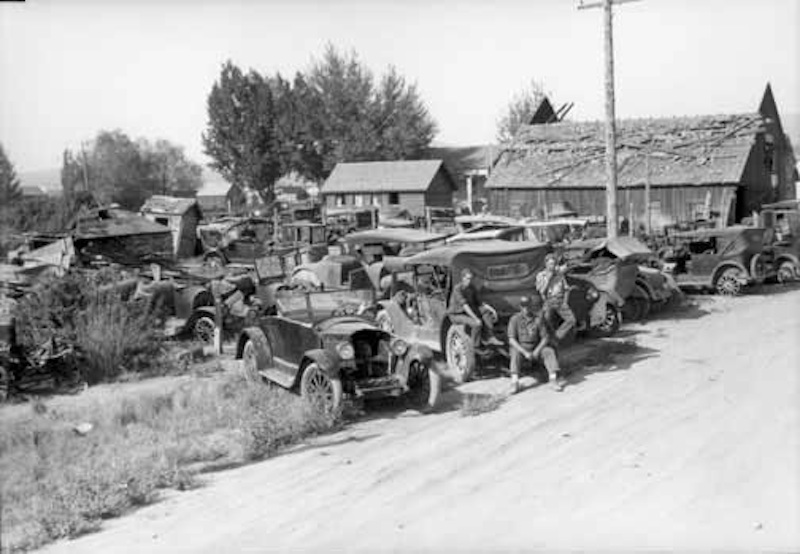
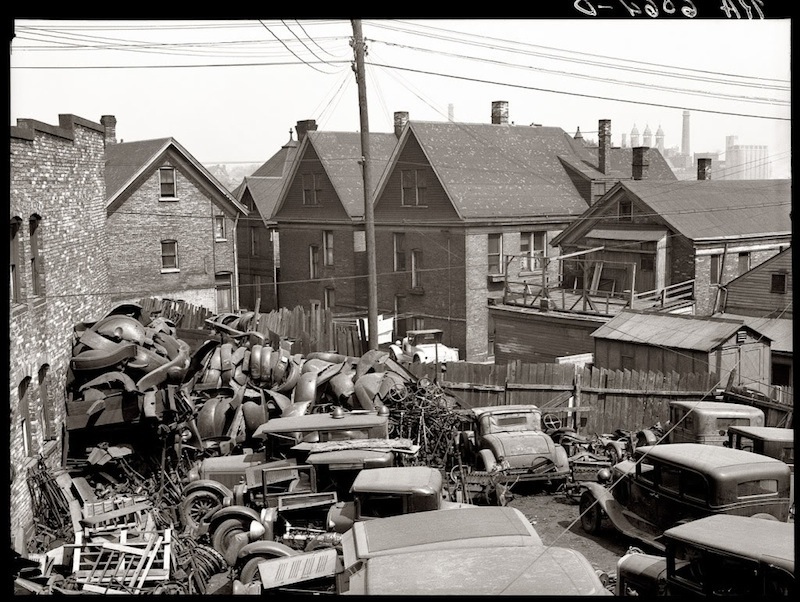
I've done a fair amount of research (or, "over-thinking") and have built up a decent collection of reference pictures that match my vision for the model and capture the organized chaos of a salvage yard:
Please feel free to comment as I go along. Like a good doctor, I value second opinions. The extra eyes on the forums have served me well in the past--no matter your experience or skill level!
When I start a project, I like to have two sets of goals in mind: one for the model and another for modeling skills. I'm stating them here as a reminder for myself but it may be helpful for others, too. For the model, I'm hoping to end up with a scene of a thriving auto salvage yard that's about to fall on hard times. The owner probably was a good mechanic but a real pain in the a%$ to deal with. He knows cars and scrapin' but he's a bad businessman who doesn't take care of his employees or his property. The structures are starting to reflect his "if you don't like it, go some place else" attitude. Keeping that little image in mind can help solve modeling challenges: his tools and parts would be kept in neat order, but the roof? Bahhhh...slap some tar paper on the leak and call it done!
Now for my modeling skills. As in the past, I'm hoping to try some new techniques and different materials. I'll be trying some stuff with the roof(s), working on my dry brushing, and experimenting with some scenery ideas. I'm not quite ready to alter the shape of the structures in a kit but I'm going to incorporate a new/different structure somewhere on the dio while maintaining the balance of the scene. The other challenge will be the vehicles. I'm going to need LOTS of them in various stages of disintegration. I've never built a single Jordan so why not dive in and build a dozen or two!!
I've done a fair amount of research (or, "over-thinking") and have built up a decent collection of reference pictures that match my vision for the model and capture the organized chaos of a salvage yard:
Please feel free to comment as I go along. Like a good doctor, I value second opinions. The extra eyes on the forums have served me well in the past--no matter your experience or skill level!
Comments
Bryan- glad to have you following along. Any chance you'll be bringing you Tool Shed to the Expo? I wanna see that beauty in person!
Okay...let's begin Quincy's! The prep work for the castings and stripwood are all pretty straight forward. I made a few variations here and there. One was with the soaking recipe (I used considerably less of the brown colors in favor of more Oily Black...no reason; just to be different). Another was with the coloring for the storage shed--I soaked the strips in a bath of alcohol and black leather dye. The specific brand/type was Angelus Jet Black leather dye. It's got a tiny hint of blue to it which is nice for getting a silvery aged look. A quick 30 second soak then wiped 'em down:
For the paper shingles, the instructions call for staining the sheets with the thinned brown stain (30% Roof Brown, 10% Grime, 60% Dio-Sol). Following a light staining, I let the sheets dry then added some chalk streaks for color variety (a little orange, yellow ochre, some olive green and a little light gray). Next, I blended the chalk streaks with another coat of the same stain so that there were no hard color lines.
Ultimately, I may use individual cedar shingles, but I like the way these look and it sure was simple!
What I found most important was to allow the paint to dry COMPLETELY (like a good 24 hours) before trying to scrape any off. Without that drying time, the paint would sort of ball up rather than peel and flake off. I also experimented with the angle of the blade. By hitting the edges of the strip, the paint was removed and it looked like the board was a bit warped ("cupping" is what wood workers call it). It's pretty subtle effect, but like most good details it simply adds to the final look. Look at the edges of the two darker boards to the right of the blackened area. See how they're lighter?
There are areas of the barn where repairs have been made. Rather than vertical siding, horizontal planks are used for the patch job. I used some pieces without the SFC brown and a few pieces of left over siding from the Twin Mills that had the white peeled paint on them. Kinda suggests a "who cares" attitude toward the maintenance:
After boarding up the walls, I needed to tone down the red somewhat with a little dry brushing. Working from dark to light, I used raw umber, Khaki tan and a medium gray (all cheap acrylic craft paints). It makes a noticeable difference in softening and weathering the final look of the siding:
Jim
I don't believe that I will be attending the Expo this year, but if you make it as far south as Virginia Beach I'll be happy to give you a tour of the layout room.
Wait a minute, did someone say beach ? ? ?
Blue skies, the soft sound of the waves lapping, sand between my toes. Corona in one hand, exacto in the other.......... I can see me now....
Oh yeah........ really, REALLY nice job on the walls so far. This is going to be a fun build to keep up with. Sweet!
Karl.A
Jerry
Thanks for the nice words and encouragement. There are plenty of challenges ahead and I'm glad to have you along keeping an eye on my progress. (Karl-be careful with the Corona+exacto combination!)
Next up-more weathering. (I apologize in advance...I was rather lax in taking pictures of this step, but I need to repeat it on the next structure and I'll do better job on that one) I wanted to get a heavy water damage effect at the bottom of the boards. In the past, I'd used repeated applications of alcohol & India ink of various strengths. That works pretty well but this time around I used oil paint and mineral spirits. After a little experimenting, here's the method that gave the best results: I took clean mineral spirits and dabbed it on the bottom edges of the vertical siding allowing it to seep about 2/3s to 3/4s of the way up the siding. Next, using raw umber oil paint, I dabbed small amounts on the bottom edges and in the lower cracks and gaps. Finally, I flooded the boards liberally with more clean mineral spirits (again on the bottom edges). This diluted the oil paint and carried it up higher into the wood.
By pre-wetting the boards with spirits, there won't be any hard lines from the raw umber. The dark "water damage" will simply fade and blend in with the original wood color.
The barn has two stories. A visible seam in the vertical siding confirms an upper and lower level. I looked at some pictures of old barns to see how that seam weathers. It's pretty interesting to note that the upper vertical boards react to moisture in a similar way as the lower ones. As moisture drains down, it will still collect at the base of the vertical boards--even on the second story:
Again, I experimented to see if I could model this and if it'd make a noticeable difference.
First, here's the upper and lower stories butted together with no weathering around the seam:
In this picture, you can see the bottom-up weathering of the upper level compared to the wall with no weathering around the seam:
I used the same technique to weather the upper level (as previously described), however a bit less oil paint was applied.
Jim
Karl.A
Here's the upper left wall--which features the "Quincy" dry transfer decal. I was going to name the business after a relative of mine but when I looked into creating dry transfers, the process seemed pretty complicated and/or expensive. To get it right, you have to go through many steps. There isn't a special sheet of printer paper you can buy at Office Max that allows you to crank out dry transfers!
The decals can be a little finicky and you basically get one shot at positioning and placement, so it's got to be right. But with a little care and patience the results are awesome. I also should mention I tried using real glass for the windows. I used microscope slides.
If you go this route, get the scriber. I'll be honest...working with real glass is a real pain! You use tape to hold the pieces in place in order to scratch scribe lines to crack them into the correct shape, but just removing the tape (even low tack) cause the glass to break. You can get some really cool glass break effects, but overall it's a major pain and the end result probably doesn't justify the extra effort. (Or, perhaps I just stink at working with it!)
You do get a nice light reflection with real glass (when viewed at the right angle):
This wall has been weathered bottom up with the raw umber oil and then dry brushed with 3 light coats of cheap craft paint (raw umber, khaki tan and a light gray). After applying the "Quincy" decal I made vertical cuts where the boards meet. Then, aged it by making more vertical slits cuts and scratches to flake off some of the material. A fresh blade will give the best results--note the big chunk out of the left part of the "Q". Ooops. Yeah, that's right about when I figured out the sharp blade part!
WOW
With the walls still in the flat, the instructions have you add some more details. Namely, the old signs. When it comes to these vintage advertising signs, two things make me crazy when I seem them on models: sloppy cut jobs and white edges from the paper. Either one of those will ruin the look of a structure--no matter how good the wood and siding look. They're huge distractions, so I'll share what I do to avoid those issues.
First, we need to cut the signs out from the paper sheet. I always use a straight edge and a sharp blade and avoid free hand cutting if possible. Circles (and complex shapes) on the other hand, require good ol' scissors. No matter how careful I am, I've not yet been able to cut out a perfect circle. Probably never will! I usually end up with something pretty close but with a sharp edge here and there:
(By the way, I find it useful to look at the sign from the back side as well to see how "true" of a circle I got and spot other edges that will stand out when it gets mounted to the structure.)
I can see that there are a couple obvious spots that need to be trimmed away. Using a pair of scissors for small touch ups like this is futile. So instead, I take the finer side of a cheap nail file and carefully "sand" off the high spots of the paper. You have to make sure the paper sign is completely dry and that it hasn't absorbed any moisture from your fingertips. The edges will sort of "mushroom" over on the edges if it's even slightly damp. A couple light passes is all it takes.
This sign is about 3/8" and looks quite a bit better with the edges sanded off.
The stark white edges of the paper will SCREAM loudly if it gets mounted on the wall that way so they need to be toned down. There are several ways to do it--everything from craft paint to markers. Using just A&I alone still leaves the edges noticeable in my opinion, so I usually use a little thinned paint. In this case, I used the dark brown stain that the manual has you mix up for swiping strip wood. Since it has a lot of thinner in it, the white edges will get colored and the thinner gradually wicks into the paper carrying paint with it leaving a natural weathered look without hard edges. Just a quick touch with a brush of the thinned stain should do it.
Before:
After:
Since the signs included in the kit are pre-weathered, at this point they're ready to be mounted. However, here are a couple extra steps I took with the signs to make them pop a bit more.
First, I dabbed on a couple rust colored weathering powders and swept them off in a downward motion, streaking the sign a bit:
Next, using a toothpick, I blotted on some raw umber oil paint around the outer and lower edges:
On top of the oil paint, I dusted on more chalks and weathering powders working from dark browns and oranges up to the Kevin O'Neil staple, Gold Ochre (231.5)
I went back and forth adding a bit more raw umber then some chalk; more raw umber, more chalk; until a nice crusty, flaky layer built up. This probably sounds like a lot of work but it actually goes pretty quickly. I cut out a whole bunch of signs and got them sanded to shape first. Then went through the coloring process above in an assembly line fashion and cranked 'em out in pretty short order. Here's the final result:
I also took a tweezers and pinched random corners to make a sign look more corroded or, make it appear to have gotten bent when something was shoved against it.
A few more details on the walls and I'll get the barn together, then it'll be time to tackle the sagging roof!
Am following closely and learning a great deal already Bill, thanks.
I decided to scratch build the doors so that I could get a more run-down look: gaps between the slats, more splits and cracks and damage along the bottoms. They're also darker than the siding (brown chalks and alcohol). The man door is the metal casting included in the kit.
The awning is made from tissue paper. I put a couple creases in the paper (so that it looks like seams in the material) and colored it using medium strength A/I and a little olive green chalk. The green, I think, adds just enough color to break things up a bit plus it balances out the yellow on the two signs.
I added some scrape marks where the barn door rubs against the siding after repeated openingg and closings. I only did one side so far because I'm not convinved the coloring is right. The scrapes look a bit too new, perhaps? I also borrowed an idea from Dave Revelia's model and added some simple shutters (oops. Pictures only show them on one side, but all the windows have them).
The roof is to be covered with tar paper. I added some exposed old cedar shakes in a couple spots to show that it had been re-roofed at some point. A couple rows were glued in place then roughed up with a blade and colored with chalk and alcohol:
For the actual tar paper, I had read about guys using plain old toilet paper so I decided to try it. I used cheap white TP that I stole from work and spray painted both sides Grimy black followed by a blast of Dull Coat. I used some dark and light brown chalks along with a little gray and yellow ochre here and there to streak and weather the paper then, let it all dry. Next, I cut them into strips about 3-4 scale feet wide. Those were cut into random lengths as I laid them on the roof. They were attached with a 50/50 water & white glue mix. I found I got some interesting results depending on how I used the glue. On some strips I dunked the tar paper completely into the glue. On others, I was careful to not get any on the top surface. With those pieces, I let them float in the glue mix until they were damp:
Then pulled them out of the little dish across the edge keeping the top dry (and free of glue) and allowing the excess to drain off:
It was damp enough to poke the vent hole straight through and add some wrinkles with a tweezers:
What's nice about using TP is you get really natural looking tears. I got the best results by tearing the strips when they were totally dry, then putting them in the glue and into position:
I got lucky and found a few pieces that didn't lay completely flat while the alocohol dried and, again, got a real natural looking wind-blown piece:
Here's the completed roof--other than the ridge cap-- with a little better lighting:
Bill
Jerry
Paul
Jim Richards
Ken-next update, I'll show a bit more on how I color and texture the cedar shakes. The roof on the little storage shed is all hand cut cedar pieces.
Jim-the TP is really fussy and difficult to move if it's completely saturated in the water & white glue. It shreds and gets stingy looking--not very realistic. It can turn into a huge blob. When I used that "float" method, the strips still had a bit of rigidity to them making it easier to adjust. You still need to use care in adding the creases and wrinkles, but some brands will have lines embossed in them (like Cottonelle, for example) which give a wrinkle effect.
http://www.amazon.com/All-State-Forest-Products-1001-Gourmet/dp/B001BTP3UQ
First, I take the roof card and hit it with a brown Floquil color thinned enough to not obscure the lines. The entire card needs to be painted so that any gaps won't reveal the cardboard color underneath. After it's dry, I sketch out the areas where the roof planks will be exposed due to shakes falling off:
Using a sharp blade, I carve out the cardboard deep enough so that the planks will fit in flush with the surface of he cardstock. The plank pieces are just scrap 2x10 or 2x12...size isn't important nor is consistency of the plank widths.
I fill all the carved out ares with planks, then weather them to look pretty worn and rotten.
In a nutshell, a sheet of cedar is cut into strips of various widths (6"-16") with a brand new blade then, cross cut to a length of 24". You'll be left with a pile of tiny shingles. Next begins the process of applying the little shakes. I lay a smear of glue (yellow carpenter's glue seems to work best for me) about an inch or so across the bottom of the roof card. I stab an individual shingle with a #11 blade and position it on the roof. Using an awl or a pick, hold the shingle in place so you can remove the exacto knife.
I leave the planks exposed in a way that looks like wind damage or general disrepair with a few shakes here and there sliding down the roof. After all the shakes are applied, I let the entire roof sit overnight and allow the glue to dry completely. The next day, I come back and distress the shingles with a brush, pick and #11 blade. You have to be somewhat careful to just rough-up the shingles with cracks and splits and not pull them off the card completely. It's kinda hard to see, but here's the roof with all the shingles after distressing them:
Next, we'll add color and weather them.
http://www.rockler.com/product.cfm?page=570&site=ROCKLER
http://www.veneersupplies.com/brands/Spanish__Cedar.html
http://www.amazon.com/SPANISH-CEDAR-Veneer-CAPITOL-LUMBER/dp/B0057GJVUC
http://www.oakwoodveneer.com/cedar-veneer-spanish.html