
Howdy, Stranger!
It looks like you're new here. If you want to get involved, click one of these buttons!
Categories
- 920 All Categories
- 3 Picture Posting and Resizing
- 53 New Member Introductions
- 111 Off-Topic Forum
- 4 Photography
- 2 Resources
- 16 New Product Information
- 165 The SierraWest Forum
- 9 Brett's Blog
- 117 General News & Ramblings
- 3 Re-Release Information
- 6 Q & A about SierraWest
- 9 What Would You Like to See?
- 361 Builds
- 131 HO Scale Builds
- 154 O Scale Builds
- 59 Finished SW Build Pics
- 12 Miscellaneous Builds
- 187 Techniques
- 19 Working with Wood
- 20 Painting Castings
- 5 Masonry
- 23 Scenery
- 36 Tools and Supplies
- 21 Layout Planning & Building
- 38 Miscellaneous
- 24 Prototype Information
- 22 Reference and Research
LineSide Storage Shed

Have gotten underway with the congener to the Tool Shed....The LineSide Storage Shed. What a great little build this is and I really like the contrasting styles of the two. Brett's recommended coloring on the LineSide, which I used, is a nice compliment to the Tool Shed. I have taken pictures of the walls in various phases of completion and will follow with the five walls totally done. 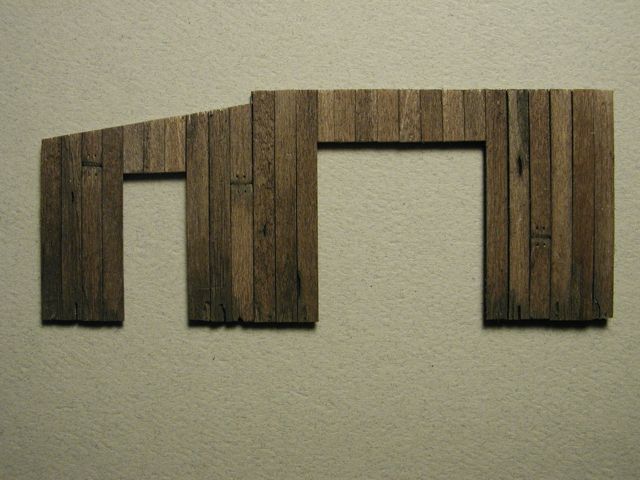 Front wall with just siding, no battens.
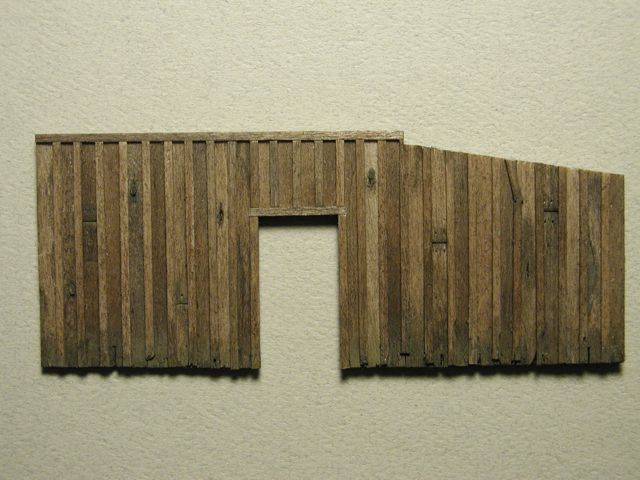 Rear wall with about half the battens installed.
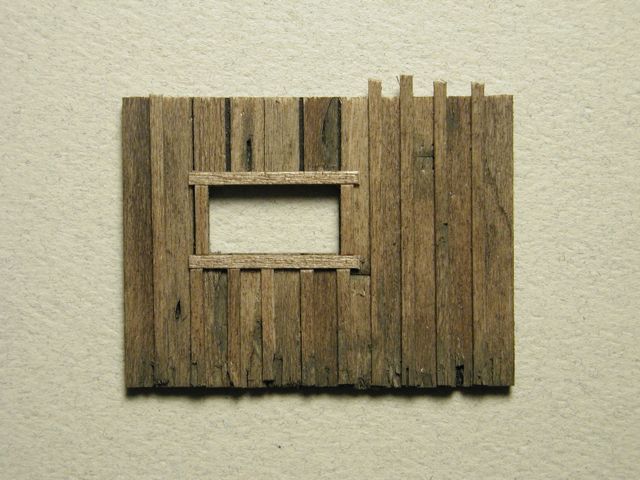 Left wall with battens most of the battens installed. battens will be trimmed even with the top. Window frame not weathered/aged yet.
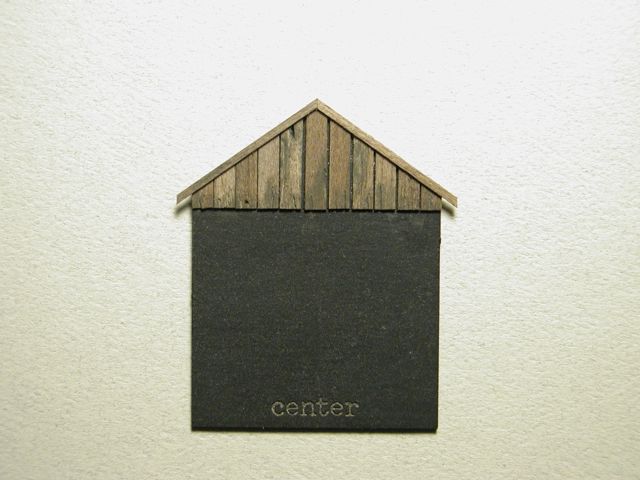 Center wall with top gable battens installed..gaps in siding will be covered by battens later.
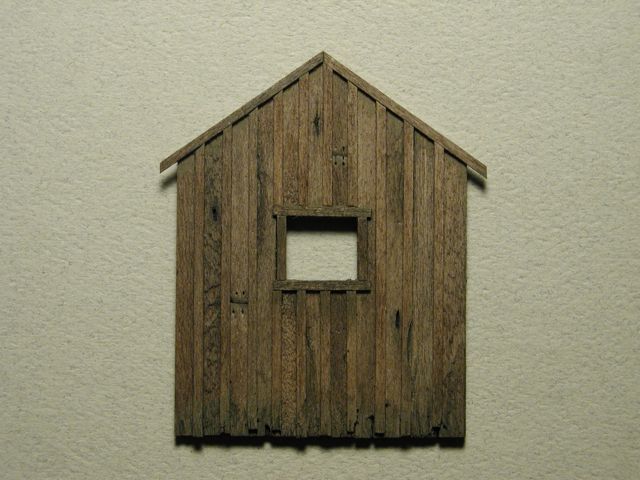 Right wall pretty much done....few little tweaks and it will be..
Front wall with just siding, no battens.Rear wall with about half the battens installed.Left wall with battens most of the battens installed. battens will be trimmed even with the top. Window frame not weathered/aged yet.Center wall with top gable battens installed..gaps in siding will be covered by battens later.Right wall pretty much done....few little tweaks and it will be..
Comments
Joints are all nice and tight and the texture looks good.
You've really nailed that colour !!
Karl.A
Karl.A
Jim
Jim..the board end effect as you described is just what I was after. I did this more on this LineSide build as it sits on the ground where the Tool Shed sits on a platform. The techniques I used was to weather each board and batten before I glue it to the framing by roughing up the ends by splitting the end, taking "chunks" out etc..then I darken the ends of each board individually with Rembrandt Raw Umber 408.3. Black was too dark and I didn't like it very well. I think treating each board as it goes on keeps things random. I dab on some chalk then soak it in with some pra. After all the boards and battens are on I follow with a dusting of Raw Umber 408.7 which gives it a decidingly greenish tone which simulates the damp, wet, mossy rot that develops. You'll notice I did this on the eaves as well to give it that dirty dusty look where grime gets concentrated between the roof and the siding. Doors and windows are in progress! Ken
Thanks for the color number of the chalk. I was trying to get your effect with alcohol and ink and black chalk yesterday and couldn't get the look. Black was too dark.
Very cool technique. What is pra? The windows look great. Very nice dirty effect. Thanks for sharing your build. I keep learning alot from everyone. By the way there are some plans in Timber Times for logging layouts. I haven't seen them but they may be worth a look.
Jim
Brett coined the acronym "pra" which stands for just "plain rubbing alcohol" it thins, blends, soaks in, and somewhat fixes the chalk to the board ends. Key here is to not have a defining line between the treated and untreated boards end. A gradual fade.
I have heard of Timber Times but have not seen an issue either. Will search it up!
Thanks Jim...-K
Colour and texture are all really well done.
To be honest I think you need to put more effort into the doors. They just look rushed.
Karl.A
I agree with Karl though. The doors look way too new and "easy to open" compared to the rest of the structure.
The angled cuts at the top of some of the fence planks are a nice touch that i will be using in the future.
Many light strokes will add some grain effect giving depth and character to the door panels.
I use this on the laser board windows also.
The "Z' bracing could be treated the same way in the direction the grain would appear.
Some heavier 'stiff' wire brushing along the bottom edges of the door panels will roughen up that clean cut look and again add depth and character.
Re-colouring of the doors will then add darker contrast into the graining and bring them more in-line with the walls.
Finally adding the darker colouration to the bottom of the doors, as you did so well with the walls will make them become part of the structure and not stand out as different.
Also as a side note, a little darker chalk colouring around the door handles will depict useage and will also break up the currently monotonous colouring of the doors giving another subtle colour variation and level of depth.
Karl.A
Bob
what's next?
Karl.A
Karl..Thanks so much for the advise on this!
Next...I'll post some pics of the finished build and castings. I have two classics that I want to do while I'm waiting on my Logging Camp Essentials and Loco & Service Shops kits that I have ordered, one is the Backwoods Water Tank and Storage Shed and the other is the Railroad Camp. Likely get on the Water Tank kit as the Railroad Camp is a good sized build and I'm slowly ramping up here!
Fantastic job on the build. I really like the doors. I had no idea that your could make the doors look this way or scribe grain into the door stock. That is really cool idea Karl gave. Can't wait to see the water tank build. I don't have this kit and wish I did. Keep up the fantastic work.
Jim
Here are pics of the finished LineSide. I'll post a couple pics next with all the castings next. They're done just didn't get them all together for the picture this time. Will be starting the Backwoods Water Tank build thread soon.
Ken
A couple suggestions for your next structure--
It's easy to get heavy handed with nail holes (trust me...I excell at out of scale nail holes). The ones on the fence pickets look perfect to my eye. On the shed, they're starting to get too big.
For tar paper roofs, I like to break up the perfectly straight lines between the rows with a few rips or tears. I'll take the strip of tar paper and a piece of fine sand paper or emory board and sand it down from the back (so, place it face down on your work surface and gently sand the back side of it). Focus on an area here and there so it wears through the edge leaving it uneven. I've sanded it from the front, but it usually comes out looking like a mistake that I tried to scuff off. Then, glue them down and add chalks and streaks.
Minor details, for sure, and not meant to take away from the fine work you've demonstrated!
Looking forward to the next one!
Bill
Bill, love hearing from you and what a great technique on the tar paper. The edges would naturally get thinned and start tearing or wearing unevenly over time. I looked at my nail holes from the front on view and pictured myself to scale and I would have been able to walk up and poke my finger right through one of those holes! Thanks for reeling me in there. Saw your Twin Mills piece on the news spots...really nice to get recognized for the work you did and a gem of a build as well. -K
I'm looking forward to seeing your details.
As a side note I'm currently scratchbuilding the water tank in O scale so I will be very interested to see your build of it here.
Karl.A