
Howdy, Stranger!
It looks like you're new here. If you want to get involved, click one of these buttons!
Categories
- 922 All Categories
- 3 Picture Posting and Resizing
- 53 New Member Introductions
- 111 Off-Topic Forum
- 4 Photography
- 2 Resources
- 16 New Product Information
- 166 The SierraWest Forum
- 9 Brett's Blog
- 117 General News & Ramblings
- 3 Re-Release Information
- 6 Q & A about SierraWest
- 9 What Would You Like to See?
- 362 Builds
- 131 HO Scale Builds
- 155 O Scale Builds
- 59 Finished SW Build Pics
- 12 Miscellaneous Builds
- 187 Techniques
- 19 Working with Wood
- 20 Painting Castings
- 5 Masonry
- 23 Scenery
- 36 Tools and Supplies
- 21 Layout Planning & Building
- 38 Miscellaneous
- 24 Prototype Information
- 22 Reference and Research
Railroad Camp build
AKA the St Mary Lumber Company office and warehouse complex.
I got started on this kit this week and decided hat I would be better at documenting the progress of my builds so here it begins.
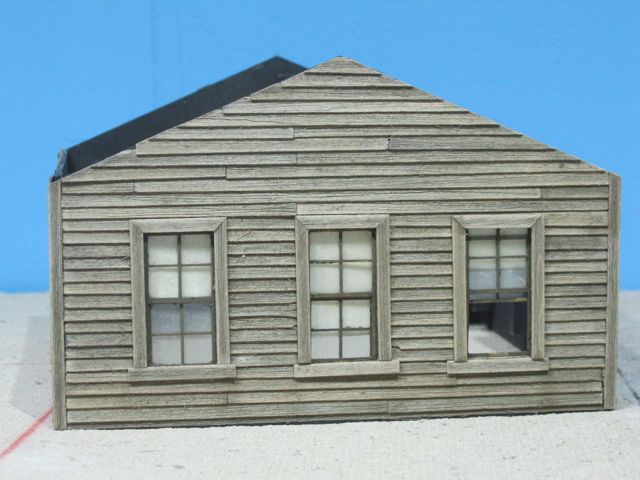
The 4 walls of the upper office were colored with a mix of Rembrandts 408.3 & 408.7. I started by graining each board by first dragging a coarse wire brush over them lightly to define a grain and then a softer wire brush heavier to bring the grain out. I went to the softer brush so I wasn't splitting the boards. I followed this with the color and let dry. I gave a light sanding with 220 grit paper and used a brass brush to clean and deepen the grain. Followed this with a wash of IA and a final light sanding.
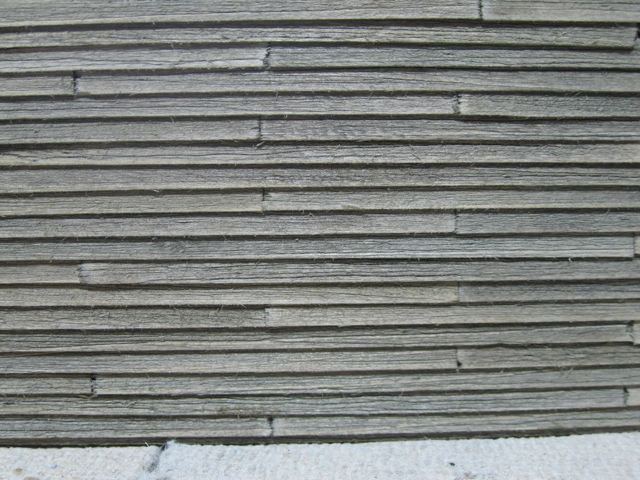
I like the look of sanding each board individually. It give almost a drybrushed effect but for me is more blended to the full color. It also helps with the fuzzies, but as you can see from the very close up I'm still struggling with them.
I kept a rough cut look to where the boards butt up against each other on the siding by brushing the ends. And I love the mitered cuts on the window frames. A jig is included to make these cuts.
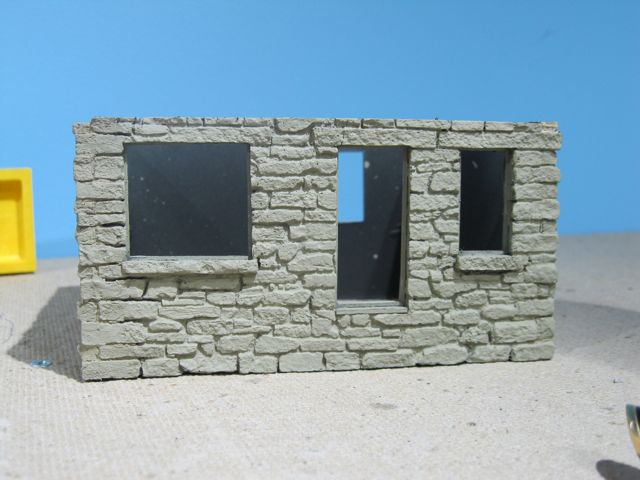
The stone walls are put together and primed with the corners mortared. I will start coloring these walls next.
I got started on this kit this week and decided hat I would be better at documenting the progress of my builds so here it begins.
The 4 walls of the upper office were colored with a mix of Rembrandts 408.3 & 408.7. I started by graining each board by first dragging a coarse wire brush over them lightly to define a grain and then a softer wire brush heavier to bring the grain out. I went to the softer brush so I wasn't splitting the boards. I followed this with the color and let dry. I gave a light sanding with 220 grit paper and used a brass brush to clean and deepen the grain. Followed this with a wash of IA and a final light sanding.
I like the look of sanding each board individually. It give almost a drybrushed effect but for me is more blended to the full color. It also helps with the fuzzies, but as you can see from the very close up I'm still struggling with them.
I kept a rough cut look to where the boards butt up against each other on the siding by brushing the ends. And I love the mitered cuts on the window frames. A jig is included to make these cuts.
The stone walls are put together and primed with the corners mortared. I will start coloring these walls next.
Comments
I did some coloring on the stone wall. I wanted to have some variation in color but wanted it to be very muted. I felt like a stone wall that had been in place for any amount of time around dusty RR tracks would start to look a monotone dirt/filth color.
So with this in mind I spray primed tan then used chalks to color. I used the same 2 colors in the wood siding and added a brown/red, a dusty gray and med gray to color each stone individually. I lightly brushed on coats of IA to blend the colors together. Once satisfied I rubbed over the whole wall with printer paper which exposed the tan underneath on the highlights. Areas that were too monochrome were touched up with an off color.
I'm wondering now how to simulate lichen growing on the walls. Thoughts?
Keep up the good work.
Stonework is coming along very nicely too.
Karl.A
Mike, with a name like Slimy Grime I'm going to have to try it.
I've had some time to myself the past few days and its been raining so what else would one do? I've got 3 of 4 sets of walls built. On the right window on the front of the warehouse I was going for the effect of someone wiping off the grime on the glass to see out. It looks kind of funny centered on the glass and should have been centered on just one pane. I'll try to fix that or replace the glass. The roller shades are masking tape.
The warehouse was colored with the same chalk colors as the office, just darker with deeper wood grain and an extra coat of IA.
It is evident that there has been some recent security issues at the lumber company and bars were installed on the loading dock window.
I'm thinking about having a broken and fixed 6x6 support to the awning for the loading dock-like a truck backed into it. Kind of like what you see when a telephone pole gets hit by a car. I have an idea in my head but am looking for a couple of reference photos if anyone can help that would be appreciated.
I'm also planning on a "boss man" leaning out of the upper office window directing the work below. I have a company name stencil being produced also to put on the warehouse.
Altogether fun stuff.
Karl.A
Awesome stuff.
All of the walls are up now. There will be some final weathering to do but for the most part they are done. I'm prepping the castings now and want to get a start on them before moving to the dock and roofs.
While blackening the metal castings I was having some of those annoying spots that just don't blacken frustrate me no end. I brushed the castings while in the blacken it but still couldn't get them all. I found that if I dipped a brush in blacken it and brushed the dried castings that the silver spots disappeared. This is a messy job so I put on some vinyl gloves. As a bonus I found that vinyl gloves will buff the metal castings leaving a nice looking finish. I tried to get a good photo of the results but my photo abilities are not so good.
The foreman in the window is eye balling something going on below so I need to figure out what that might be. I looked around for the best figure for this but selection was limited. I thought a driver might work and have both hands on the sill but his hands were turned the wrong way and they don't bend easily...at least not without damage. So I found this guy laying around. He looks like he is trying to see around the corner of the warehouse and his hand lays nicely on the sill.
I wasn't too satisfied with the way the tarpaper wall came out. I may wipe it down with alcohol and try again.
I did get that warehouse window fixed that was bothering me. I think it looks better with the rub marks in the individual panes. What I wanted was for it to look like a worker had rubbed the dirt off to see outside.
The only thing I could pick at is that the wood under the torn paper would be aged and not new looking, as far as rotten even, but that is getting real picky under scrutiny.
The guy hanging out the window has a great posture for that position, nicely done!
Karl.A
Mike, I have been looking for a suitable figure looking up but haven't found one yet. I have a guy lighting a cigarette and I was going to put him underneath a no smoking sign right in the line of sight of the manager above.
It's all one unit now with the roofs put on. Looks like a leaky roof cap on the shingled roof but only the office workers will get wet. I used the light brown from the siding mixed with gray chalk for the shingle colors. Pre-cut shingles were included in this kit which are easy and quick to use and look good. They don't have the same character as individually cut shingles though.
The tarpaper has yet to be weathered, the color variation is from my painting. I spray painted the sheet of paper with some heavy and light areas which gives some nice definition between the sheets.
The chimney casting was a real joy to do. I colored with brick, rust, brown and concrete colors. Once dry I rubbed lightweight spackling into the cracks. Rubbing with my fingers removed all of the spackling from the brick faces. Once dry I brushed on IA to gray the mortar up and even picked out a couple of spots to look like lost mortar. Kudos to Brett for coming up with this idea. It makes so much sense I don't know why I didn't try it sooner. Final weathering will make it look used.
After seeing this I am considering a brick structure. Yikes! Or at least a wall.
Very nice work Bryan, shingled roof looks well defined and the chimney looks .. wow.
The diferenciation on the loading dock boarding is also very nice, that overhead shot really shows it all off well.
Karl.A
1) using turnouts and flex track, locate where the siding will go.
2) mark off appropriate space
3) cut it out
Wala! I'm almost ready to start needing the base so this was my solution. You know when your blade hits the plywood by the sound it makes. I beveled the edges of the base and the hole to make it easier to put in. I plan on using glue sparingly in the corners to hold it in place-homasote to homasote not to the plywood. This way if I need to take it out for any reason I can. May need a screw or 2 to make sure it's level but we'll see.
I'm getting down to the final details. Going to build a pile of pallets for the other side of the fence then put down a final ground cover. Finish another figure or 2. Put up some signs etc.
I Have really enjoyed watching this build and the color, texture and weathering is very subtle and natural looking. You have a very good eye! That being said I hope you take the following comments as constructive criticism and not thoughtless nit picking. First I think the birds detract from the model, not add to it. These are a very difficult detail to do and yours are better than most I've seen but still only detract not add to the scene. These metal castings just never really look,like real birds at least IMHO. The other thing that I don't feel works is the repair. I know modelers want to tell little stories within the total scene but this one doesn't look right to me. In reality someone would have just yanked the broken post out (while temporarily supported like you show) and cut and wedged a new one under the overhang. If I were to do this scene I would use just one old length of board that maybe was slightly warped as the temporary support so the repair guy would no he better get a new post under there ASAP. Again I do think your work is excellent and the castings are very well done. I hope you take these comments as my honest opinion of how I think you could improve this dio.
Kevin
I too look at all of the photos I take with a very critical eye. I see things in the photos that just don't show up with the naked eye. The 2 things you mentioned are both things that I have been debating for a while.
Starting with the birds. I love roof details and birds look very natural on a roof. That being said, these pigeons are big almost pigeon-o-saurasus. They are about 18" scale and they lack surface detail. So I wanted them but was unsure about them. I drilled a #76 hole in the bottom of the pigeons and in the roof (where 2 shingles meet) and inserted a .020 wire. This way the pigeons are not glued to the roof just in case I didn't like them they come right out.
The repair scene. I think we all try to tell a story with our scenes and I considered 3 options for this story. The first you see here. The second was the truck still backed into the post. The 3rd as you described. I tried this one first because I thought of it first and I thought it would be an interesting action scene. I agree that yanking the post out would have probably been the more likely repair. I was thinking of this as I was putting this together and I'm thinking more about it now.
I have until I do the groundcover to make a final decision...probably on Friday.
Thanks for the keen eye.
I also agree that the birds should go. They are too big and 'blobby' and stand out amongst the other much finer details below them. As Kevin says, they draw your eye and detract from all the fine work around them.
I like the idea of the awning repair scene. I do think it is currently over engineered though.
The awning temporarily supported by a 2x4 with the broken post discarded on the ground nearby while the workers cut a new replacement post. I think this is what both you and Kevin have already said and I like that scenario much better.
Keep us posted ... 8~)
Karl.A
(edit) I know that you wont but I'll say it anyway........ dont foget to touch-up those shingle edges..as can be seen in photo two.
I started to remove the pigeons because of their size and lack of detail but one of my kids insisted that they stay. So they came back..maybe they are homing pigeons.
I have learned my lesson about homasote as a base. Don't do it! As you can see the corners have warped. Not a problem once installed because I will screw the corners down to the plywood. This makes the awning posts come out of the dirt but I can brush up some more when I hide the screw heads and cut lines. Back to pink foam for the base. In anticipation of this possibility I only used 4 small spots of glue on the corners of the stone base to secure the structure.
Once installed I will blend the ground cover to the surrounding areas and call it done.
I usually dont like figures in dioramas (it's a personal taste thing) but you have pulled it off exceptionally well, placement and posture is perfect.
Karl.A