visit sierrawestscalemodels.com

O’Neills Fabrication as interpreted by David C

edited January 2022 in O Scale Builds
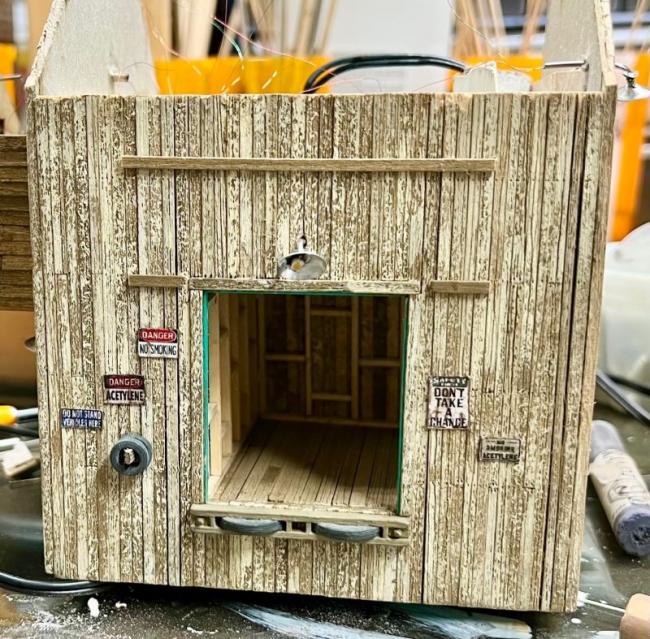
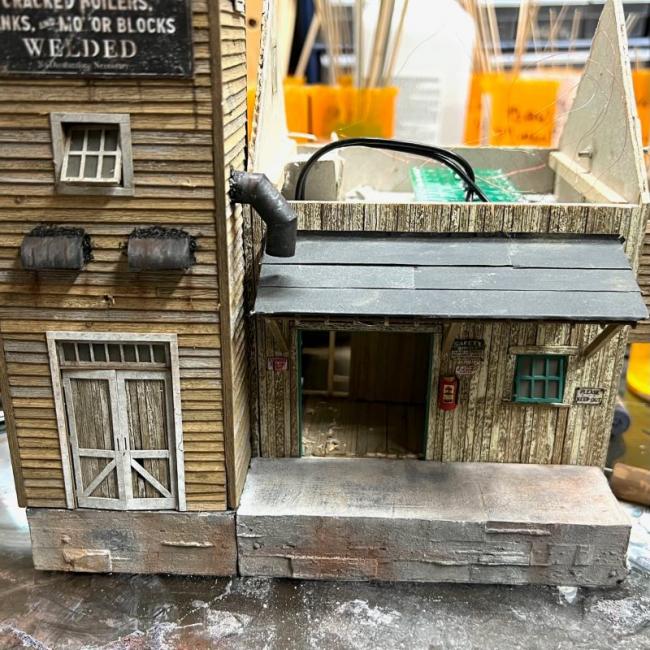
Hello fellow forum members. I have finally decided to post a bit of info on my version of O’Neills. The main building has got to the point of installing LED lighting, my decision of adding a couple of interior walls instead of a paper view block and painting and weathering the cement dock and tower base. The tower has its four walls joined together but I haven’t installed the LEDs yet, next on my list of to dos.

I have experimented with Rembrandt chalks over Bretts suggested paint colours for the cement dock and tower base, and I think I may have accomplished my desired look. I still have the nbw to be painted. After I have got all the nine lights I want installed, I may decide to add one or two more. The Ngineering power distribution board can have sixteen lights on the one side, then I’ll get down to finishing the rest of this beautifully designed structure.

Right now, I don’t have a layout put together, I went through a design, redesign, another redesign, and finally a give up for now phase, and decided on having several dioramas instead for now.

I will gladly accept any suggestions put forth by any of the illustrious artists that have shown their talents on this Sierra West Forum.SW1b
SW2b
«1

Comments

  • Great job. Opening up those loading zones really adds to the model.
  • Thanks Jim, my only problem then is if I have the doors open more, what would be inside the building. I couldn’t find anything on the WWW to show what I could use for this application. I still need to put door scrapes on the floor. A little pricey too much detail?
  • Looking great David. Nice work on the interior finishing, really making it your own. Nice job on the paint peel. The interior detailing is open for interpretation and gives you a nice opportunity to provide your own spin on it.
  • The dock coloring is good and the open door really makes a statement. As far as what would go in there...junk and clutter, crates and barrels, just about anything. I'd keep it open enough to enjoy the floor and studs you built.

    You got a good effect with the peeling paint but it still looks a bit like fresh paint. You may want to dirty it up a bit. I'd go with dark washes and/or powders in very light layers. Stop when it looks right to you.
  • Beautiful work David. Love the interior areas you have created. Thanks for sharing and I look forward to more updates!
  • Nice work David! The interior really adds to the overall structure. The concrete dock turned out great also! Brian pointed out the paints looks a bit fresh. It's a bit late now, but I like to lightly wire brush the walls after they are assembled, before assembling the structure. It seems to "dull" them down a bit.
  • Thank you Ken, Brian, Brett and Tom. I suddenly had an epiphany at the time and started to add a floor. Then that lead to the view block, becoming a wall. When this starts to happen, I keep on going. I now have to put relative items inside, even though you might not see them for the doors. It’s like when I was a kid building model cars. I won a few awards back in the day in my adding so much detail to them. I have a 1/8th scale 32 Ford that I have been working on that has the gas pedal operate the linkages to all six carburettors, and I added an operating brake pedal that pushes the rod into the master cylinder. I also added all the brake lines along the frame. Steel tubing for the exhaust pipes. It keeps on going. A special thanks to Brett for all the work he puts into his kits to give us a desire to excel in our building. I still have to finish all the builds I’ve started and still the five kits I haven’t.

    As for your suggestion Brian, I’m going to do that with some darker chalks, and I think I’ll add some darker staining around the base of the walls where they contact the ground. The wood always seems to seep up moisture to the sides due to weather. I’ve done that technique to all the structures I’ve built where the wood contacts the ground.

    I am learning so much more about detailing and building thanks to all the suggestions from the members in this Forum and also the details and techniques added by some members in their own builds.

    More to come.
    David

  • Great Build so far. The interior is a great idea and nicely executed. Looking forward to seeing how you finish it.
  • Thanks Joel. I’ve been going over pictures in areas such as acetylene and oxygen storage and dispersal then in addition to all the exterior LEDs, add a couple more inside where the flooring is. I have so many ideas, it’s just how to implement them.
  • Looking great so far Dave, the interior walls add alot of depth to the structure, nicely done.
    The exterior walls and concrete dock also look great.
  • Dave, since the interior will have limited viewing you don't necessarily need to put a lot of expensive details inside. I have taken dowel rod and cut it to the size of a 55 gallon drum, painted it and placed it inside structures. The same for crates, take a block of wood, paint it and place it inside. These can be placed in the background with a few more visible detail parts that have more detail in the foreground. It gives the illusion of more details but without much added expense.
  • Thank you Karl. Tom, sometimes I go a bit anal retentive. If I’m going to do something, I have to try to do it right. I wouldn’t be happy if I cut corners to complete something.
  • Really loving the open door idea. Backlit in the dark will really make that look incredible.
  • edited January 2022
    Hello people, I've managed to scratch together a sort of tank rack that will be used to fill the oxygen and acetylene tanks that will go in the front part of O'Neills. They are no work of art by any means but for an old guy with very shaky hands, but I'm quite pleased with it. I still have to do some filing, and I'm going to paint them to, hopefully, get them to look like it's scratched up. There will also be some small chains between each tank then I'm going to add some tubing and hoses to attach to the tanks for filling. I only hope that with my ability, I can do justice to Bretts great kits.SW3
  • Nifty idea David.
  • Oh, by the way Emery, thank for your comment. That is what I'm going to accomplish when I finish up with O'Neills.
  • Thank you Ken, I appreciate that.
  • Great idea david.
  • Thank you Brett. I'm really impressed with your 3D printing, they are so detailed. I think I'm going to put the resin tanks into the rack and inside the building and put the 3D printed ones outside, that way the detail will be viewed better.
  • Sound wisdom David!
  • Tank filling rack so far. The tanks on the right are acetylene and the tanks on the left are for oxygen. I managed to find three valves in all my castings, and I was hoping to find six to eight more. the intention was to have both of the middle and back rows having valves, but even if I could find three more, I could have the back row complete. The next step is to add tubing and hoses to attach to the wall to complete the scene.Tank Rack with Wall
  • Interesting idea and nicely executed!
  • David: Your O'Neills is looking great. I like your work on this diorama and I think these additional details go a long way to giving it your own stamp of identity.

    Only you can decide how prototypical you want to be but in case you are interested: In regards to your "tank filling rack" there some "real world" details from back in the last century that you might not be aware of ---

    Typically oxygen cylinders were green or black and acetylene welding cylinders (which contain acetone for acetylene absorption) were dark red or burgundy;

    Acetylene cylinders were filled on a scale so as to not over-fill them (similar to propane tanks) and often sprayed with water during or immediately after filling to remove the heat generated by the acetone absorbing the acetylene (exothermic process);

    Oxygen and acetylene cylinders would not be filled together on the same rack for safety reasons. However, back then it is quite feasible that filled cylinders in stock for sale might be stored on the same rack.

    Again I stress that it is solely your decision how you wish to depict these various mini-scenes but I thought that you might be interested in a bit of history.

    BrianM
  • Thank you Brian for that interesting response, I really appreciate that information. I had downloaded loads of pictures and went by their depictions. I figured that was the way they were separated but I put them both together because I didn’t have much room to put them in separately. The detail will be somewhat hidden by the doors not open fully, but once I started making it, I just couldn’t stop. I like to add details that don’t come with the kits just for fun.
  • I like the rack a lot. It may overwhelm a scene though with all the red.
  • Thanks for the great information Brian. Brian is my go to Engineer when I have technical questions!

    David, love the idea of the rack! What are you going to weather the rack and tanks with?
  • Thank you brownbr, you have a good point, and thank you Brett, I think combining brownbrs thoughts about the brightness of the red, I’m thinking of toning it down with Rembrandt chalks. Brett’s tutorial of weathering using ipa and cosmetic sponges for a chipping effect will be used and I’ll also be adding scratches and scrapes with AK Interactive weathering pencils. I’ve found them to work very well both wet and dry. I’d also like to take Brian’s information and instead of a filling station, I’ll just use the rack as an area used for filled tanks ready for sale. It will not only make it more realistic,but it’ll save me a lot of grief making up the lines, hoses and valves I was intended on making. I will be adding some signage for the wall as well as the tanks themselves, after I refinance the house in order to buy more ink for the printer I have. Costs a small fortune, money that really needs to go into my Sierra West account. I’m going to try using the decal paper I bought to make some decals with that printer.
  • edited February 2022
    Looking good so far,
    as you are already planning on re-working some weathering onto the frame and bottles I am assuming they aren't glued down yet.
    So, with that said, I don't think I would have red bottles on a red rack, red is a very powerful color in modeling as Bryan has noted and can easily be overpowering.

    My first suggestion would be to spray the rack black as a base coat to represent metal and then finish it with a chipped light grey top coat and rust chalk to dull and blend it down.

    Secondary suggestion would be to paint it with a dull silver color to look like raw galvanized metal and add some rust effects at the joints to show aging on the welds/joints.

    Looking good so far and just a couple of ideas for you to think about.
    Keep up the good work.
  • Thank you so much Karl. You’ve given me a lot more to think about.
  • I did some alteration to the tank rack. Suggestions by some members of this great forum, were well accepted so I went through with them and this is the result. Thanks guys for those suggestions.IMG_0500
Sign In or Register to comment.