
Howdy, Stranger!
It looks like you're new here. If you want to get involved, click one of these buttons!
Categories
- 922 All Categories
- 3 Picture Posting and Resizing
- 53 New Member Introductions
- 111 Off-Topic Forum
- 4 Photography
- 2 Resources
- 16 New Product Information
- 166 The SierraWest Forum
- 9 Brett's Blog
- 117 General News & Ramblings
- 3 Re-Release Information
- 6 Q & A about SierraWest
- 9 What Would You Like to See?
- 362 Builds
- 131 HO Scale Builds
- 155 O Scale Builds
- 59 Finished SW Build Pics
- 12 Miscellaneous Builds
- 187 Techniques
- 19 Working with Wood
- 20 Painting Castings
- 5 Masonry
- 23 Scenery
- 36 Tools and Supplies
- 21 Layout Planning & Building
- 38 Miscellaneous
- 24 Prototype Information
- 22 Reference and Research
#306 RailRoad Camp - O Scale - Part One. Karl.A

Sometimes it doesnt matter how many other projects you are working on at the bench and trying to get finished...... the excitement and anticipation of a new SWSM box arriving seems to take precedence.
Perfectly packaged, as is usual for a SierraWest kit, the initial content inspections reveal nothing less than the highest quality, as expected.
Detailed content pics tomorrow hopefully.
Unfortunately I won't be able to unpack this gem completely until then when I clear the desk (somewhat) and make some space....
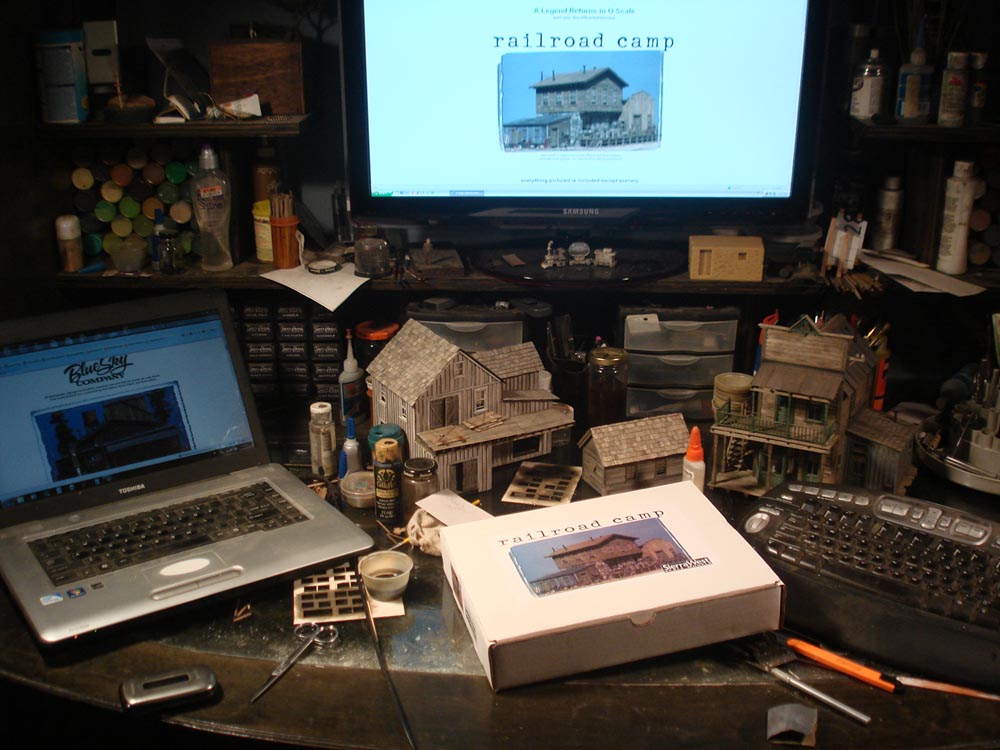
With all these ongoing projects I'm starting to think I may need to build 'another' modeling bench !!
Hickory's still a long way away.... right?
Karl.A
Perfectly packaged, as is usual for a SierraWest kit, the initial content inspections reveal nothing less than the highest quality, as expected.
Detailed content pics tomorrow hopefully.
Unfortunately I won't be able to unpack this gem completely until then when I clear the desk (somewhat) and make some space....
With all these ongoing projects I'm starting to think I may need to build 'another' modeling bench !!
Hickory's still a long way away.... right?
Karl.A
Comments
I can only imagine what you're gonna do with this beauty, Karl. I'll check in for those pics tomorrow...(hopefully)
I thought I was good at packing but Brett sure can cram ALOT of goodies into his boxes...
'Most' of the contents laid out for inspection.. Tons of stripwood, lasercut subwalls roofs and floor. A plethera of Bretts innovative cutting jigs to make life(modeling) easy and enjoyable. Full sized templates, spiral manual and all the other stuff to get to...
Casting box full of resin and metal details....
The fantastic interlocking stone walls mastered by Nick O. They really are incredible to look at, size, style and texture. Nick did an amazing job on these beauties.
An excellent fit straight from the wrapper, just propped together..
This is where I'll be starting, getting the stone walls together and painted....
Karl.A
The next step was to fill in the minor corner gaps with soupy plaster, applied with a fingertip and wiped with a damp cloth.
When this was dry I sprayed the interior with flat black and then the exterior with Kilz primer from a rattle can.
Next will be to colour the individual stones with several different coloured washes.
Karl.A
Colours I will be using are....
This much paint...
and this much water...
Essentially I am staining the Kilz primer with the colours and not actually painting the stones..
A wash of dark grey to blend and fill in the mortar lines....
Nothing else to do now but wait for it to dry and evaluate the results. Make any adjustments necessary and transfer this to the visible walls.
Time will tell if Xylol will be needed, I hope not!!
Karl.A
Wall dry yet???? I hope you didn't lose the colors after you did the grout. That was a nice choice of colors for the stonework.
Jerry
Really enjoying the build so far, but Karl has used two trade names "Kilz" and "Xylol", neither of which I have ever heard of. Could you elaborate, please Karl?
Greg In Australia.
The KILZ® brand includes many high-quality primers. Xylol Paint Thinners.
I don't if you have these down under but there just a primer and a paint thinner. Hope this helps. Until Karl shows up.
Jerry
Greg.
Xylol is actually Xylene, it is a specialised thinner, though not for paint.
Xylene is also used as a stripper and will remove dried paint (water or solvent based)almost instantly.... Great for when you need a do-over.
It will not damage the resin when wiped on with a rag or scrubbed with a toothbrush to remove paint. I have used it on Brett's details several times with no ill effects, however it will eat through plastics and rubber so I've never left a resin part soaking overnight..... just in case.... 8~)
I also have a small 'spice jar' of xylene on my work bench for cleaning brushes.
Xylene should be available at a good paint store next to the Paint thinner, paint strippers, acetone and other nasty chemicals....
Karl.A
Sometime ago I completed the stone walls.
Today I spent some time graining and staining the stripwood for the clapboard upper story. Chalks used were 408.3 and 408.5 predominently. A tiny amount of black and grey was also used on some boards for a subtle variation.
Hopefully more progress later today.
Karl.A
Karl.A
Nice job on the stonework. Like the color of the siding to. Glad you got back to the bench.
Jerry
I never really got away from the bench, just been working on stuff that hasnt been posted.
85 holes , 90 pick-points and 2 hours of 'fun' later....
Karl.A
The main thing to be careful of is the final blending/mortar wash. Unsealed plaster will soak this wash up and you will need to be careful not too make it too dark and obliterate your hard work on the stones.
Sealing the plaster after the stones are coloured and before doing the wash is one option, but, I havent tried it personally so I cant vouch for the results, but it should be good.
Karl.A
Karl.A
At this point I did a test fit to see how things were looking.
Karl.A
On your knott holes...did you clip the toothpicks to the exact length so they'd be flush with the hole or did you shove the toothpicks in, then go back and sand/file them down somehow? In any case, you've got a great rustic look on that wall that's very realistic.
For the knots.....
First the boards are weathered/coloured to completion.
holes drilled and small glue blob placed on back of hole.
tooth pick pushed in from front and then clipped flush with toenail clippers.
(toenail clippers are convex instead of concave and are extemely use full in modeling
at many times)
board is placed face down on the desk and pressed down around pick, this drives the
pick perfectly flush with the front of the board.
let the glue dry and then clip the back flush, sand lightly if required.
colour the knots with tiny amount of A&I on a detail brush to avoid staining the surrounding board.
Karl.A
For anyone who has tried and had trouble with the tissue paper for tarpaper technique here is a quick and simple trick to make it simpler.
The first step makes everything quick, easy and repeatable... (three of my favorite words)
Grab your handy can of 3M Super 77 spray adhesive.
Give your base paper a quick spritz with the glue.
Lay your tissue paper ontop, try not to get any wrinkles, I was rushing and did.
I just used regular single ply TP, and yes it was embossed, not a problem though.
I painted the laminated paper with 50/50 craft paint black and water almost imediately. Brushed on with a half inch soft brush.
Quick snap of a roof on a current inprogress scratchbuild I am working on, not finished or weathered yet, but, it does show a nice texture.
Takes about 5 mins to do an 8x11 sheet.
Karl.A
Thanks also for the tarpaper technique...........dwaine
Worked on the storage shed to about 75% complete, will finish off the remainder when it's time to put everything together.
Next on the list will be the loading dock assembly for an hour, then it wll be cool enough for some yard work.....
Karl.A
Thanks for the toothpick lesson. And a great tip on roofing paper.
The build is of your usual quality work.
Jerry
Karl.A
Thanks for the additional toothpick info and the tarpaper method. Looks great and the "5 minute" quality makes it even better!